BERTAZZONI OWNER’S MANUAL 30" ELECTRIC SELF CLEAN BUILT-IN OVEN XT 3100569 WWW.BERTAZZONI.
/ From the desk of the President From the desk of the President Dear new owner of a Bertazzoni, I want to thank youDear new owner of a Bertazzoni appliance. I want to thank you for choosing one of our beautiful products for your home. My family started manufacturing kitchen appliances in Italy in 1882, building a reputation for quality of engineering and passion for good food. Today, our products stand out because of their unique blend of authentic Italian design and superior appliance technology.
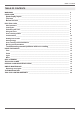
/ Table of contents TABLE OF CONTENTS WARNINGS ___________________________________________________________________ USING OVEN___________________________________________________________________ Knob-display layout __________________________________________________________ First use ____________________________________________________________________ Before first use ______________________________________________________________ ELECTRIC OVEN________________________________________________________________ Sh
/ Warnings WARNINGS Warning and Important Safety Instructions appearing in this manual are not meant to cover all possible conditions and situations that may occur. Common sense, caution, and care must be exercised when installing, maintaining, or operating the appliance. if available, a multipurpose dry chemical or foam type extinguisher. Child Safety • NEVER leave children alone or unsupervised near the appliance when it is in use or is still hot.
/ Warnings Cooking Safety • • • • • • • • • • • • • • • • During use the appliance becomes hot. Care should be taken to avoid touching heating elements inside the oven. WARNING: Accesible parts may become very hot during use. Young children should be kept away. Once the unit has been installed as outlined in the Installation Instructions, it is important that the fresh air supply is not obstructed.
/ Warnings Oven Heating Elements • • • NEVER touch oven bake and broil elements areas or interior surfaces of oven. Bake and broil elements may be hot even though they are dark in color. Areas near elements and interior surfaces of an oven may become hot enough to cause burns. During and after use, DO NOT touch or let clothing or other flammable materials contact heating elements, areas near elements, or interior surfaces of oven until they have had sufficient time to cool.
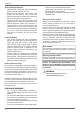
/Using the oven USING THE OVEN KNOB/DISPLAY LAYOUT OK OFF DOWN BAKE CLEAN CONV BAKE BROIL CONV BROIL BACK CONV LIGHT PROBE PIZZA WARM SETTINGS + UP TIME ASSISTANT MORE FUNCTION KNOB DISPLAY TOUCH TURN + /- AND PUSH KNOB BEFORE FIRST USE • • • • • • Remove any film and other packaging residue from the inside and outside of the oven. Remove and wash all accessories. Run the oven for 30 min.
/ Electric oven ELECTRIC OVEN FUNCTIONS Attention! USING THE OVEN When using the oven for the first time it should be operated for 15-30 minutes at a temperature of about 500°F/260°C without cooking anything inside in order to eliminate any moisture and odours from the internal insulation. 1. Place rack in desired position and shut the door. 2. Select the oven function with the dedicated function knob. The light in the cavity will turn on. 3.
/ Electric oven Convection Heat from the convection element and airflow convection with fan. Use this mode for most recipes being careful at calibrating the time. Less time is usually required to reach the desired result when using convection. The temperature is kept uniform throughout the oven, which is particularly suitable for baking on several levels or for batch cooking.
/ Electric oven Broil CONDENSATION Heat from the upper element only The BROIL setting creates intense heat from the top of the cavity. The broil mode is effective when food is placed on upper racks. Possibility of three levels of temperature: LOW MEDIUM - HIGH. • Beef steaks, ground meat patties, and lamb chops 1 inch or less: level 6. • Meat 1 inches or more thick, fish, poultry, pork chops, ham steaks 1 inch or more: level 5.
/ Electric oven GETTING THE BEST RESULTS • • • • • • • • • • • • • • Minimize opening and closing the oven door during operation. Use the rack position recommended by the recipe and fine-tune with personal experience. Use the bakeware recommended in the recipe. We recommend placing the food at the centre of the rack. Cooking will continue with residual heat. remove the dish from the oven immediately to avoid overcooking The set temperature and cooking time may vary slightly from one oven to another.
/ Electric oven BROILING RECOMMENDATION Food item Control temperature setting selector Approximate cooking time Special instructions and tips BEEF Ground Beef Patties, ½” thick T-Bone Steak Flank Steak Eye of Round Roast 500°F fixed temperature setting 15 to 20 minutes Broil until no pink in center 500°F fixed temperature setting 500°F fixed temperature setting 325°F 12 to 20 minutes 12 to 20 minutes 20 to 25 min/lb PORK Loin Roast POULTRY Boneless Skinless Chicken Breasts Chicken Thighs 325°F 5
/ Using display USING THE DISPLAY TIME The time function allows to manage cooking times. After setting the function and temperature, press the touch timer button and choose a time function. Timer 1. Press TIME. 2. Turn the OK KNOB to select the timer function 3. Press OK KNOB to confirm 4. Turn the OK KNOB to select the desired time 5. Press OK KNOB to confirm 6. The countdown start immediately and the display will show the remaining time 7.
/ Self-cleaning SELF-CLEANING WARNING: Children should not be left alone or unattended in an area where appliances are in use. • During the Self-Clean cycle, exterior surfaces may become hotter than usual. Parts of the appliance may become potentially harmful to children, and to persons who lack adult knowledge of appliances and lack adult reactions to potentially harmful conditions. Keep these individuals away during self-clean and while the appliance is in use.
/ Self-cleaning perature drops below 460-500°F/240-260°C approximately. At the end of the cycle turn both the oven mode selectors and the temperature to the OFF position. WARNING The interior of the oven will still be at baking temperatures when the automatic lock cycles to its open position and the oven door can be opened.
/ Accessory STELESCOPIC GLIDES The telescopic glides fit any shelf level and work with the wire shelves provided as standard equipment. Fitting the glides • • • • • • • Locate the two spring clips at the front and back of the glides. Locate the pin on the glide that indicates the back. Choose the right level and position the telescopic glide near the upper wire. Gently insert the front spring clip on the glide. Insert the rear spring clip on the glide.
/ Keeping your Bertazzoni clean KEEPING YOUR BERTAZZONI CLEAN Burn hazard • Make sure the heating elements are turned off and allowed to cool completely before any cleaning and/or maintenance operation. • Things to avoid: • • • • Do not use a steam cleaner to clean the range: the steam could reach electrical components and cause a short. Do not spray liquids such as cleaning agents into the openings on the bottom and top of the ovencavity.
/ Simple maintenance SIMPLE MAINTENANCE These simple tasks can be performed by the owner. For any other maintainance task, we recommend employing a trained service technician.
/ Troubleshooting TROUBLESHOOTING Here are answer to common problems you may experience. You are also welcome to call our toll free Customer Service line to troubleshoot any issue with your Bertazzoni: ENGLISH 866 905 0010 if located in the US, BC, B, Sk and MB FRANCAIS 800 561 7265 if located in ON, QC, PE, NU, NS, NL, NB The oven will not operate Is there power to the range? Check the switch fuse or circuit breaker. The oven does not heat Check that the showroom function is not activated.
/ Two year limited warranty TWO YEAR LIMITED WARRANTY The warranties provided by Bertazzoni Spa in this statement apply exclusively to Bertazzoni appliances and accessories sold as new products to the original owner by a Bertazzoni authorized distributor, retailer, dealer or service center and installed in the United States and Canada. The warranties provided in this statement are not transferable and have validity from the date of installation.