
Instructions / Assembly

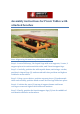

Assembly instructions for Picnic Tables
Note: align using the numbers printed on each part.
Step 1.- Locate Table top, (2) A shaped Legs, (2) support pieces and (1)
hardware kit.
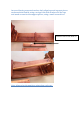
Step 2.- Carefully, place the table upside-down and place A shaped-legs
into table using the letters or number printed on each part. Start by
attaching the (1) A shaped-legs to the table with (2) 5” carriage bolts
and then (2) 3.5” bolts. Tap the bolt all the way into the wood to set it,
then add a washer and nut and lightly tighten. At this point the leg
should be set. Repeat process for other A shaped-leg.
Step 3.- Position the support pieces from the bottom of the table to the
legs, using (2) 3.5” bolts to attach them from the A shaped-legs to the
table, position (4) wood screws carefully in an angle position to attach
the (2) support pieces to the table (2 wood screws for each support
piece).