
Installation Guide


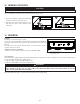

3
These power packs must be installed with the P12NA blower (sold separately). Do not substitute for an other blower.
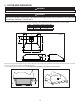
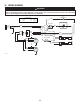
Plan where and how the ductwork will be installed. A straight, short duct run will allow the hood to perform most efficiently.
Install 10-inch ductwork, elbows and roof or wall cap. Connect metal ductwork to the cap and work back towards the hood location. Use
2" metal foil duct tape to seal the joints.
Run 3-wire power supply cable to installation location.
The power pack must be installed at least 36’’ above the cooking surface
HH0270A
POWER PACK
ROOF CAP
WALL
CAP
10” ROUND DUCT
36” ABOVE COOKING SURFACE
10” ROUND ELBOW
WARNING
!
The power cable must be a GFCI protected branch circuit.
NOTE: Before proceeding to the installation, check the contents of the box. If items are missing or damaged, contact the manufacturer.
Make sure that the following items are included:
- Power Pack
- Accessories • Baffle filters with handles
• 10” round adapter
•
Bag of parts including: 1 wire clamp, 2 waterproof wire connectors, 9 no. 8 x 5/8” type A screws,
2 no. 8-18 x 3/8” screws, 1 suction cup.
Parts sold separately:
• Blower assembly model P12NA.
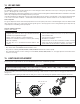
WARNING
!
When performing installation, servicing or cleaning the unit, it is recommended to wear safety glasses and gloves.
This power pack is not designed for use with a charcoal grill.
CAUTION
This range hood is intended for outdoor covered patio or lanai area. As with all electric appliances, this unit must
be protected from the effects of the weather.
1. PREPARE THE INSTALLATION
2. INSTALL THE DUCTWORK AND ELECTRICAL WIRING