
Installation Guide


7
CAUTION
Take care not to kink ducting when installing the power pack.
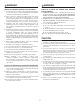
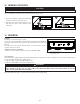
Using the provided no. 8 x 5/8” screws, install the power pack inside the custom hood. Start
with 2 screws in the front corners, then install 4 screws for the sides and use the remaining
screws to finalize securing the front power pack. (See figure at right for mounting screw
specific locations.)
Make sure the adapter enters the ducting. When there is access to the top of the power
pack, seal connections with metal foil duct tape.
HH0271
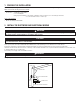
10. INSTALL THE BLOWER IN THE POWER PACK
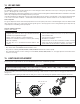
To install the P12NA dual blower inside the power pack, first remove the blower plate from inside the
power pack, and lay it on a protected surface.
Mount both blowers on the blower plate using 8 hexagonal nuts included with the blowers (see
illustration A). Make sure that both holes in the blower plate are entirely covered by the blowers. The
blowers should be 0.5 inch apart (see illustration B).
To install the blower plate and blowers into the power pack, insert the blower plate tabs into the slots
and reinstall both nuts previously removed to secure the blower plate to the power pack.
Connect the blower power cord to the power pack, and tie the blower power cord using the preinstalled
twist tie.
HD1067
HD1068A
0.5"
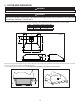
9. INSTALL THE POWER PACK
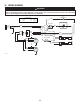
Reinstall the bottom panel using the screws
removed previously and a Phillips screwdriver.
Reinstall the drip grease rail.
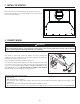
RETAINING
SCREW
H D1110
11. REINSTALL THE BOTTOM PANEL AND GREASE DRIP RAIL
HO0343
RETAINING
SCREW
AB
CAUTION
Remove the protective plastic film covering the bottom panel and the grease drip rail before reinstalling them.