
Installation Manual

TrailMax™ II High Back Bucket Seat – Installation Instructions
Rev. 2 0907 39436 pg. 2
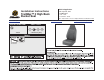
Parts List and
Hardware Identifi cation
Seat Back,
Qty - 1
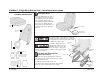
Assemble Seat
Release the fabric fl ap on the side of
the Seat Bottom to access the bolt
holes. Align the holes in the brackets
on the Seat Back with the holes in
the Seat Bottom. Install an M10 x 20
Bolt in each hole. Tighten the bolts
securely. Replace the fabric fl ap over
the bracket and hook it to the bottom
of the seat.
M8-1.25x25 Bolt, Qty - 4
M10x20 Bolt, Qty - 4
Seat Bottom,
Qty - 1
Flat Washers, Qty - 4
M10 x 20 Bolts
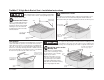
Before beginning the seat installation, set the park-
ing brake, place the vehicle in gear or park and
chock the wheels to reduce the risk of the vehicle
unexpectedly moving, which could result in serious injury.
The seat is designed to be in-
stalled on the original seat riser.
DO NOT remove or loosen any
of the original seat riser anchor bolts. Doing so may cause
improper anchoring of the seat, which could result in serious
injury, to you and others.
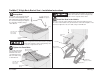
Remove the four (4) nuts that mount the seat track
slides to the riser. Do not throw away the four (4) nuts
since they will be reused.
The nuts are under the ledge on the riser.
Then remove the bucket seat and track slides from the
vehicle (the seat riser will remain in the vehicle).
Remove the Existing Seat
from the Vehicle
Seat Track
Slide
Remove
Nuts
Seat Track
Slide
Remove Nuts
Seat Riser -
Remains in
vehicle
Track
Bar
Hook Flap to
bottom of Seat