
Installation Manual
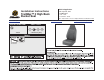

TrailMax™ II High Back Bucket Seat – Installation Instructions
Rev. 2 0907 39436 pg. 4
Insert M8-1.25x25 Bolts
from Parts Kit - Tighten to
21 Ft/Lbs
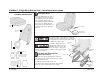
Track Bar - Push
down to slide
Track forward
Seat Cushion
(Front)
Track
Press down on the track bar and slide
the tracks forward. Install two of the
M8-1.25x25 Bolts from the Parts Kit in
the rear track mounting holes. Tighten
the rear bolts to 21 ft/lbs, using a
13mm Wrench.
Install the tracks on the
Bestop Seat
Failure to tighten the bolts and nuts to the specifi ed
torque can result in the seat loosening, thereby caus-
ing serious bodily injury to the vehicle occupants and to others.
Track
M8-1.25x25 Bolts -
Tighten to 21 Ft/Lbs
Seat Cushion
(Front)
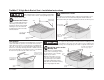
Press down on the track
bar and slide the tracks
toward the rear of the
seat. Tighten the front
bolts to 21 ft/lbs, using
a 13mm Wrench.
Track Bar - Push
down to slide
Track to rear
Tighten the Front Bolts
Seat Riser
Seat Track
Slide
Track Bar
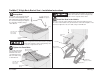
Re-Install Nuts -
Tighten to 21 Ft/Lbs.
Re-Install Nuts -
Tighten to 21 Ft/Lbs.
Failure to tighten the bolts and nuts to the specifi ed
torque can result in the seat loosening, thereby
causing serious bodily injury to the vehicle occupants and to others.
Place the seat in the vehicle. Align the studs on the tracks with the holes in
the seat riser. Reinstall the four (4) nuts that were removed in Step One on the
track studs. Tighten the nuts to 21 ft/lbs, using a 13mm Wrench.
Install the Seat in the Vehicle