
Automobile Accessories User Manual
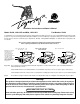


51403 5
Rev. D 1298
WILLY'S
WILLY'S
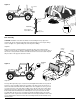
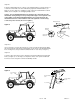
Figure 2
34 1/2"
33 1/2"
Bow Assembly
CAUTION: Installation of the Bow Assemblies involves drilling in the top edge of the
vehicle body. Check under the body edge at the marked locations. There may be wiring
for the rear lights. If so, pull the wiring out of the way before drilling.
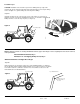
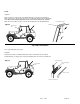
Step One
Measure 27 3/4 inches and 29 3/4 inches along the top edge of the vehicle from the
outside rear of the body (see Figure 3). Mark the locations with a pencil on the top edge of
the vehicle. Center punch the locations and drill a 3/16 inch hole at each location. Repeat
this procedure on the opposite side of the vehicle.
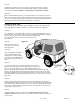
Left Bow
Assembly
Right Bow
Assembly
Detail of Vertical
Retainer Mount - Left
5/16-18
Tapped Plates
Rear point of
measurement
on body
Figure 3
Rear point of
measurement
on body
Left Bow
Mount
Right Bow
Mount
Area detailed at
right
Washers
5/16-18 x 1" Phillips
Head Bolts
Vertical Retainer
Mount - Left
Step Two
This step will require two people. Locate the left and right Bow Assemblies in the parts kit.
Select one of the assemblies and lay the assembly on the body. Secure the front hole of
the bow mount bracket with a #14 Sheet Metal Screw. Do not tighten the screw yet. Then
secure the front hole of the other bow assembly on the opposite side of the vehicle. Once
the brackets are in place, lift up the bow assembly and secure the rear hole of each bow
bracket with a #14 Sheet Metal Screw. It will help here if one person steadies the bow
assembly while the other person assembles the #14 Sheet Metal Screws to the vehicle.
Tighten the screws. Lay the bow assemblies down onto the body and start the male end of
one assembly into the female end of the other assembly. Push the bows forward to snap
them into place.
29 3/4"
27 3/4"