
Automobile Accessories User Manual


51403 7
Rev. D 1298
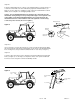
Step Two
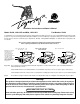
Center the windshield channels on the top of the windshield frame so that the two pieces
of channel are flush with each other and butted up against the windshield frame (see
Figure 6). Use the channels as templates to mark, center punch and drill with a 1/8 inch
drill bit. Secure using #8 x 1/2" Self-tapping Phillips Screw.
Caution: A loose Windshield Retainer may allow the top to disengage from the
windshield, causing damage to the top and possible injury to the occupants of the
vehicle. Make certain that the Windshield Retainer is securely fastened to the
windshield at the time of first installation. Check the tightness of the mounting
screws every three months. (Do not over tighten.)
Windshield Channel
WILLY'S
Figure 6
#8 Sheet
Metal Screw
Windshield
Channel
Area detailed at right
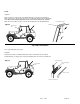
Step Three
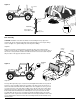
If your vehicle does not have Door Channels, use those provided in the parts kit. Orient
the channels with the "tails" down and install them on the outside of the windshield frame,
in the existing holes, using four #10 Sheet Metal Screws on each side (see Figure 7).
Step Four
Locate the upper door hinges 3 inches below the hole that was drilled for the Horizontal
Rods (see Figure 7). Use the hinges as templates to mark, center punch and drill 3/16
inch holes. Secure using #14 x 1/2" Pan Head Phillips Screws.
Door Channel
WILLY'S
Figure 7
Area detailed at
right
3"
Left Upper Door
Hinge
1/2"
#10 Sheet Metal
Screw
#14 Sheet Metal
Screws