
Product Manual


Part No 891061 - 3 - Form No F052209A
KV HOSE KIT P/N 891125
INSTALLATION: continued
Step 3. Attach coupler (item 8) and nozzle to
hose.
1. Slide the two hose clamps over both ends of the
hose and at one end attach the coupler to the hose
using a 5/16” nut driver. Note: the hose is attached to
the end of the coupler without the pin. Make sure the
hose is completely seated next to the plate and secure it
with one of the hose clamps. Next attach the nozzle with
the handle to the other end of the hose by sliding it into
the hose with enough distance to allow the clamp to hold
the hose to the nozzle securely then tighten the clamp.
Step 4. Attach the hose-holding bar (item 11).
1. Connect loop on right side of wire bracket hose
retainer to the upper handle of the machine, pull left side
of wire until the loop will go over the upper handle.
2. Attach the blocker plate to the wire bracket hose
retainer when not in use by sliding the wide slot over the
top of the wire bracket and then sliding it down to it’s
resting position.
Step 5. Attach hose coupler to nozzle housing.
1. Slide the hose coupler into the nozzle housing. Slide it
in at an angle and insert one of the pins into the slot,
then rotate and slide the other pin through, this will allow
the coupler to sit flush.
2. Reconnect spark plug.
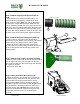
Step 6. Hose placement when not in use.
1. With the hose off to the left side of the machine (on
the Honda model), drape the hose over the hose wire
bracket holder and rest the nozzle into the nozzle
bracket holder. Note: The hose should be wrapped
around the right side of the machine with Briggs models.
Use this method of transporting the hose when not in
use (See picture right). Warning: Do not let the hose
come into contact with hot parts of the engine, as this
will damage your hose and is not covered by the
warranty.
8
1
1