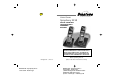
USER GUIDE Symphony 2210 DIGITAL CORDLESS TELEPHONE WITH ANSWERING MACHINE THIS EQUIPMENT IS NOT DESIGNED FOR MAKING EMERGENCY TELEPHONE CALLS WHEN THE POWER FAILS. ALTERNATIVE ARRANGEMENTS SHOULD BE MADE FOR ACCESS TO DIAL EMERGENCY SERVICES. UK Argos Ver. 1, Nov. 07 BINATONE “ Symphony 2210 ” User Guide - Back Page Before operating this set, please read these instructions carefully.
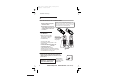
Symphony 2210 Remote operation 1 Using a tone-dialling phone, dial your home number 2 While your outgoing message is playing, press 3 Key in your remote PIN (security code) The default PIN is 00 000.. To set a new PIN, see the User Guide.
Color profile: Generic CMYK printer profile Composite Default screen Important note — emergency calls The Symphony 2210 is not designed for making emergency calls when the mains power fails. So you should make alternative arrangements for access to Emergency Services. (This means that you should also have a basic phone that does not need mains power, connected to your line so that you can make calls during a power failure.) If you need help … The Binatone Help Line is available from 9.00 am to 5.
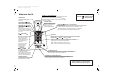
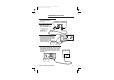
Color profile: Generic CMYK printer profile Composite Default screen Where to find it MENU button Press to start using Menu functions. PHONE BOOK button Press to open the Phone Book. PHONE / OK button Press to begin or answer a phone call. When using Menu functions, press to confirm your selection. Press switch the speakerphone on or off. UP and DOWN buttons Press during programming to move through the menus and options. Press to move through the Caller D Display or Redial list.
Color profile: Generic CMYK printer profile Composite Default screen Symbols on the handset's display The handset’s name (the default is BINATONE) JANny 2 16-25 The handset’s number(if you have more than one handset on your Symphony 2210 system). The current time What the symbols mean Radio link/ signal level The first symbol on steadily when there’s a radio link between the handset and base unit. It flashes while the handset is trying to establish a link to the base unit.
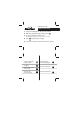
Color profile: Generic CMYK printer profile Composite Default screen Contents Symbols on the handset’s display 1 Read these notes first 4 Choosing a site for the base unit telephone and charger pod, 4 Radio signals between handset and base unit, 4 Mains power connection, 4 Installation and set-up 5 Before you start 8 To delete all Phone Book entries, 18 To store a number from the Redial list, 18 Caller Display on the handset 19 Examples of Caller Display records, 19 To check Caller Display records,
Color profile: Generic CMYK printer profile Composite Default screen Contents When the memory is full 37 Default settings on TAM 37 Customisze your phone system 38 44 49 Guarantee and service information 50 Handset name, 38 Key tone, 38 Display language, 38 PIN code, 39 Dial mode, 39 Flash (recall) timing, 40 Default setting, 41 Handset registration Troubleshooting Cleaning and care Technical details 51 Declaration of conformity 52 42 To register a new handset, 42 To register to a different bra
Color profile: Generic CMYK printer profile Composite Default screen Read these notes first Before you install your Symphony 2210 — Choosing a site The base unit and charger pod(s) should be placed on a for the base level surface, in a position where: unit telephone I the mains adapter plug will reach an easily accessible and charger 230-V ACswitched mains supply socket — never try pod to lengthen the mains power cable I the base unit’s telephone line cable will reach your telephone line socket or extensio
Color profile: Generic CMYK printer profile Composite Default screen Installation and set-up 1 Choose a suitable site for the base unit telephone See page 4 2 Connect the mains power lead and the telephone line cord into the back of the base unit Use the telephone line cord supplied with your DECT Phone- don’t use any other telephone line cord 3 Plug the mains adapter into a 230 V AC, 50 Hz mains socket, with the switch on the socket set to OFF,the socket-outlet need to be near the equipment and shal
Color profile: Generic CMYK printer profile Composite Default screen Installation and set-up 5 Switch on at the mains socket(s) 6 Fit the batteries in the cordless handsets A.Insert the three rechargeable batteries as shown DON'T use non-rechargeable batteries in the handset -t hey may bur st, causing damage. Use the rechargeable batteries supplied (1.2V AAA size 300mAh NiCd or 550mAh NiMH). + - 7 Charge the batteries + - + - B.
Color profile: Generic CMYK printer profile Composite Default screen Installation and set-up 9 If you have a Broadband line If you connect your telephone to a line with a broadband connection, you will need to insert a microfilter(not included) between the telephone and the telephone line, otherwise you may get interference between the telephone and the broadband, which could cause problems.
Color profile: Generic CMYK printer profile Composite Default screen Before you start Electrical safety Interference ■ DON’T let the base unit telephone or charger pod get wet. Electrical equipment can cause serious injury if used while you are wet or standing in water.
Color profile: Generic CMYK printer profile Composite Default screen Switching on and off To switch the handset on and off To lock the handset keypad To switch the handset off and save battery power: ◗ Press the HANG UP/C button and hold it until you hear a beep. When you release the button,the display will go blank. ◗ To switch the handset back on: Press and hold the HANG UP/C button. Or, place the handset on the base or charger pod.
Color profile: Generic CMYK printer profile Composite Default screen Setting the date and time If you subscribe to Caller Display (see pages 19 ) your Symphony 2210 should take the date and time setting from the network when you receive an incoming call. So you won’t need to set the time and date yourself,but you may need to change the year. If you don’t subscribe to Caller Display, you’ll need to set the date and time using the cordless handset.
Color profile: Generic CMYK printer profile Composite Default screen Your handset's names Before you start to use your cordless handsets, you’ll probably want to personalise their displays. Each display shows a name (up to eight characters) and number. The default name is BINATONE , and each handset registered to your base unit is numbered 1, 2, 3 … etc. ◗ If the handset’s display is blank, press the HANG UP/C button to switch it on.
Color profile: Generic CMYK printer profile Composite Default screen ▼ Ringer melodies and volumes Base unit ringer 1 2 Press the PHONE/OK button Ú The display shows PHONEBOOK ▼ 3 Press the PHONE/OK button Ú The display shows BS VOLUME 4 Press the PHONE/OK button Ú The display shows the current volum e level and the base rings. ▼ 5 ▼ 6 ▼ 7 ▼ 8 ▼ 9 12 Press the ▼ button to go to BS RINGER ▼ ▼ button to go to the Press the ▼ or volume level 1 to 3qyou prefer.
Color profile: Generic CMYK printer profile Composite Default screen Ringer melodies and volumes Handset ringer 1 2 Press the MENU button Ú The display shows PHONEBOOK ▼ Press the ▼ button twice Ú The display shows HS RINGER 3 Press the PHONE/OK button Ú The display shows HS VOLUME 4 Press the PHONE/OK button Ú The display shows the current volume level and the handset rings.
Color profile: Generic CMYK printer profile Composite Default screen Making & answering calls To make a call 1 Key in the telephone number If you make a mistake, press the HANG UP/C button to clear digits from the display. 2 Press the PHONE/OK button Note: you can press the PHONE/OK button to get Dial tone before you key in the number if you prefer. But that way, you won’t be able to correct any dialling mistakes. To answer a call To end a call When there’s an incoming call, the handset rings.
Color profile: Generic CMYK printer profile Composite Default screen Making & answering calls To mute the microphone during a call so the person on the other end can’t hear you: Press and hold the #/MUTE button for 2 seconds (press and hold again to un-mute) Ú The display shows a ‘Mute’ symbol while the microphone is muted. Muting the microphone ◗ The 10 most recent numbers you dialled (up to 20 digits each) are stored for redialling.
Color profile: Generic CMYK printer profile Composite Default screen Using the Phone Book You can store up to 40 names and numbers in each handset’s Phone Book. Each name can have up to 10 characters (including spaces) and each number can have up to 20 digits.
Color profile: Generic CMYK printer profile Composite Default screen Using the Phone Book To modify (change) a Phone Book entry 1 2 ▼ ▼ 3 To delete a Phone Book entry Press the PHONE BOOK button to open the phonebook Press the ▲ or ▼ button to go to the entry that you want Press the MENU then the ▲ or ▼ button to displayMODIFY 4 Press the PHONE /OK button Ú Modify the name if necessary - Use the HANG UP/C button to delete characters. 5 Press the PHONE /OK button Ú Modify the number if necessary.
Color profile: Generic CMYK printer profile Composite Default screen Using the Phone Book To delete all Phone Book entries 1 ▼ 2 ▼ Press the PHONE BOOK then M ENU button Press the ▲ or ▼ button to display DELETE ALL 3 Press the PHONE/OK button Ú The display shows CONFIRM? 4 Press the PHONE/OK button to delete all entries (or press the HANG UP/C button to cancel) Ú The display goes back to standby mode.
Color profile: Generic CMYK printer profile Composite Default screen Caller Display on the handset This network feature lets you see the phone numbers of your callers on the display, before you answer. To subscribe to Caller Display, all you need to do is contact the company that supplies your telephone line. When you have new Caller Display records, the display shows the symbol. DAVID 08-25 14-06 ▼ A call from someone whose name and number are stored in your Phone Book.
Color profile: Generic CMYK printer profile Composite Default screen Caller Display on the handset To check 1 Caller Display records 2 To return a call ▲ ▼ Press the ▲ or ▼ button to scroll through the records 1 Display the Call Display records as described above steps 2 Press the PHONE /OK button to dial the number Display the Call Display records as described above steps To delete a 1 Caller Display record 2 3 Press the MENU button ▲ ▼ Press the ▲ or ▼ button to display DELETE 4 Press the
Color profile: Generic CMYK printer profile Composite Default screen Caller Display on the handset To store a 1 number in the Phone Book ▲ ▼ Press and hold the Redial/CDS button then press the ▲ or ▼ button to go to the number 2 Press the the MENU button Ú The display shows COPY TOPB 3 Press the PHONE/OK button 4 Key in a name then press the PHONE/OK button Ú The number appears with the cursor at the end. You can edit the number (using HANG UP/C) before storing it if you wish.
Color profile: Generic CMYK printer profile Composite Default screen Using a multi-handset system If you have a Symphony 2210 multi-handset system, you already have more than one handset registered to your base unit. You can register additional handsets - up to Five per base unit. With two or more handsets, you can: • make intercom calls from one handset to another. • transfer an outside call from one handset to anther. • set up a three-way conference call.
Color profile: Generic CMYK printer profile Composite Default screen Using a multi-handset system Intercom 1 call from the handset 2 Press the INTERCOM button on the handset. The display show CALL INT briefly, then the numbers of any other handsets registered to the base. Press the appropriate number to select and call that handset The other handset rings, and its display shows INT # (where # is the number of the number of the calling handset).
Color profile: Generic CMYK printer profile Composite Default screen Using a multi-handset system To transfer a call 1 Make or answer an outside call using the handset 2 Briefly press the INTERCOM button then key in a handset number Ú The outside call is put on hold. When the user of the other handset unit answers, you can talk on an intercom call.
Color profile: Generic CMYK printer profile Composite Default screen Using a multi-handset system Three-way conference When you have an outside call (either one you’ve made or answered, or one that’s been transferred to you) in progress — 1 Press the INTERCOM button then key in a handset number Ú The outside call is put on hold.
Color profile: Generic CMYK printer profile Composite Default screen Answering machine - Quick Ref Buttons to pre ss...
Color profile: Generic CMYK printer profile Composite Default screen Answering machine - Basis use The Symphony2210 is supplied with answering machine that will allow the caller leave a message after the machine play a predefined message.
Color profile: Generic CMYK printer profile Composite Default screen Answering machine-Basis use The Symphony2210 has two answering modes, Answering modes ANS ONLY# and ANS/REC mode. ANS/REC – this invites callers to leave a message. This mode is switched on by default and will remain on unless you change mode. ANS ONLY# – this simply asks callers to try later and does not give them the opportunity to leave a message.
Color profile: Generic CMYK printer profile Composite Default screen Answering machine-Basis use Outgoing messages (OGMs) OGM is what callers hear when the machine answers. The Symphony 2210 has two predefined outgoing messages (OGMs), one is for use in ANS/REC mode, it is pre-defined as “ Sorry — we cannot answer your call now. Please leave your message after the beep”, another is forANS.ONLY mode, it is pre-recorded as “Please call later”.
Color profile: Generic CMYK printer profile Composite Default screen Answering machine-Basis use The Symphony 2210 will allow you to record a memo that can be replayed with messages. This can be useful if you want to leave a message for other users of the phone. To record a memo 1 2 ▲ 3 ▲ ▼ 4 5 6 30 Press the MENU button Press the ▲ button display TAM then press the PHONE/OK button Use ▲ and ▼ to go toREC MEMO and seclect it using PHONE/OK button Ú The display shows RECORDING after the “beep”.
Color profile: Generic CMYK printer profile Composite Default screen Answering machine-Basis use When there are new messages and/or memos waiting, the message indicator on base flashes and shows you how many; The symbol is blinking on handset display.
Color profile: Generic CMYK printer profile Composite Default screen Answering machine-Basis use While a caller is leaving a message, you can listen over the loudspeaker when the call screening is set to on.
Color profile: Generic CMYK printer profile Composite Default screen Answering machine-Basis use After you' ve listened to your messages, remember to delete them. Otherwise, the memory may become full. To delete individual message Simply press the 6 button while the message is playing * Whether this is a new message or an old message ( one you've listened to before) it will stop being played, and will be deleted immediately.
Color profile: Generic CMYK printer profile Composite Default screen Answering machine - Remote use The Symphony 2210 will allow you to check your message remotely from another phone. To use this function you must call using a tone dialing telephone and you will need to enter your Symphony 2210 master PIN. The remote control function must be activated before it can be used.
Color profile: Generic CMYK printer profile Composite Default screen Answering machine — remote use ... Remote operation 4 Once the message have been played you can use the buttons listed on below table Ú If you stop pressing the buttons within 15 seconds , your Symphony 2210 will hang up. Codes to use during remote operation Switch answering machine on/off 0 Play/Stop 2 Back to previous message 1 Skip to next message 3 Current message to be deleted 6 http://www.binatoneonline.
Color profile: Generic CMYK printer profile Composite Default screen Answering machine - Advanced use You can adjus t the number of rings that sound before the machine answers the call. The machine can be set to answer calls after three to eight rings . If you don’t set a number, it will answer after five rings.
Color profile: Generic CMYK printer profile Composite Default screen Answering machine — Advanced use If you check your message remotely, you can set Toll Saver - the machine will answer after two rings if there are new mes s ages ; after five rings if there are no new mes s ages . S o, if it has n’t answer after three rings, you can hang up to save the cost of the call.
Color profile: Generic CMYK printer profile Composite Default screen Customise your phone system The Symphony 2210 can be customised to suit your preferences in number of ways .Some of these functions have been covered earlier in this User Guide. This section is roundup of items that have not yet been mentioned. Handset name See page 11. Normally, each time you press a button on the handset, you hear a tone. Y ou can turn this off if you prefer.
Color profile: Generic CMYK printer profile Composite Default screen Customise your phone system This is the system PIN -- a four-digit code you may need if you want to register new handsets to your base unit or access your answering machine remotely. The default PIN is 0000; you can change it to any four-ditgit number you' ll remember. PIN code 1 2 Press the MENU then the ▲ or ▼ button to go to BASE Press the PHONE/OK button twice Ú The display shows PIN CODE.
Color profile: Generic CMYK printer profile Composite Default screen Customise your phone system ... Dial mode 3 Press the PHONE/OK button, then the ▲ or ▼ button to select PULSE or TONE 4 Press the PHONE/OK button to confirm the setting changed Flash (recall) timing It's very unlikely that you'll need this function, and it's usually best to leave the setting at its default SHORT.
Color profile: Generic CMYK printer profile Composite Default screen Customise your phone system 1 By selecting this option,you return the Base unit to its default settings, Press the MENU then the ▲ or ▼ to go to DEFAULT 2 Select it using PHONE/OK button Ú The display shows CONFIRM? 3 Press the PHONE/OK button to confirm Ú The display shows BASE PIN 4 Key in the current PIN and confirm using PHONE/OK button and Ú The display shows WAITING... your phone unit is default after ‘beep’.
Color profile: Generic CMYK printer profile Composite Default screen Handset registration The handsets supplied with your Symphony 2210 system are already registered to the base unit. You don’t need to register them yourself. If you buy new handsets separately, you’ll need to register them. Up to FIVE handsets can be registered to each base unit; but each handset is registered to one base unit only.
Color profile: Generic CMYK printer profile Composite Default screen Handset registration To register to a different brand of base unit Your Symphony 2210 handset can be registered to any GAP-compatible base unit; or you can register other GAPcompatible handsets to your S ymphony 2210 base unit. ! But we do not guaratee that all features or display message will be available using other manufacturer’s equipment.
Color profile: Disabled Composite Default screen Troubleshooting ! ALWAYS check first that: The DECT Phone must be serviced by trained engineers. NEVER attempt any repairs or adjustments yourself — you could make the problem worse and invalidate the Guarantee.
Color profile: Disabled Composite Default screen Troubleshooting disable the network answer service Or set the answer machine rings to five or less. “I cannot make a call.” The handset’s keypad may be locked (see page 9). Unlock it before you make a call. “When I press keys, nothing happens.” Make sure the batteries are correctly fitted in your handset. If the ‘battery charge level’ symbol on the display shows ‘low’, recharge the batteries.
Color profile: Disabled Composite Default screen Troubleshooting You’ll get the best results if you site the base unit as high as possible. For example, in a two-storey house, the first-floor landing is an ideal place for the base unit. “My call was cut off when I went out of range. Now I can’t use my handset.” Move the handset closer to the base unit before you try again to make a call. “I hear ‘beeps’ from my handset while I’m on a call.” You may be going out of range of the base unit.
Color profile: Disabled Composite Default screen Troubleshooting Using a multi-handset system “I can’t transfer a call.” Make sure the other handset is in range of the base unit. Make sure you’re dialling the correct number for the other handset (1 to 5) . Batteries “The handset‘s batteries are running low within an hour or two.” Before you first used the handset, you should have left it on the base unit or charger pod for up to 15 hours to charge the batteries fully.
Color profile: Disabled Composite Default screen Troubleshooting “Last Number Redial and/or memory dialling don’t work on a PBX.” When you first make a call, after keying in the outside line access code (e.g. 9), press and hold the Last Number Redial button until a P appears on the display. This inserts a pause between the access code and the telephone number. You should later be able to redial the number. When storing numbers in memory, you can include the outside line access code (e.g.
Color profile: Generic CMYK printer profile Composite Default screen Cleaning and care ■ Don’t clean any part of your Symphony 2210 with benzene, thinner or other solvent chemicals — this may cause permanent damage which is not covered by the Guarantee. When necessary, clean it with a damp cloth. ■ Keep your Symphony 2210 away from hot, humid conditions or strong sunlight, and don’t let it get wet. ■ Every effort has been made to ensure high standards of reliability for your Symphony 2210.
Color profile: Generic CMYK printer profile Composite Default screen Guarantee and service information This product is guaranteed against manufacturing defects for a period of 1 Year. This does not cover the product where the fault is due to misuse, abuse, use in contravention of the instructions, or where the product has been the subject of unauthorised modifications or alterations, or has been the subject of commercial use.
Color profile: Generic CMYK printer profile Composite Default screen Technical details Standard Digital Enhanced Cordless Telecommunications (DECT) Frequency range 1.88 to 1.9 GHz (bandwidth = 20 MHz) Channel bandwidth 1.728 MHz Operating range up to 300 m outdoors; up to 50 m indoors standby: 100 hours approx. Operating time talking: 10 hours approx.
Color profile: Generic CMYK printer profile Composite Default screen BINATONE TELECOM PLC UNIT 1, PONDERS END INDUSTRIAL ESTATE EAST DUCK LEES LANE, ENFIELD MIDDLESEX, EN3 7SP UNITED KINGDOM Tel: +44(0) 20 8344 8888 Fax: +44(0) 20 8344 8877 e-mail: binatoneuk@binatonetelecom.co.uk ________________________________________ .
Color profile: Generic CMYK printer profile Composite Default screen Waste electrical products must not be disposed of with household waste. This equipment should be taken to your local recycling centre for safe treatment. Binatone Telecom plc operates a policy of continuous product improvement, and so reserves the right to make changes to the product and functions without notice. http://www.binatoneonline.