USER'S GUIDE 4625, 5206, 5283 SERIES 2 Thank You 3 Safety Instructions 4 Product View 5-7 Assembly 7-9 Operations 10-15 Maintenance and Care 16 Troubleshooting 17 Replacement Parts 18 Accessories 19 Warranty 20 Product Registration 20 Consumer Care
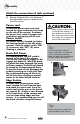
Thanks for buying a BISSELL Vacuum Cleaner We’re glad you purchased a BISSELL vacuum cleaner. Everything we know about floor care went into the design and construction of this complete, high-tech home cleaning system. Your BISSELL vacuum cleaner is well made, and we back it with a two-year limited warranty. We also stand behind it with a knowledgeable, dedicated Consumer Care department, so, should you ever have a problem, you’ll receive fast, considerate assistance.
IMPORTANT SAFETY INSTRUCTIONS When using an electrical appliance, basic precautions should be observed, including the following: Read all instructions before using your Upright VACUUM. WARNING: To reduce the risk of fire, electric shock, or injury: ■ Do not use outdoors or on wet surfaces. ■ Do not leave machine when it is plugged in. ■ Do not use with damaged cord or plug.
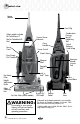
Product view Upper Handle Cord Clip Select models include Pet TurboEraser™ Tool or TurboBrush® Tool Power Cord Combination Dusting Brush/ Upholstery Tool Suction Power Indicator Carry Handle Quick Release® Cord Wrap Power Switch Easy Empty Dirt Container Stretch Hose Extension Handle Crevice Tool Febreze® Filter* Specialty Tool** Lock ’n Seal™ Lever Pre-Motor Filter Hose Wand Base Height Adjustment Knob Edge Cleaning Port Pet Hair Lifter (select models) WARNING: Do not plug in your vacuum cleane
Assembly Warning: The only tool you’ll need to assemble your vacuum cleaner is a Phillips screwdriver. Plastic film can be dangerous. To avoid danger or suffocation, keep away from babies and children. Attach handle to vacuum Some models may have a nonFebreze® filter already installed in the post-motor filter compartment. If you want to use the Febreze® filter while vacuuming, replace the non-Febreze filter with the Febreze® one. See figure A for the location on your vacuum. A. 1. 1.
Assembly Attach the vacuum hose & tools continued 3. Place the TurboBrush® Tool or Pet TurboEraser™ Tool (select models only) into its holder from the front of the vacuum. Power cord To store the power cord, wrap cord around the upper and lower cord wrap on the side of the vacuum. To release the power cord, rotate the upper cord wrap down and gently pull off cord. Power switch The power switch is located just below the carrying handle on the side of the vacuum.
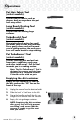
Assembly Handle Positions Using your foot, press the handle release pedal, located on the lower left side of the vacuum to recline to a cleaning position. 1. 2. 1. Upright – For storage and above floor cleaning with tools. 2. Normal Cleaning – Press handle release pedal once. This position is used for most household floor cleaning tasks. Operations Transporting your cleaner 1.
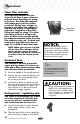
Operations Clean filter indicator The clean filter indicator tells you when the air flow in your vacuum is reduced due to dirty filters or a clog in the hose. The clean filter indicator will remain green until the airflow is reduced. At that time, it begins to change to red. When the indicator is fully red, the airflow is significantly reduced or clogged by a dirty filter. Follow the steps on page 11 to clean your filters or there is a clog in the hose.
Operations Pet Hair Fabric Tool (select models): Use this tool on fabrics such as drapes, beds or anywhere else pet hair may collect. Long Reach Dusting Tool (select models): Use this tool for dusting large surfaces. TurboBrush® Tool (select models): Use rotating brush action for small flat areas such as stair and cushions. Press gently down and pull toward you in raking motion; too much pressure will cause brush to stop rotating.
Maintenance and Care To maximize your cleaning performance and extend the life of your vacuum, it is very important that you empty your dirt container and check and clean your filters frequently. Follow the instructions on the following pages, and perform these simple maintenance steps: 1. Empty the dirt container when the dirt reaches the “Full” line on the container, or more frequently, to prevent overfills. 2. Check the pre-motor and post-motor filter regularly. Clean or replace as needed.
Maintenance and Care Cleaning the dirt container continued 5. If desired, the lower dirt cup may be washed in warm water. Make sure it is completely dry before reassembling. NOTE: Do not put in the dishwasher. NOTE: Use of moist parts/components in your unit will damage the motor and void your warranty 6. To reassemble, replace the inner cyclone screen by sliding it into the upper tank and rotating it to the left until the locking tabs stop the rotation.
Maintenance and Care Clearing Clogs 1. Turn the power switch off and unplug the vacuum from the electrical outlet. 2. Check the upper tank for build up or clogs. 3. If you notice dirt build up in the inner cyclone, follow instruction on how to clean the inner cyclone in page 10. 4. Check for a clog in the foot hose & edge cleaning port, the wand or in the hose. NOTE: When the indicator reads Red, there is a clog in the hose which is diminishing suction power.
Maintenance and Care Maintaining the Pet TurboEraser™ Tool and TurboBrush® Tool (select models only) Select models come with either the Pet TurboEraser™ Tool or TurboBrush® Tool. Both tools should be checked regularly for clogs and debris wrapping around either the paddles or bristles. 3. 1. Unplug unit from outlet. 2. Remove tool from hose or vacuum. 3.
Maintenance and Care Check rotating floor brush and drive belt You should check your vacuum cleaner's rotating floor brush and drive belt regularly for wear or damage. You should also clean the brush and the brush ends of strings, hair and carpet fibers. This type of debris can wrap around the brush and hamper its ability to effectively clean your carpet. Also remove any debris that has accumulated under the brush cover. 1. Turn the power switch off and unplug the vacuum from the electrical outlet. 2.
Maintenance and Care Replace drive belt 1. Turn the power switch off and unplug the vacuum from the electrical outlet. Remove floor brush following steps 2-4 on page14. rotating floor brush 2. 2. With the rotating floor brush removed from the vacuum cleaner, grasp the old drive belt and remove from the motor pulley. Discard the old drive belt. motor pulley 3.
Troubleshooting Vacuum cleaner won’t turn on Possible causes Remedies 1. Power cord not plugged in 1. Check electrical plug 2. Blown fuse/tripped breaker 2. Check/replace fuse or reset breaker Vacuum cleaner won’t pick up dirt Possible causes Remedies 1. Incorrect height adjustment 2. Hose not attached to suction opening 2. Grasp quick reach handle and firmly push hose wand onto the suction opening 1. Adjust powerfoot to correct height setting 3. Crack or hole in hose 3.
Replacement parts Below please find a list of common replacement parts. While not all of these parts may have come with your specific machine, all are available to you for purchase, if desired. Item 1 2 3 4 5 6 7 8 *Not all 1 Part No.
Accessories Item Part No. Part Name 1 203-1740 Crevice Tool 2 203-7529 Pet TurboEraser™ Tool 3 203-1741 Pet Hair Fabric Tool 4 203-1228 Dusting Brush/Upholstery Tool 5 203-1769 Long Reach Dusting Tool 6 203-2447 TurboBrush® Tool *Not all parts are included with every model. 1 4 18 3 2 5 w w w. b i s s e l l .
Warranty - Floors & More™ This warranty gives you specific legal rights, and you may also have other rights which may vary from country to country. If you need additional instruction regarding this warranty or have questions regarding what it may cover, please contact BISSELL Consumer Care by telephone, or regular post as described below, or contact your local in country distributor.
BISSELL consumer care If your BISSELL product should require service: Call BISSELL Consumer Care at the numbers below and we will give you the location of a BISSELL Authorized Service Center in your area. For all other countries, contact your local in country distributor for questions, service, or repair. If you have questions about your warranty or need replacement parts please contact the numbers below. For UK inquiries: Monday - Thursday 9 am — 5 pm Friday 9 am — 4 pm BISSELL Homecare (Overseas) Inc.