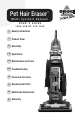
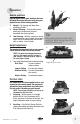
Pet Hair Eraser ™ Multi Cyclonic Vacuum USER’S GUIDE 10N6 SERIES 220-240V 3 Safety Instructions 4 Product View 5-6 Assembly 6-10 Operations 11-16 Maintenance and Care 16-17 Troubleshooting 18 Consumer Services 19 Replacement Parts 19 Additional Accessories 20 Warranty
Thanks for buying a BISSELL Vacuum We’re glad you purchased a BISSELL vacuum. Everything we know about floor care went into the design and construction of this complete, high-tech home cleaning system. Your BISSELL vacuum is well made, and we back it with a limited one year warranty. We also stand behind it with a knowledgeable, dedicated Consumer Services department, so, should you ever have a problem, you’ll receive fast, considerate assistance. My great-grandfather invented the floor sweeper in 1876.
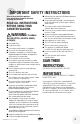
IMPORTANT SAFETY INSTRUCTIONS When using an electrical appliance, basic precautions should be observed, including the following: READ ALL INSTRUCTIONS BEFORE USING YOUR CANISTER VACUUM. WARNING: To reduce the risk of fire, electric shock, or injury: ■ ■ ■ ■ ■ ■ ■ ■ ■ ■ ■ ■ ■ ■ ■ ■ ■ ■ Use indoors only. For dry pick up only. Do not leave machine when it is plugged in. Do not use with damaged cord or plug.
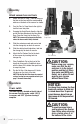
Product view Handle Hose Clip Stretch Hose Dusting Brush/ Upholstery Tool TurboBrush™ Pet Quick Release™ Cord Wraps Carry Handle Crevice Tool Twist ‘n Snap™ Hose Inner Cyclone Power Switch Upper Tank Power Cord Hose Wand Extension Wand Pet Contour Tool™ Easy Empty™ Dirt Container HEPA Media Post Motor Filter Washable Pre-Motor Filter Lock ‘n Seal™ Lever Handle Release Pedal Height Adjustment Knob Headlight Foot Window Quick Release™ Cord Wraps Hose Wand Base Wide Cleaning Foot 4 www.
C AUTION: Do not plug in your Assembly vacuum cleaner until you are familiar with all instructions and operating procedures. The only tool you’ll need to assemble your vacuum cleaner is a Phillips screwdriver. Attach handle to vacuum 1. Locate the handle and cord wrap. Remove the screw packet taped to the handle. 2. Stand the vacuum upright and from the rear of the unit, slide the base of the handle firmly into the grooves at the top of the vacuum body. 3.
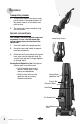
Assembly 1. 3. Attach vacuum hose and tools 1. Attach the Twist ‘n Snap™ Hose by lining up the tabs on the base with the corresponding notches on the back of the vacuum as shown. 2. Turn the Twist ‘n Snap Hose to the right to lock the hose into place. 3. Grasping the Quick Reach Handle, slide the end of the Hose Wand onto the Hose Wand Base. Snap the Hose into the Hose Clip. NOTE: The vacuum will not operate effectively unless the hose wand is firmly attached. 4.
Operations 1. 2. Handle positions 3. Press the handle release pedal, located on the lower left side of the vacuum, with your foot to place your vacuum into one of three cleaning positions. 1. Upright – For storage and above floor cleaning with tools. 2. Normal Cleaning – Press handle release pedal once. Position used for most household floor cleaning tasks. 3. Low Cleaning – With the vacuum in normal cleaning position, press handle release pedal Before cleaning under low furniture, check again.
Operations Transporting cleaner 1. To move your cleaner from room to room, put the handle in the upright position, tilt the cleaner back on its rear wheels and push forward. 2. The cleaner can also be moved by using the carry handle. 1. Special on-board tools Your vacuum is not only a powerful carpet and rug cleaner, it’s also a versatile above floor vacuum cleaner when you select one of the special tools. 1. Raise the handle to the upright position. 2.
Operations Special on-board tools (continued) Crevice Tool: Use in tight narrow spaces. Extension Wand: Use with desired attachment for a longer reach. Dusting Brush/ Upholstery Tool Hose Wand: Use with desired attachment for a longer reach or for cleaning hard to reach places. Crevice Tool Extension Wand Pet Contour Tool: Use to reach into corners and edges on stairs as well as armrests and other curved surfaces. The tool can be flipped to use in any direction.
Operations Power cord usage 1. 10 To use your vacuum, remove the cord and plug it into an electrical outlet. For your convenience, there are two quick release Quick Release cord wraps for easy cord removal. There is Cord Wraps also a cord clip that is part of the upper cord wrap where you can attach the cord when vacuuming. 2. When you are finished cleaning, turn vacuum cleaner off. 3. Unplug power cord by grasping the plug (NOT the cord) and disconnect from outlet. 4.
Maintenance and care To maximize your cleaning performance and extend the life of your vacuum, it is very important that you empty your dirt container and check and clean your filters frequently. Perform the following maintenance steps: 1. Empty the dirt container when the dirt reaches the “Full” line on the container, or more frequently to prevent overfills. For best performance, empty after each use. 2. 3.
Maintenance and care Post-Motor HEPA Media Filter Cleaning the pre-motor and post-motor HEPA media filter 1. Unplug the vacuum from electrical outlet. 2. The pre-motor filter protects the motor from dirt particles. It is located in the slide out tray underneath the dirt container. If the filter becomes dirty, pull out the tray, lift out the foam filter pad and clean it. NOTE: The pre-motor filter may be hand washed in cold water with mild detergent. Rinse well and air dry thoroughly before replacing.
Maintenance and care Check rotating floor brush and drive belt (continued) 7. Check drive belt carefully for wear, cuts or stressed areas. 8. Check air passageway for obstructions. Remove debris from this area. 9. Insert front edge of the brush cover and rotate into place. Snap the latches and replace the two screws. 8. Motor Pulley Replace drive belt 1. Unplug the vacuum from electrical outlet. 2.
Maintenance and care Replace lightbulb 1. Unplug the vacuum from electrical outlet. 2. Using a screwdriver, first remove 2 screws on either side of lens and pull out to remove the lens. 3. Remove the bulb from the socket by grasping the bulb and pulling gently. Install the new bulb by pushing it gently into the socket until the bulb snaps into place. 4. Reposition the lens place cover back over headlight and reinsert 2 screws. 2. 3. 4.
Maintenance and care Clearing clogs Low suction or poor pickup may be due to a clog in the vacuum cleaner. If you notice a change in the sound of the motor, check for clogs. 1. Unplug the vacuum from electrical outlet. 2. Empty dirt container. 3. Check upper tank for build up or clogs. 4. If you notice a clog in the upper tank, remove the inner cyclone (see section "Cleaning the upper tank" on page 16). 5. Grasp the hose wand and separate it from the hose wand base.
Maintenance and care Cleaning the upper tank 1. Grasp the inner cyclone and twist to the left until the locking tabs stop the rotation. Pull down from the upper tank to remove it. 2. Wipe out the inside of the upper tank and the inner cyclone with a damp cloth moistened with water or a mild cleaning solution. 3.
Troubleshooting Vacuum cleaner won’t run (continued) Possible causes 2. Remedies Damaged power cord 2. Unplug, check for damage, replace as necessary Vacuum cleaner and tools won’t pick up dirt Possible causes Remedies 1. Incorrect height adjustment 1. Adjust powerfoot to correct height 2. Hose not attached to suction opening 2. Firmly push hose wand into hose wand base 3. Twist 'n Snap hose not securely attached 3. Make sure Twist 'n Snap hose is snapped into locked position 4.
BISSELL Consumer Services If your BISSELL product should require service: In the UK, Australia or New Zealand call BISSELL Consumer Services at the numbers below and we will give you the location of a BISSELL Authorized Service Center in your area. For all other countries, contact your local in country distributor for questions, service, or repair. If you have questions about your warranty or need replacement parts please contact the numbers below.
Replacement parts - BISSELL vacuum Item Part No. 1 2 3 4 5 1 Part Name 32074 203-1297 203-1283 203-1073 3091 2 Style 7/9/10/12/14 Drive Belt (2-Pack) Headlight Bulb Wide Window Foot Brush Roll (gray) Style 7/8/14 Pre-Motor Foam Filter Style 8/14 HEPA Media POST-Motor Filter 3 4 5 Additional accessories Item Part No. 1 2 3 4 5 6 7 1 2 6 7 www.bissell.
Warranty - BISSELL Pet Hair Eraser ™ Multi Cyclonic Vacuum This warranty gives you specific legal rights, and you may also have other rights which may vary from country to country. If you need additional instruction regarding this warranty or have questions regarding what it may cover, please contact BISSELL Consumer Services by telephone, or regular post as described below, or contact your local in country distributor.