HAD1000 I Hearing Assistive Device User Manual
Contents Contents --------------------------------------------------------- 01 Kit Includes ------------------------------------------------------ 02 Quick User Guide ---------------------------------------------- 03 Warnings and Safety Instructions -------------------------- 09 Features ----------------------------------------------------------- 11 Installation -------------------------------------------------------- 11 General Operations ---------------------------------------------- 13 Music Streaming Op
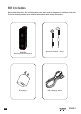
KIt Includes Please read these rules. Do not follow these rules may result in dangerous or violation of the law. This user manual provides more detailed information about safety instructions.
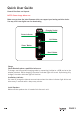
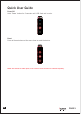
Quick User Guide General Functions and Layouts NOTE: Please charge before use Make sure you have the latest firmware which can support your hearing assistive device. You may visit iclear-digital.com for downloading. Charging Socket Status Indicator ‘Up’ Button ‘Power’ Button ‘Down’ Button Charge Check Bluetooth phone capabilities before use. To charge, use the provided charging cable by connecting it either to a USB port or to the adaptor provided. While charging, the status indicator light will be red.
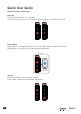
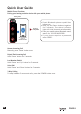
Quick User Guide General Functions and Layouts Power On Hold the ‘Power’ button for 3 seconds. The LED will flash purple for 2 seconds before changing to a blinking blue LED. Pairing Mode After power on, continue and hold the ‘Up’ and ‘Down’ button to enter into device pairing mode. The LED will blink blue and red alternately. Pairing mode Turn on Bluetooth search for ICLEAR HAD1000 Volume Press ‘Up’ button once to increase volume. Press ‘Down’ button once to decrease the volume.
Quick User Guide Power Off Hold ‘Power’ button for 5 seconds until LED flash red in color. Reset Press all three buttons at the same time to reset the device. NOTE: The volumes for mobile phone, music and hear assist functions are controlled separately.
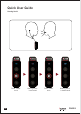
Quick User Guide Mobile Phone Functions Pairing your hearing assistive device with your mobile phone. Pairing mode Pairing completed Turn on Bluetooth search for ICLEAR HAD1000 • Check Bluetooth phone capabilities before use. • Hold Up and Down buttons together for 2 seconds. The status indicator light will blink blue and red alternately. • From your mobile phone Bluetooth menu, search for ‘ICLEAR HAD1000’. • If your phone requires a password, enter ‘0000’.
Quick User Guide Music Streaming Function NOTE: For music Bluetooth adaptor you would need to pair the music bluetooth adaptor before using it with hearing assistive device.
Quick User Guide Hearing Assist Press ‘Power’ once EN Hearing assist is activated Hearing assist is deactivated Press ‘Power’ once I PAGE 8
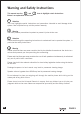
Warning and Safety Instructions ! This manual uses the and Below is an explanation of the icons. icons to highlight certain instructions. ! Attention This icon highlights special instructions and precautions intended to avoid damage to the system. Non-compliance may void the product warranty. Warning This icon provides precautions important to prevent injuries to the user.
Warning and Safety Instructions ! Attention Charging and handling rechargeable battery products incorrectly may cause them to overheat, catch fire or explode. To prevent this please follow the instructions below: 1. Never change the batteries yourself, always bring the device to an authorised dealer to perform the replacement for you. 2. When charging, use ONLY the charging cable provided or a replacement cable from the dealer.
Features Hearing assistive device has three main functions: 1. Make mobile phone calls. 2. Listen to music. 3. Hearing assist. Mobile phone functions • Bluetooth phone audio capabilities, HFP & HSP profile. • Hearing assist function applied to your phone call. Music streaming functions • Bluetooth music streaming with hi-fi and stereo capabilities, A2DP profile. • Bluetooth audio/ video remote control capability, AVRCP profile. • Hearing assist function not applied to music streaming.
Installation Install Universal Earbud Make sure the speaker wire is inserted into the main unit. lnsert the speaker wire into the control unit until you can no longer see the 3 ribs on the speaker wire plug.
General Operations Your hearing assistive device is now all set and ready to go!!! The operations described here are applicable to all modes of operations. Power On Hold the ‘Power’ button for 2 seconds to power on the hearing assistive device. The status indicator will blink blue and a power up tone can be heard. Power Off To switch off the hearing assistive device, press and hold the ‘Power’ button for 5 seconds.
General Operations To use the hearing assistive device with your mobile phone for the first time, you must first connect them wirelessly by pairing. Pairing • To connect the control unit to a mobile phone, hold the ‘Up’ and ‘Down’ buttons for 2 seconds. This puts the control unit into paring mode. The status indicator would blink blue and red alternately. • Turn on the mobile phone Bluetooth functions and search for Bluetooth devices. • Select ‘IClear HAD1000’ to pair with the desired device.
General Operations Mobile phone opeartions Hearing Assist (Activated automatically) Allows you to experience the adaptive hearing enhancement in the phone call according to the hearing curve obtained in the testing of Tune2Fit apps. Last Number Redial To redial the last number, hold the ‘Up’ and ‘Power’ buttons for 2 seconds. The capability of this function is dependent on the mobile phone used.
Music Streaming Operations To use the control unit with your music devices you must connect them wirelessly through Bluetooth pairing. The music device must have Bluetooth capability. Pairing - To connect the control unit a Bluetooth music device, hold the Up and Down buttons for 2 seconds. This puts the ICLEAR into pairing mode. The status indicator will blink blue and red alternately. - Next, put the Bluetooth music device into pairing mode.
Hearing Assist operations Allows you to experience the adaptive hearing enhancement in daily conversation according to the hearing curve obtained in the testing of Tune2Fit apps. Press ‘Power’ Hearing assist Press ‘Power’ Hearing assist once is activated once is deactivated Hearing Assist, Phone Call and Music Switching Music has the lowest priority. If you are in music mode, an incoming hearing assist request will stop the music and you will be connected to the hearing assist mode.
Mobile Phone Operations TUNE 2 FIT App Download Tune2Fit.apk file from http://www.iclear-digital.com (Only applicable for Android) Open the file and install the app. NOTE: To tune the hearing assistive device using the Tune2Fit app you would need to pair the unit with an Android Smartphone.
Mobile Phone Operations TUNE2FIT Make You Hear Clearer Open the app. Start Click the ‘Start’ button to begin TUNE2FIT Select Device ICLEAR HAD1000 00:02:5B:BB:10:07 ICLEAR HAD1000 00:05:5B:BB:10:06 ICLEAR HAD1000 00:02:5B:BB:10:02 Select ICLEAR HAD1000 TUNE2FIT Select Mode Tuning Mode Configuration Mode EN Select to tune your own hearing curve or configure the device. If this is the first time you are using the device.
Mobile Phone Operations TUNE2FIT Select tuning mode: If you select Manual Tuning Please continued on (page 20) How will you tune it? If you select Auto Tuning Please continued on (page 21) Auto Tuning What is Auto Tuning? The program will require you to tune each ear’s hearing sensitivity in 8 different frequency bands. Manual Tuning What is Manual Tuning? A total of 16 tuning points is required.
Mobile Phone Operations TUNE2FIT TUNE2FIT Instruction How will you tune it? The volume will increase slowly from 0. Press OK when you hear it. There will be 8 tests on each ear, a total of 16 tests. Click START to begin! Auto Tuning What is Auto Tuning? Start Manual Tuning What is Manual Tuning? Auto Tuning Auto Tuning allows user to have a simpler and faster tuning method for quick fix. Click the start button and the tuning will start immediately.
Mobile Phone Operations TUNE2FIT Preview Sound Hearing Curve Volume (dB) 90 Severe 80 70 60 50 The Hearing Curve allows you to understand your hearing capability. 40 30 20 10 Normal 400 750 1050 1350 1800 2300 2900 3500 Frequency (Hz) Click the Before button to experience your listening capability before using HAD1000. Orange: Left Ear Cyan: Right Ear Click the after button to experience your listening capability with the help of HAD1000.
Mobile Phone Operations TUNE2FIT Noise Suppression OFF Adaptive Double Beamforming Battery Level ON Refresh 79% Hearing ComfortZone Once you are in configuration mode, the hearing assist mode will be activated. This is to help you experience the different setting live. Done Back to Tuning TUNE2FIT Noise Suppression OFF Adaptive Double Beamforming Battery Level 79% ON Refresh Hearing ComfortZone Noise Suppression Allows you to enjoy your hearing experience even in noisy environment.
Mobile Phone Operations TUNE2FIT Hearing Comfort Zone Left Ear Right Ear Volume (dB) 90 80 70 60 50 40 Comfort Zone 30 20 10 400 750 1050 1350 1800 2300 2900 3500 Frequency (Hz) Adjust Max Threshold Dynamic Display UP OFF Comfort Zone Adjustment Allows you to adjust the maximum threshold of your hearing comfort zone. The algorithm will adaptively maintain the power level of the sound you hear in different frequency bands within the hearing comfort zone.
Button Configurations Summary Power On Power Off Enter Pairing Reset Start Hearing Assist Stop Hearing Assist Answer Incoming Call Reject/ End Incoming Call Volume Up Volume Down Play/ Resume Music Stop Music Fast Forward Back Track Volume Up Volume Down EN Basic Press and hold ‘Power’ button for 2 seconds Press and hold ‘Power’ button for 5 seconds Press and hold both ‘Up’ and ‘Down’ buttons for 2 seconds Press ‘Power’, ‘Up’ and ‘Down’ buttons at the same time Hearing Assist Press ‘Power’ once Press ‘Po
Status Indicator Configurations Summary The table below shows the status indicator configurations.
Technical Data Unit Dimensions (L x W x H) Weight Audio Frequency response Sampling rate SPL Bluetooth Specifications Profiles Radio Carrier frequency Range RF output power Power Power consumption Power input (Charging) Built – in Battery Music / Talk time Standby time Temperature Operation temperature Charging temperature Storage temperature 67.7mm x 18mm x 19mm 14.19g 20Hz to 20000Hz 8000Hz 105dB+ / -3dB Version 4.0 Compatible A2DP, AVRCP, HSP, HFP 2.402 - 2.
Notices Changes or modifications not expressly approved by the party responsible for compliance could void the user’s authority to operate the equipment. This equipment has been tested and found to comply with the limits for a Class B digital device, pursuant to Part 15 of the FCC. Rules these limits are designed to provide reasonable protection against harmful interference in a residential installation.
Notices WARRANTY: Without prejudice of legal warranty, the product is covered under a 2 year warranty by manufacturer from the date of purchase. Please provide the proof of purchase when you return the item to the supplier. The warranty covers manufacturing defects only.
Notices All risks from operating or usage of the product rest solely and entirely with the user of this product, the original purchaser or any third parties, who assumes full responsibility for all injuries, losses and/ or damages, whether caused in whole or in part by the negligence, omissions or other conduct of others, including that of BITwave, and all their representatives, partners, agents, distributors, suppliers, resellers and all others in its supply and distribution chain either due to the designe
Notices PERSONAL SAFETY: Do not open the seal of the hardware, tamper, repair or modify any parts. Do not touch the product with metal objects or parts or chemical products. Violation of the above will lead to potential fire hazards and mishaps. Please contact the technical support or your local supplier if your product malfunctions. Always comply with the local law and traffic regulations.
NOTE: This equipment has been tested and found to comply with the limits for a Class B digital device, pursuant to part 15 of the FCC Rules. These limits are designed to provide reasonable protection against harmful interference in a residential installation. This equipment generates, uses and can radiate radio frequency energy and, if not installed and used in accordance with the instructions, may cause harmful interference to radio communications.
I MAR 2015