AV200 CableLAN Ethernet Adapter Manual
Corinex AV200 CableLAN Adapter Corinex Communications Corp. # 670-789 West Pender Street Vancouver, BC Canada V6C 1H2 EN 61000-3-2 EN 61000-3-3 Vancouver / Feb.08.
Copyright This document, as well as the software described in it, is furnished under license and may be used or copied only in accordance with the terms of the license. The content of this document is furnished for informational use only, it is subject to change without notice, and it does not represent a commitment on the part of Corinex Communications Corp. Corinex Communications Corp. assumes no responsibility or liability for any errors or inaccuracies that may appear in this document.
End User License Agreement CORINEX COMMUNICATIONS CORPORATION This End User License Agreement (“EULA”) is a legal agreement between you and CORINEX COMMUNICATIONS CORPORATION (“CORINEX”) with regard to the copyrighted Software provided with this EULA.
End User License Agreement 7. Export Laws. This EULA involves products and/or technical data that may be controlled under any applicable export control laws, and regulation, and may be subject to any approval required under such laws and regulations. 8. Precedence. Except as set out above, where separate terms are provided by the software supplier, then, subject to this EULA, those terms also apply and prevail, to the extent of any inconsistency with this EULA.
Contents Contents 1. 1.1 1.2 2. 2.1 2.2 2.3 2.4 2.5 3. 3.1 3.2 3.3 3.4 3.5 4. 4.1 4.2 5. 5.1 5.2 5.3 5.4 6. Copyright .......................................................................................... 1 End User License Agreement .............................................................. 2 Introduction ..................................................................................... 5 Overview ...........................................................................................
Introduction 1 Introduction 1.1 Overview The Corinex AV200 CableLAN Adapter is a network adapter, connecting your computers and devices to each other, and to your Internet connection, over the electrical circuits already in your home or office.
Installation 2 Installation 2.1 Package Contents When you receive your Corinex AV200 CableLAN Ethernet Adapter, check to be sure that your package contains: • Corinex AV200 CableLAN Ethernet Adapter • Standard Ethernet cable • Standard coaxial cable • Standard coaxial splitter • CD with documentation • Quick Start Guide • Registration and Warranty Card We are always working to improve our products. For any hardware/software changes, downloads, and additional information on your device, please visit www.
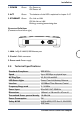
Installation 1. POWER Green On: Power on Off: Power off 2. ACT Green The behavior of this LED is explained in chapter 3.4.7 3. ETHERNET Green On: Link on LAN Off: No link on LAN Blinking: receiving/transmitting data Connector Definitions (Connectors from left to right) 1. LAN: 1x RJ-45 LAN10/100 Ethernet port 7 2. Coaxial : Cable connector 3. Power cord: Power supply 2.4 Technical Specifications Standards Compliance IEEE 802.
Installation 2.5 Connecting the AV200 CableLAN Adapter To connect the Corinex AV200 CableLAN Adapter to your computer, follow the steps listed below. 1. Connect the supplied Ethernet cable to the Ethernet (LAN) port on the adapter and to an Ethernet port on your computer. 2. Plug the Corinex AV200 CableLAN Adapter unit directly into any standard electrical outlet. Note: Please use a standard Ethernet cable for connection of the AV200 CableLAN Adapter to your computer.
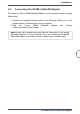
Adapter Configuration 3 Adapter Configuration In order to access the web-based configuration pages, it is necessary to know the adapter’s IP address and for your computer to be connected to the CableLAN adapter (as described in section 2.5). Corinex adapters come with a default IP address 10.10.1.69. Open a web browser (Microsoft Internet Explorer v6.0, Mozilla v1.7.2 and Mozilla Firefox v1.0 have been verified for use with these products.
Adapter Configuration Note: If password protection is disabled, you will be taken straight to the Main page, rather than the Authentication page. 3.2 Main Page This is the first page after login. It shows basic status information about the adapter, a list of available CableLAN connections, MAC and IP addresses, MAC type, etc. At the top of the screen are the main categories, “Status,” “Additional Information,” “Basic Settings” and “Advanced Settings”. The menu shows the current category and page.
Adapter Configuration 3.3 Additional Information Page This page shows more detailed information about the adapter. System Information Uptime Shows how long the adapter has been running since the last startup. Firmware Version Shows the detailed firmware version. MAC Status MAC Address Displays the unique hardware address (serial number) of the adapter. MAC Type This should be In-Home AV. Node Type Shows the type of device – this can be EP, AP or Static AP.
Adapter Configuration PHY Status Notches Indicates whether or not frequency notches are enabled. notches should always be enabled, in order to eliminate interference with Radio Amateur bands specified by the local authorities. Power Control Indicates status of the power control mechanism (described in chapter 3.4.4). Multicast Status IGMP Aware Multicast Syndication Shows the status of the IGMP settings (described in chapter 3.4.5).
Adapter Configuration Priority Status Default Priority Shows the default priority for traffic transmission. Criterion 1 & 2 Shows which criteria are used to classify traffic. This can be TOS, 802.1p or Custom. If Custom, the complete parameters are displayed below. Please see chapter 3.4.7 for additional information. Security Status Status Indicates whether configuration page protected.
Adapter Configuration 3.4 Change Configuration Page 3.4.1 Overview The configuration pages allow you to change the settings on the CableLAN adapter. Any parameters changed here will be stored in the CableLAN adapter‘s permanent memory, and at the next startup, will be activated automatically. Any changes will take effect immediately after startup, with the exception of the Network Configuration settings (these require a restart of the CableLAN adapter).
Adapter Configuration • If the CableLAN adapter is to be accessed through a router (e.g., in a large office network), the gateway IP needs to be configured. Otherwise, it can be ignored. WARNING: CHANGING AN ADAPTER‘S IP TAKES EFFECT ONLY AFTER A RESTART. YOU MAY WANT TO PLACE A LABEL ON EACH ADAPTER WITH ITS IP ADDRESS, SO YOU DON’T ACCIDENTALLY LOSE THE ABILITY TO ACCESS IT. 3.4.
Adapter Configuration If you want to enable 3DES encryption in your network, please select one of the input methods and enter the password. Input methods: ASCII If ASCII is selected, the Encryption Key string can have up to 24 non-extended ASCII characters. Quote and doublequote characters are not supported. Extended ASCII characters are not supported. HEX On the other hand, if HEX mode is selected, the Encryption Key string can have up to 42 hexadecimal digits (for example 34AE4F54B38D).
Adapter Configuration If you want to configure the CableLAN adapter to function as an automatic EP/AP, please select “EP” from the list. If you want the adapter to behave as a Master, select “Fixed AP” from the list. After selecting one, click “OK” to confirm your choice. Note: Fixed AP is available only when a Network ID is set on the adapter (please read below for details on Network Identifiers). The AV200 technology supports multiple networks on a single circuit.
Adapter Configuration The following picture shows an example of two AV200 networks with different Network Identifiers: Communication between adapters (called modems in this picture) is encrypted with a Triple-DES algorithm. The Encryption Key can be set to any string of letters and numbers (Encryption Key field, ASCII or HEX). Saving an empty string (leaving it blank) disables the encryption. After selecting ASCII or HEX and then entering a password, click “OK” to confirm your choice.
Adapter Configuration 3.4.3.2 Network Configuration Your Corinex AV200 CableLAN Adapter can be configured to use either DHCP (automatic IP address assignment), or a fixed IP. The following parameters are used by the fixed IP configuration. In order for the CableLAN adapter to correctly communicate with other devices on the network, it is necessary to define a valid IP address, as well as a proper subnet mask and gateway address.
Adapter Configuration Note: It is strongly advised to turn on the notching function. Power Control is an automatic transmission power control which prevents different networks from overpowering each other. Power Control is turned on only when other networks are detected in the channel. If the transmission strength reaches the isolation point between networks, the transmission power is limited from overpowering the other network.
Adapter Configuration 3.4.6 VLAN Configuration When AV200 CableLAN Adapters are used for ADSL extension, it is important for the operator to be able to distinguish the type of traffic that each adapter is generating. This is usually done by means of VLAN tagging. The AV200 technology includes the ability to tag all traffic that enters the CableLAN network through each adapter’s Ethernet interface. It is only tagging - there is no VLAN filtering on an AV200 CableLAN network.
Adapter Configuration LED is blinking The average connection to the Slaves is slower than the defined upper limit, but faster than the lower limit. The average connection to the Master is slower than the defined upper limit, but faster than the lower limit. LED is ON The average connection to the The average connection to Slaves is faster than the defined the Master is faster than the upper limit. defined upper limit. After setting both values, please click OK to save the values to NVRAM.
Adapter Configuration Several options are available in this form. The first, and easiest to understand and use, is the Default Priority value. Output traffic generated by adapters with higher default priority will have preference in the network. The rest of the parameters let you configure two Class of Service criteria (Criterion 1 and Criterion 2 checkboxes). If you select None, 8021p or TOS, custom parameters are hidden, leaving a predefined setting in place.
Adapter Configuration of the patterns, it will get a default priority. There is a set of pre-defined criteria which classifies traffic based on the 802.1p field of the Ethernet packet or the TOS field of the IP packet. 3.4.8 Security Configuration The configuration page allows you to change the password. Type your new password and confirm by typing it in a second time. If both fields are left empty, the password will be disabled (the message ‘No password installed’ will be shown).
Adapter Configuration 3.4.10 Flash Upgrade The firmware, the loader and the factory settings (default factory configuration) are stored in Flash memory. To upgrade them, first select the Flash section to update (Firmware, Loader or Factory Settings) and the protocol (FTP or TFTP). Type the IP address of the FTP or TFTP server (Server IP Address field). (If using FTP, type the user name (FTP User) and password (FTP Password)). Finally, type the name of the firmware file (File Name) and click OK. 3.4.
Adapter Configuration 2. Save the firmware file in the folder specified in “Current Directory” or click “Browse” and find where the file is saved. 3. Open the Web browser and enter the IP of the adapter to be upgraded. 4. When the page comes up, click on Change configuration. 5. In the Firmware Update window, select TFTP and enter the IP of the TFTP server and the name of the file, as shown in the following picture : 6. Click “OK” to start the process. The progress is shown every 30 seconds. 7.
Adapter Configuration The adapter connected to the ADSL adapter is the access point. Data and video are delivered through ADSL. The access point must prioritize the video higher than other data, to avoid a jittery image whenever there is a heavy data download. First of all, the Criterion field must be set to Custom, in order to create custom rules for traffic classification. To prioritize UDP traffic, first the Ethernet packets containing IP packets must be detected.
Video Network Setups 4 Video Network Setups 4.1 Introduction An In-Home AV network is made up of an access point (AP) adapter and several end points (EPs). In-Home AV networks can have only one AP. However, several InHome AV networks can be created in the same space, each of them with its own AP, because each network is isolated by a unique network identifier. An adapter can be configured as a Fixed AP (i.e. it always will be an AP) or an automatic EP/AP.
Video Network Setups • Public Network - This is the default configuration of an In-Home network. If you do not want to change the settings on your network, the network configuration protocol will configure all the adapters automatically. By default, all adapters are EPs and have a public (empty) network ID. If the protocol does not detect an AP in the channel, it will change an EP to act as an AP. All EPs will connect directly to the automatic AP if they can, or to an EP that will act as a repeater.
Video Network Setups 4.2.1.2 Extending the Internet Connection to an AV200 CableLAN Network This picture shows a more advanced CableLAN network with three Corinex AV200 CableLAN Adapters. This is a common network configuration, where Internet access and digital video are delivered through the same ADSL line. This configuration requires some QoS (Quality of Service) settings to guarantee video quality when the network is carrying large amounts of data from the Internet connection.
Video Network Setups In multi-network scenarios, such as the one depicted in the picture above, there is a new entity, called the QoS controller. The QoS controller’s role is to assign channel access to the different networks. The QoS controller acts at the same time as the AP of one of the networks. In the presence of several networks, the coexistence protocol automatically selects one of the APs as the QoS controller. 4.2.2.
Network Configuration 5 Network Configuration 5.1 Setting an IP Address on your Computer This section explains how to set a static IP on your computer, in order to connect to the Corinex AV200 CableLAN Adapter and configure it. 5.1.1 Setting Up a Static IP in Windows XP 1. Click the Start button, open the Control Panel. From there, click the Network Connections icon and then the Network Connections window appears. 32 2.
Network Configuration 4. Select Internet Protocol (TCP/IP) and click the Properties button. 5. Select Use the following IP address. Set the IP address manually in the format 10.10.1.X (for example 10.10.1.200) and mask 255.255.0.0 of local TCP/IP settings. The Default gateway box can be left blank.
Network Configuration 6. Click OK in the TCP/IP Properties window to complete the PC configuration, and click Close or the OK button to close the Network window. 5.1.2 Setting up a static IP in Windows 2000 1. Go to the network screen by clicking the Start button. Click Settings and then Control Panel. From there, double-click the Network and Dial-up Connections icon. 34 2.
Network Configuration 3. Click the Properties button to get to the Local Area Connection Properties. 4. Select Internet Protocol (TCP/IP) and click the Properties button. 5. Select Use the following IP address. Set the IP address manually in the format 10.10.1.X (for example 10.10.1.200) and mask 255.255.0.0 of local TCP/IP settings. The Default gateway box can be left blank.
Network Configuration 6. Click the OK button in the TCP/IP Properties window to complete the PC configuration, and click Close or OK to close the Network window. 5.1.3 Setting Up a Static IP in Windows 98 1. Go to the network screen by clicking the Start button. Click Settings and then Control Panel. From there, double-click the Network icon. 2. On the Configuration tab, select the TCP/IP line for the applicable Ethernet adapter. Do not choose a TCP/IP entry that mention DUN, PPPoE, VPN, or AOL names.
Network Configuration 5.1.5 Setting up a static IP in Mac OS 1. Open the Network Control Panel in System Preferences. 37 2. Select Built-in Ethernet from the pop-up menu.
Network Configuration 3. Set the IP address manually in the format 10.10.1.X (e.g. 10.10.1.200) and Subnet Mask 255.255.0.0. 4. Click on Apply Now and close the Network panel, saving your settings. 5.2 Improving Network Performance The latency (delay) of a CableLAN network is higher than that of an Ethernet network. Most operating systems have a default setting of the network latency based on Ethernet figures.
Network Configuration With a Linux PC running kernel 2.4 or higher, open the console and execute the command ./tcpwin.sh 512 logged in as root. tcpwin.sh for use with Linux operating systems After applying the script, please restart the system. This applies to both Windows and Linux. 5.3 Checking Network Performance On the Main page, under the heading Available CableLAN Connections, is a list of the MAC addresses of all of the neighboring adapters that have a connection with that adapter.
Network Configuration When to use this filter: • When you want to isolate your AV200 CableLAN network from the rest of the coaxial infrastructure, either because you don’t want the CableLAN signal from your network to go out and disrupt other adapters, or because you want to isolate this network from the noise, or other traffic, in the rest of the cable network.
Troubleshooting Guide 6 Troubleshooting Guide The Corinex AV200 CableLAN Adapter has been designed to be a reliable and easy-touse network connection device. Please refer to the list below to aid in troubleshooting or visit www.corinex.com/retail and go to the appropriate section for information on your product. There you will find news, manuals and software updates, as well as frequently asked questions (FAQ). The POWER LED is off. 1.
Troubleshooting Guide 3. If all the computers can ping themselves, try pinging another computer on your AV200 CableLAN network. If this fails, then there is a problem with the connection across your AV200 CableLAN network or with the configuration of the CableLAN adapters. Check the connection to the outlet, or try a different outlet. Verify the configuration of your adapters, especially the network number, as only adapters on the same network can see each other.