
User manual


7
ENGLISH
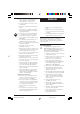
• To replace blade ensure the cutting
edges of the blade are closest to the
ground and place blade onto the
combined mount.
H3
• Place the clutch plate over the shoulder
of the combined mount protruding
through the blade. Ensure to align the
inside edges with the outside edges of
the blade.
H4
• Place the square steel blade spacer on
the motor shaft aligning the inside flats
with the shaft and engaging the outside
edges with the plastic clutch plate.
Engage nut on shaft and turn it
clockwise to tighten.
• Ensure that removed parts are replaced
correctly before use, incorrect assembly
may result in damage to your mower and
reduced cutting performance.
Note: This unit is fitted with a clutch plate
(16), between the blade nut and the blade,
which must be assembled correctly at all
times. Damaged blade assembly parts must
be replaced before use.
Care and maintenance
The advice given in this section covers the general
care and maintenance of the main body of your
mower. Advice relating to the blades is given in
“Maintenance of blades”. Advice relating to the
maintenance and storage of the battery is given in
“Battery information”.
• Always keep your mower clean and free from
grass cuttings, especially the underside of the
cutter deck and the air vents.
• At the end of each cutting session we
recommend that the build up of grass on the
underside of the cutter cover is removed using a
blunt scraper. The spanner included with this
mower may also be used for this purpose.
• Clean all plastic components with a damp cloth.
Caution: Do not use solvents or cleaning fluids as
these may damage the plastic components of your
mower.
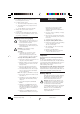
Overload protection (Fig. J)
• Your machine is fitted with overload
protection. If you work too quickly in long
grass, or in heavy conditions, you may
overload the motor. If this occurs, the
safety key fuse will blow, causing the
machine to stop.
• This is not a fault of the machine but a
safety device to protect your machine.
J
• When this occurs, remove the safety key
and inspect the fuse link. If link is broken,
the fuse has blown and needs to be
replaced with a new key. One of which is
supplied as a spare in your parts pack.
Alternatively, you can purchase a new key
from any Black & Decker service agent.
To obtain the best results:
• Cut the grass regularly.
• Do not cut wet grass.
• When the grass is longer than 10cm
(4 inches), it is advisable to go over the
lawn on a high cut setting and then finish
using a lower setting.
Fault finding
If your mower does not operate correctly,
use the table below to locate the problem.
Problem Solution
Mower does not run (a) Check to make sure the safety
when switch lever key has been inserted correctly.
is activated (b) Remove the safety key, turn your
mower over and check that the
blade is free to turn.
(c) Has battery been fully charged?
Recharge the battery.
Mower stops when (a) Remove safety key. Turn your
mowing mower over and check that blade
is free to turn.
(b) Raise cutting height of wheels
and start mower.
(c) Has battery been fully
charged. Recharge the battery.
(d) Inspect the safety key fuse link.
If broken, the safety key fuse has
blown and requires replacement.
Mower runs but (a) Has battery been fully
cutting performance charged? Recharge the battery.
is unsatisfactory (b) Battery may need replacing.
Refer to ‘Battery disposal’ section.
Mower is too hard (a) Raise cutting height to
to push reduce drag on grass. Check
each wheel for ease of rotation.
Mower is abnormally (a) Remove safety key. Turn unit
noisy and vibrates on its side and check blade for
damage. If damaged, replace with
Black & Decker replacement blade.
(b) If there is no visible damage
to the blade or underside of the
mower return to your local
service agent.
GRC450/750 UK p01-18 w/p 16/3/00, 3:03 pm7