
Operation Manual


5
ENGLISH
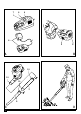
Fitting and removing the battery (fig. B)
To fit the battery (5), line it up with the receptacle on the
tool. Slide the battery into the receptacle and push until
the battery snaps into place.
To remove the battery, push the release button (9) while at
the same time pulling the battery out of the receptacle.
Connecting the blow tube (fig. C)
Blow tube must be assembled to the blow clamshell before use.
Align the circles (10) on the clamshell and the upper tube (3).
Push the tube firmly onto the clamshell until the circles
click into place.
Align the circles (10) on the upper tube (3) and the lower
tube (4).
Push the tube fully onto the clamshell until the circles click
into place.
For storage the blow tube can be detached from the blow
clamshell by depressing the circles on either side and
gently sliding off the tube.
Use
Warning! Let the tool work at its own pace. Do not overload.
To charge the battery (5), remove it from the tool and
insert it into the charger (6). The battery will only fit into
the charger in one way. Do not force. Be sure that the
battery is fully seated in the charger.
Plug in the charger.
8 hour charger
The battery will be fully charged in approx. 8 hours. It can be
removed at any time or left in the connected charger indefinitely.
1 hour charger
Check if the red charging indicator (7) lights up. If the
green end of charge indicator (8) lights up now instead,
the battery is too hot and cannot be charged. If this
happens, remove the battery from the charger, let the
battery cool down for approx. 1 hour and re-insert it.
After approx. 1 hour of charging, the red charging indicator will
stop lighting and the green end of charge indicator will light
up. The battery is now fully charged.
Remove the battery from the charger.
Switching on and off
To switch the tool on, press the on/off switch (1).
To switch the tool off, release the on/off switch.
Hints for optimum use
Hold the blow tube approx. 180 mm above the ground
when operating the tool.
Use a sweeping motion from side to side. Advance slowly
keeping the accumulated debris/leaves in front of you (fig. D).
After blowing the debris/leaves into a pile, it is easy to
dispose of the pile.
Cleaning the tool
Clean the tool regularly.
Warning! Keep your product dry. Under no circumstances
spray with water.
To clean the tool, use only mild soap and a damp cloth.
Warning! Do not use any type of detergent, cleaner or solvent
which may contain chemicals that could seriously damage the
plastic.
Self lubricating bearings are used in your product,
therefore lubrication is not required.
Protecting the environment
Z
Separate collection. This product must not be
disposed of with normal household waste.
Should you find one day that your Black & Decker product
needs replacement, or if it is of no further use to you, do not
dispose of it with household waste. Make this product
available for separate collection.
z
Separate collection of used products and packaging
allows materials to be recycled and used again.
Re-use of recycled materials helps prevent
environmental pollution and reduces the demand for
raw materials.
Local regulations may provide for separate collection of
electrical products from the household, at municipal waste
sites or by the retailer when you purchase a new product.
Black & Decker provides a facility for the collection and
recycling of Black & Decker products once they have reached
the end of their working life. To take advantage of this service
please return your product to any authorised repair agent who
will collect them on our behalf.
You can check the location of your nearest authorised repair
agent by contacting your local Black & Decker office at the
address indicated in this manual. Alternatively, a list of
authorised Black & Decker repair agents and full details of our
after-sales service and contacts are available on the Internet at:
www.2helpU.com