A 3 2 1 12 4 5 6 7 10 11 9 13 8
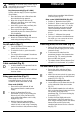
B2 B1 B3 a b B4 C D I 0 E1 E2 E3 E4
E5 F1 F2 F3 F5 F6 F4 F7
English ® 1
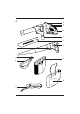
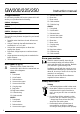
GW200/225/250 Instruction manual Congratulations! 5. Vacuum tube lower 6. Blow tube 7. Blow control 12. Cable restraint 13. Collection bag On purchasing the Black & Decker system which will assure you of problem free leaf clearing. GW200 - Mastervac Vacuuming ✔ Shredding ✔ GW225 Vacuuming ✔ Shredding ✔ Variable blow speed ✔ GW250 1. Powerhead 2. On/off switch 3. Release button 4. Vacuum tube upper 5. Vacuum tube lower 6. Blow tube 7. Blow control 8. Carrying strap 9. Bag frame 10. Bag frame release 11.
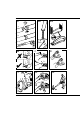
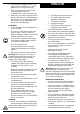
• • • Preparation • Do not operate your machine barefoot or in open sandals. • To protect your feet, always wear stout shoes or boots - freshly cut grass is damp and slippery. Rubber or man made footwear will enhance your safety. • Use protective equipment. Wear safety spectacles or goggles whilst operating your machine in blow mode. • Use a face mask if dusty. • Use ear protection if the sound level seems uncomfortable when using your machine. • Wear long trousers to protect your legs.
• ! Replacement fans are available from a Black & Decker service agent. Warning! If the supply cord is damaged, it must be replaced by a special cord or assembly available from Black & Decker or a recognised service agent (Black & Decker part number: 372832-01 - UK only and part number: 370017-04 - Australia and New Zealand only).
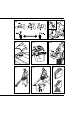
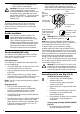
! ENGLISH Warning! The shoulder strap should only be used during vacuum mode. Never use the strap during blow mode. Bag frame assembly (Figs. B3 & B4) Secure collection bag (11) to the bag frame (9) as follows: • Place the frame onto a flat surface with the underside facing upwards. • Align slots in bag rim with the clip features in the frame, open end of bag rim away from handle. • Insert rim in groove and push firmly into place until all clips engage.
• • As the bag fills, the power of the suction will decrease, switch off the unit and unplug from the mains power supply. Remove the bag frame assembly, depress the bag frame latch (10) as shown in (Fig. F4) and unzip the bag and empty the debris before continuing (Fig. F7). Fault finding ! Disconnect from the mains power supply before attempting any maintenance. Failure to operate (1) Check the connection to the power supply. (2) Check the fuse in the plug, if blown, replace (UK only).
The guarantee policy Failures due to the following are not covered: • Replacing worn or damaged blades, or cables damaged during storage or use. These are regarded as replacement items which wear during normal usage. • Failures as a result of sudden impact or obvious abuse. • Failures due to usage not in accordance with instructions and recommendations contained in this manual.
Australia Black & Decker (A’asia) Pty Ltd 286-288 Maroondah Highway, North Croydon, Victoria 3136 Tel: 03 9213 8200 Fax: 03 9726 7150 New Zealand Black & Decker 483 Great South Road Penrose, Auckland Tel: 09 579 7600 Fax: 09 579 8200 South Africa Black & Decker South Africa (Pty) Ltd Suite no 107, PostNet X65 Halfway House 1685 Tel: 011 314 4431 Fax: 011 314 4435 United Kingdom Black & Decker 210 Bath Road, Slough Berkshire SL1 3YD Tel: 01753 574277 Tlx: 848317 BAND MH Fax: 01753 551155 Part no.
9 Data protection act: Tick this box if you prefer not to receive information from Black & Decker or other companies.
GUARANTEE CARD South Africa: Black & Decker South Africa (Pty) Ltd, Suite no 107, PostNet X65, Halfway House 1685 United Kingdom & Ireland: PO Box 821, Slough, Berkshire, SL1 3AR Please complete this section immediately after the purchase of your blowervac and post it to the Black & Decker address in your country (above). If you live in Australia or New Zealand, please register your purchase by using the alternative guarantee card supplied. 10 Part no.