
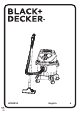
User Guide


6 • ENGLISH
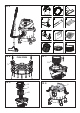
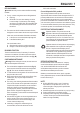
CARTON CONTENTS LIST - FIG. A
PART DESCRIPTION QTY
1 Vaccum assembly 1
2 Flexible hose 1
3 Sofa brush 1
4 Floor brush 1
5 Crevice nozzle 1
6 Extension tube 3
7 Wheel 4
8 Washable dust bag 1
9 User manual 1
10 HEPA filter 1
11 HEPA filter cover 1
12 Sponge filter 1
DRUM ASSEMBLY
Warning! If any part is missing or damaged, please do not
assemble until you have all the parts.
Invert drum to install wheel.
Insert the four wheels (7) into the socket of wheel base.
Be sure that wheels spin freely (Fig. B)
ASSEMBLING THE UNIT
1. Fitting the HEPA filter.
► Remove the sponge filter (12) from the float holder
(Fig. C).
Remarks: the sponge filter can be always keep on float
holder, if the float holder do not assemble the HEPA.
► Put the HEPA filter (10) into float holder, then lid
the HEPA filter cover (11), fasten it clockwise. On the
contrary, remove the HEPA filter anticlockwise (Fig. D).
NOTE: When picking up small amounts of liquid the HEPA
filter can be left in place. When picking up large amounts
of liquid we recommend that the HEPA filter should be
removed. If the HEPA filter is not removed, it will become
saturated and misting may appear in the exhaust
2. Fit the paper dust bag. Put the dust bag board
(8) into inlet base (dust bag board should aim at the
slot of the inlet base). Rotate the board clockwise
90º degrees to fasten the dust bag according to arrow
direction (LOCK side) (Fig. E).
To remove the paper dust bag from the inlet base, just
rotate the paper dust bag board anticlockwise 90º degree
(OPEN side), then take out the dust bag.
NOTE: The dust bag use only for dry-vacuum.
3. Install the power head assembly into the drum assembly
as shown (Fig. F).
4. Rotate both latches down and press until you hear them
snap over the flanges on the drum (Fig. G).
5. Insert the flexile hose connector into the inlet base of the
vacuum cleaner.(Fig. H).
OPERATION
Accessories use instructions
The vacuum cleaner is equipped with three nozzles for different
applications. Each individual nozzle can either be fitted onto the
connecting tube or directly onto the handle of the flexible hose.
1. Floor brush
This is suitable for cleaning wide areas. The floor brush is
fitted with a practical 360º
tie-in, this ensures that you can
reach easily into any corner. (Fig. I)
2. Sofa brush
You can use this to clean the dust from books or sensitive
objects such as picture frames etc. This nozzle is suitable
for the careful cleaning of upholstered furniture, mattresses,
cushions, curtains etc. (Fig. J)
3. Crevice nozzle
This nozzle is suitable for sucking and cleaning the corners or
niches that cannot be reached with the floor brush. Besides, it
can be used as blowing tool. (Fig. K)
ATTENTION!
1. Make sure all the assembly is according to the instructions.
Connect the hose to the unit, then install the specific
accessories for the intended cleaning purpose. Insert the
plug into the socket. Press the ON/OFF switch button, start
the using. After using, press the ON/OFF switch button to
stop. Unplug the cord from the socket. (Fig. L)
WET VACUUMING
Caution! Always remove the dust bag when you commencing
wet vacuuming.
1. When picking up small amounts of liquid the HEPA filter
may be left in place.
2. When picking up large amounts of liquid we recommend
that the HEPA filter should be removed and install the
Sponge Filter (12). If the HEPA filter is not removed, it
will become saturated and misting may appear in the exhaust.
3. When the liquid in the drum reaches a predetermined
level, the float mechanism will rise automatically to cut off
air-flow, the indicator light turn on at the same time. When
this happens, turn off the vacuum, unplug the power cord,
and empty the drum .
4. After using the vacuum to pick up liquids, the HEPA
filter must be dried to reduce the risk of possible mildew
and damage to the filter.