
Instructions / Assembly


blackstoneproducts.com
8
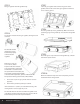
STEP 5
Take gas regulator o of the griddle body.
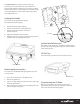
STEP 6
Screw in the LP bottle into the gas regulator, turning the tank
clockwise.
The LP bottle should
look like the picture
below when properly
connected to the
regulator.
Make sure to only use
a 3.8 x 7.8inch, 16.4oz
Propane bottle. The LP bottle
to be used must be constructed
and marked in accordance with
the specications for LP bottles, U.S.
Department of Transportation (DOT)
or the Standard for Cylinders, Spheres and Tubes for the
Transportation of Dangerous Goods, CAN/CSA-B339.
1. Do not store a spare LP gas cylinder under or near this
appliance;
2. Never ll the cylinder beyond 80 percent full.
If the instructions in 1) and 2) are not followed exactly, a re
causing death or serious injury may occur.
STEP 7
Insert the gas regulator and tank into the gas line of the
griddle, then turn the collar of the gas regulator clockwise to
secure it to the gas line.
STEP 8
Place the griddle top on the griddle body. Make sure the four
positioning pegs on the griddle top are seated into the griddle
body.
STEP 9
Attach the grease cup to the back of the griddle top, it should
look like the picture below.
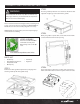
STEP 10
When the installation steps have been completed, your unit
should look like the image below.
The LP bottle must be disconnected when the griddle is not
in use. Only cylinders marked “propane” may be used. The LP
bottle must be positioned for vapor withdrawal.