DR350 User manual Ver 3.70 www.pittasoft.
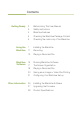
Contents Getting Ready Using the BlackVue BlackVue Software Other Information 2 Before Using This User Manual 3 Safety Instructions 4 BlackVue Features 5 Checking the BlackVue Package Content 6 Checking the main body of the BlackVue 7 Installing the BlackVue 11 Recording 13 Playing a Recorded File 16 Running BlackVue Software 17 The Screen Organization 18 Playing a Recorded File 20 Saving as an Image or Video File / Printing 21 Configuring Your BlackVue Set-up 26 Installing t
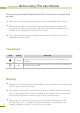
Getting Ready Before Using This User Manual Thank you for purchasing Pittasoft’s BlackVue. This product is a vehicle drive recorder. XX Make sure to read this manual thoroughly in order to use the BlackVue correctly. XX Pittasoft will continue to add new functions and enhancements and apply new technologies to this product. Any information and specifications contained in this manual can be changed without prior notice to users.
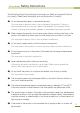
Getting Ready Safety Instructions The following instructions are given to ensure your safety and prevent the loss of property. Read them thoroughly and use the product correctly. ]] Do not disassemble, repair, or remodel the product. This may result in electrical shock, fire or damage to the product. Contact a service center when your product needs to be repaired. Your warranty will be voided if you have disassembled, repaired, or remodeled the product yourself.
Getting Ready BlackVue Features Normal Recording Records all circumstances while driving in high quality video. Parking Recording Automatic parking mode is provided. If the movement of the vehicles is not detected for a pre-determined period of time (by G-sensor), the mode automatically switches to parking mode. If the movement of the vehicle continues, the parking mode is automatically cancelled.
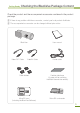
Getting Ready Checking the BlackVue Package Content Check the product and the accompanied accessories contained in the product package. NN If there is any problem with the accessories, contact your local product distributor. NN The accompanied accessories can be changed without prior notice. BlackVue Video OUT Cable Video IN Cable User manual Power cable Cable holders Double-sided tape X (A spare unit for mounting X the BlackVue onto the vehicle.
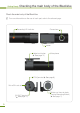
Getting Ready Checking the main body of the BlackVue Check the main body of the BlackVue. NN For more information on the use of each part, refer to the relevant page.
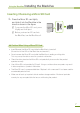
Using the BlackVue Installing the BlackVue Inserting / Removing a Micro SD Card 1. Press the Micro SD card lightly and slide it into the BlackVue in the direction shown in the figure. NN To remove the Micro SD card, press it lightly and it will eject. NN Before you insert an SD card into the BlackVue, turn the BlackVue off. ] Caution When Using a Micro SD Card • Insert/Remove the Micro SD card while the BlackVue is turned off. X (Ensure that all the LEDs of the BlackVue are turned off.
Using the BlackVue Installing the BlackVue Installing the BlackVue in a vehicle 1. Stop the engine and remove the key from the ignition. NN Install the BlackVue in a well-lit and safe location. 2. d Insert a Micro SD card into the BlackVue. NN For more information on using the Micro SD card, refer to page 7. 3. Attach the BlackVue to a windshield of your car using double-sided tape. NN We recommend that you install the BlackVue behind the rear view mirror.
5. Tie the power cable. NN Use the provided cable holder, if necessary. 6. djust the position of the camera A lens of the BlackVue. NN The BLACKVUE logo should be slightly further down than horizontal. NN Check the data saved during a test drive. Adjust the lens position, if necessary. NN If you connect a mobile video device (smart phone/navigation), you can adjust the angle of the lens viewing the video. ( See page 10.) 7. d tart the engine. Check whether the S BlackVue is installed correctly.
Using the BlackVue Installing the BlackVue Connecting the BlackVue to an AV Product Video OUT Cable 1. Video IN cable* Connect the BlackVue’s [AV OUT] terminal to the AV unit using the Video OUT/IN cable (accessory). NN You can view the real-time video of the BlackVue through the connected AV product. NN You cannot play the files recorded by BlackVue. NN If you use the [AV OUT] port of BlackVue, the frame rate decreases.
Using the BlackVue Recording Using the Normal Recording Function Start the engine. BlackVue turns on and starts the Normal Recording function. BlackVue records all the videos while the power is on. NN If you connect BlackVue with POWER MAGIC (a battery power controller), it is always on. NN If you select [Normal record Off] in the [Normal Record] in the Set-up screen, this function will be disabled ( See page 22).
Using the BlackVue Recording Using the Event Recording Function When the vehicle is running or parked, if the BlackVue detects an impact over a pre-determined threshold, the video of the before and after is automatically recorded. NN Go to the setup screen and adjust the settings for [G-Sensor] under Sensitivity.X ( See page 24). It is possible to configure different [G-Sensor] settings for the normal recording and parking recording functions.
Using the BlackVue Playing a Recorded File BlackVue recordings are saved in MP4 format so that you can easily play the recorded files using a general video player (PC, smart phone or navigation) without file format conversion. NN BlackVue recording files are saved in the ‘Record’ folder of the SD card.X X Playing Recorded Files with a smart phone Downloading BlackVue applications • Pittasoft provides useful BlackVue specific applications for your reference.
Using the BlackVue Playing a Recorded File Playing Recorded Files with a Navigation 1. Insert the SD card into the SD card adaptor. Then insert the adaptor (with the SD card inserted) into the SD card reader. 2. Connect the SD card reader to the navigation system. 3. Tap a play-related icon and select the removable disk that contains the video clips. 4. Tap on a video clip. The video clip will be played. NN Playing a video clip may differ depending on the device model.
Playing Recorded Files with a PC 1. Insert the SD card into the SD card adaptor. Then insert the adaptor (with the SD card inserted) into the SD card reader. 2. Connect the SD card reader to the PC. 3. Double-click the “BlackVue.exe” file in the “Applications” folder of the SD card. The BlackVue software will be launched. 4. Tap on a video clip to play it. NN For PC video player, you have to install H.264 video codec and AAC audio codec for normal playback.
BlackVue Software Running BlackVue Software When playing a BlackVue recording file on a PC, use the BlackVue player software. BlackVue software enables convenient playing and management of BlackVue recording files. NN You can use the BlackVue player directly without installing the program. 1. Insert the SD card into the SD card adaptor. Then insert the adaptor (with the SD card inserted) into the SD card reader. 2. Connect the SD card reader to the PC. 3. Double-click the “BlackVue.
BlackVue Software Recorded Date The Screen Organization Zoom In/OutX (Adjust using the mouse’s scroll wheel) Playing Screen View BlackVue Version information Save Image Save Video Print Set-up G-Sensor View File List Timeline 1 D isplay Calibration / Flip / Overlay / Date·time display button ( See page 19) 2 Play Control buttons 3 C ontrol the Playing Speed / Control the Volume 4 Play Time Types of Recorded Files : Indicates a Normal Recording file. This is shown in green in the timeline.
BlackVue Software 1. Playing a Recorded File lick the [ Browse] button and C select the folder in which the file is located. NN The files contained in the selected folder are displayed in the list. 2. ouble-click the file you want to D play. (Alternatively, select the file and click the button.) The selected file starts to be played. NN Scroll mouse wheel to Zoom In/Out in Playing Screen View. X (Min. 0.5X ~ Max. 2.0X) NN You can control the playing speed from 0.5x to 2.0x speed.
Adjusting the Screen XX (Display Calibration) Corrects display distortions. XX (Flip) Flips the display vertically. XX (Overlay) Activates the overlay feature supported by the graphics card. XX (Date-time button) The date and time has been made appear on top left of the screen. Using the timeline By using the timeline, you can view the recordings for each hour of the selected date at a single glance. In addition, you can easily search/play a file for the hour you require. XX 1 Select the date.
BlackVue Software Saving as an Image or Video File / Printing Saving the Selected Screen as an Image File / Printing 1. ause the file by clicking the P scene you want to save. button while it is being played. Select the NN To select the scene you want, select the seconds in the timeline or seek the scene by using the / buttons. 2. Click the button. Check the path in which the file will be saved and then click the Save button. The selected scene is saved as an image (jpeg or bmp) file. 3.
BlackVue Software Configuring Your BlackVue Set-up 1. Click the 2. Configure your BlackVue Set-up. 3. Select the drive to which the Micro SD card is connected. 4. Click the [Save & Close] button. button. The Set-up screen is displayed. NN Before clicking the [Save & Close] button, check that you correctly selected the drive to which the Micro SD card is connected. If the settings are not saved on the Micro SD card, your configuration of the BlackVue Set-up will not be performed.
BlackVue Software Configuring Your BlackVue Set-up 1 Time Zone Select the time zone where you are using the BlackVue. This setting is used for the time information for recorded files. 2 Image Setting XX Image Quality : Set the image quality for recorded files. The higher the image quality, the larger the file. XX Frame Rate : Set the frame rate for recorded files. XX Brightness : Controls the brightness of the recording. 3 ETC XX LED On : Allows you to selectively turn LEDs on or off.
XX Date and Time Display : Adds the date and time to the bottom left of the recording. XX Record File Unit : Sets the Recording File Unit when a file is saved. XX Event Recording File Protection (Storage Allocation) : Storage Allocation: When the storage is full, the oldest file is automatically deleted to record a new video. • By time : When the storage is full, the oldest file is automatically deleted regardless of its type. • By type : You can allocate storage space to each file type separately.
BlackVue Software Configuring Your BlackVue Set-up Setting the sensitivity 1 2 1 Sensitivity for Normal Recording Determines the sensitivity threshold of the G-sensor for the event recording function in permanent recording mode. 2 Sensitivity for Parking Mode Determines the sensitivity thresholds of the G-sensor and the motion detector for the event recording function in parking mode.
Advanced sensitivity setting Click the Advanced button for each of the settings. You can configure the sensitivity while watching a recorded video. 1. Open a recorded video (1). Play the video (2). 2. Configure the sensitivity while watching the video. XX XX G-sensor sensitivity setting : Adjust the sensor area moving the adjustment bar up or down.
Other Information Installing the BlackVue Software 1. Insert the micro SD card(accessory) into the PC. ( See page 15) 2. Double-click the ‘BlackVueSetup_E. exe’ file on the Micro SD card. 3. Follow the directions presented by the Setup program until you finish the installation. 4. Check that a shortcut to the BlackVue Software is created on the Windows Desktop. NN Double-click the shortcut to the BlackVue Software to run the program.
Other Information Upgrading the Firmware Firmware upgrade refers to upgrading the product by downloading a new version of firmware. By upgrading the firmware to the latest version, you can use BlackVue in better environment. 1. Insert the micro SD card into the PC. ( See page 15) 2. Go to the ‘www.blackvue.co.kr/ en’ webpage and download the firmware upgrade file. 3. Double-click the firmware upgrade file. Perform upgrade according to the instructions on the screen.
Other Information Product Specifications Camera ¼" CMOS sensor / 320,000 pixels Resolution VGA(640X480) / Max 30fps Compression Format Audio H.264 AAC LC View Angle Memory or Storage Device Diagonal: 121° / Horizontal: 94° / Vertical: 69° Micro SD card (Maximum 16GB) Normal Recording, Event (G-Sensor) Recording, Parking Recording (Motion Detection Algorithms) Recording Video Output Dimensions Weight Composite Diameter: 32.0 mm (1.26 inch) Length: 101.3 mm (3.
Warranty • The warranty of this product is 1 year from the purchase date. (The warranty period for accessories such as the battery and Micro SD card: 6 months) • Pittasoft provides the following warranty for our product in accordance with the Consumer Dispute Resolution Criteria (announced by the Korean Fair Trade Commission). When a service is requested, Pittasoft or an authorized partner will provide the service.
Pittasoft (Head Office) Address #1113, Newticastle, 429-1, Gasan-dong, Geumcheon-gu, Seoul, 153-779, Korea Hompage www.blackvue.co.kr/en Email sales@pittasoft.