DR380-HD / DR380G-HD / DR400G-HD / DR400G-HD II User's Manual www.blackvue.com BlackVue_Eng_0726.
BlackVue_Eng_0726.
Table of Contents Preparations BlackVue Usage BlackVue Software Others BlackVue_Eng_0726.
Preparations Before Reading the User's Manual Thank you for purchasing Pittasoft's BlackVue. This product is a video event data recorder (VEDR) for vehicles. XX Please read the User's Manual carefully before using the BlackVue. XX Pittasoft is planning to supplement its product and add new features via firmware on a constant basis. All information and specifications in this manual are subject to change without a prior notice.
Preparations Safety Instructions This manual is about what should be done to protect the user's safety and prevent property damage. Please make sure to read it thoroughly before using the product. Do not disassemble, repair and/or alter the product. This may cause a fire, an electric shock and/or malfunction. Contact the service center if you need to have the product fixed. User may not be entitled to free service if and when product malfunction is caused by user's fault.
Preparations Safety Instructions Cautions for GPS Usage GPS models Only XX Poor GPS reception will not affect video recording. It will only lead to a failure to record a vehicle's coordinates and speed. XX Please maintain the optimum temperature, which ranges 0 to 50 ºC from for proper working of GPS. GPS reception may get unstable or its connection time may be delayed in the midsummer or wintertime.
Preparations Product Features High-definition Video The BlackVue uses high quality mega-pixel lenses, which produce clear and sharp images even at night. Smartphone/PC Viewer The product comes with a PC viewer and applications for smartphones (running on Android). You can check images easily and customize various settings. Normal Recording The product makes a high-definition video recording of all the events while driving. Parking Mode Recording The product automatically shifts to the parking mode.
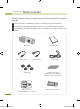
Preparations What's included Check the product and the accompanied accessories contained in the product package. Please contact your dealership if there is a problem with the components. *Components provided and optional items may vary depending on a model. Components provided and optional items are subject to change without a prior notice. BlackVue Video OUT Cable* 6 BlackVue_Eng_0726.
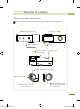
Preparations BlackVue At a Glance Check the main body of the BlackVue. For more information on the use of each part, refer to the relevant page. Recording Mode LED GPS Reception LED Camera Lens Holder GPS models only Holder lock button ( See page 11) Microphone [DC IN] terminal ( See page 9) Micro SD Card Slot [VIDEO OUT] terminal ( See page 11) Main Body Button (Parking Mode Recording Button) ( See page 12) 7 BlackVue_Eng_0726.
BlackVue Usage Installation Insert the Micro SD Card into the BlackVue 1. Insert the Micro SD card into the Micro SD slot in the same direction as shown in the picture. Press the card again to remove it. While doing this, be careful so that the Micro SD card won't pop out. Tur n of f the BlackVue before inserting the card into it. Cautions for Using the Micro SD Card yy Insert/remove the Micro SD card with the BlackVue off. (Check to see if all the LEDs on the BlackVue are off.
Install the BlackVue in the Car 1. Turn off the ignition and pull out the car key. Install the device in a bright and safe place. 2. Insert the Micro SD Card into the BlackVue. For instructions for use of Micro SD card, please refer to page 8. 3. Attach the BlackVue on the vehicle's window using double-sided tape. We recommend you install the device on the backside of the rearview mirror so that the BlackVue camera lens is at the center of the vehicle.
BlackVue Usage 5. Installation Organize the power cable. Use the provided cable clips if necessary. 6. Adjust the position of the BlackVue's camera lens. Install the product in such a way that the BL ACK VUE logo in the button section faces slightly lower than the level. Che ck the store d data af te r te st driving, and adjust the position of the lens if necessary. If you connect the product to portable video devices (smar tphone, GPS navigator, etc.), you can adjust the lens angle checking video.
Connecting the BlackVue to AV Product Or Video OUT Cable 1. Video IN Cable* Connect the BlackVue's [VIDEO OUT] terminal, to the AV product using the Video OUT/IN cable (accessory). You can check the BlackVue's real-time video on the connected AV product. If you use the BlackVue's [VIDEO OUT] port, you can reduce the video frame rate. The Video IN* cable may not be compatible with certain GPS navigators. Check the compatibility before use.
BlackVue Usage Recording Normal Recording Start the ignition. Doing this will turn on the BlackVue and start the normal recording. Recording will go on as long as the BlackVue is on. Connected to the Power Magic (UPS unit), the BlackVue will remain on. If you set [Set Normal Recording] in the configuration to [Normal Recording Off], normal recording becomes deactivated. ( See Page 27) Parking Mode Recording This product has [Automatic Shift to Parking Mode] as a default setting.
Event Recording If the BlackVue detects an impact above the threshold, the device automatically records video before/after the event. You can adjust the sensitivity of the BlackVue detecting an impact in [Set Sensitivity]. ( See Page 29) You can set different sensitivities between normal recording mode and parking mode. G-sensor (3-axis Acceleration Sensor) yy The BlackVue records event video with its G-sensor detecting an impact.
BlackVue Usage Playing Recorded Videos Recorded files of the BlackVue are saved in MP4 format. You can easily check the recorded video on media players (PC, smartphone, and GPS navigator) without converting the files. Recorded files of the BlackVue are saved in the ‘Record’ folder of the Micro SD card. Playing videos on your smart phone Download BlackVue Application yy We provide an application for the BlackVue. Using this application, you can easily play and manage video clips recorded by the BlackVue.
Playing videos on GPS Navigator 1. Insert the Micro SD card into the SD card adapter. Insert the SD card adapter into the SD card reader. 2. Connect the SD card reader to your GPS navigator. 3. Select a video play icon, and select the removable drive containing video files. 4. Press the desired video file, and playback will start. The way of playing video may vary depending on the product. For more information, see the user's manual for your navigator.
BlackVue Usage Playing Recorded Videos Check Video on PC 1. Insert the Micro SD card into the SD card adapter. Insert the SD card adapter into the SD card reader. 2. Connect the SD card reader to your PC. 3. Double-click the ‘BlackVue.exe’ file in the ‘Application’ folder in the Micro SD card, and the BlackVue will be launched. 4. Select the desired video file to play it. For a PC media player, you have to install H.264 video codec and AAC audio codec to play the video properly.
BlackVue Software Running BlackVue Software Use the BlackVue player to play files recorded by the BlackVue on your PC. The BlackVue software allows you to easily play and manage video recorded by the BlackVue. You can use the BlackVue player without installation. 1. Insert the Micro SD card into the SD card adapter. Insert the SD card adapter into the SD card reader. 2. Connect the SD card reader to your PC. 3. Double-click the ‘BlackVue.
BlackVue Software Screen At a Glance Playback Pane Screen Zoom in/out G-sensor Pane (Controlled by scrolling the mouse wheel) View BlackVue Version Information MyWay Viewer ( See Page 22) / Save Image / Print / Set Configuration GPS Information Pane File List Timeline F ull-screen View Button / Reverse Screen Button ( See Page 20) Play Control Buttons P lay Speed Control / Volume Control Duration MyWay Viewer, GPS information and map are only available for the GPS models.
BlackVue Software 1. Playing Recorded Files ress the [ P Browse] button to select the folder containing files. The files in the selected folder will appear on the list. 2. Double-click the desired file (Or, select the file and press the button), and the file will be played back. Double-click the playback pane for a full-screen view. Press the ESC button to return to the default screen size. Scroll the mouse wheel in the playback pane to zoom in/out the playback window. (from 0.5 times up to 2.
BlackVue Software Playing Recorded Files Display Settings XX (Full-screen button) Display the video in full screen. XX (Reverse screen button) Turns an image upside down. Timeline Bar Using the Timeline, you can check the recording status by the hour of the selected date. In addition, you can easily search/play the files recorded at the desired time.
Exporting/Deleting Files From the player file list, select a file and rightclick it to display the context menu. Select [Delete] to delete the selected file or select [Export] to save it in a different location. Video Export settings Set the file name and the location to save the file to export video. Set the section of video you want to export. Check this box to delete the sound when exporting video. Checking the Map GPS models only Select the Map tab when playing a recorded file.
BlackVue Software Playing Recorded Files Opening the MyWay Viewer Press the GPS models only button, and the MyWay Viewer window will appear. The driving route will appear on the map. XX Double-click the map, and the video of a driving route close to the clicked location will be played back.
BlackVue Software Saving as an Image File / Printing Saving the Desired Screen as an Image File 1. Press the button during playback to stop the screen. Select the desired screen. To search for the desired screen, select the Second unit in the Timeline, or press the / button to navigate. 2. ress the P button. Check the file saving path, and press the Save button. Save the selected screen as an image (jpeg, bmp) file. Printing the Selected Screen 1.
BlackVue Software Configuring BlackVue Settings 1. Insert the Micro SD card into your PC. ( See Page 16) 2. Press the button, and the Configuration window will appear. You cannot set configuration if the SD card with the BlackVue Firmware installed is not connected to the PC. 3. Customize your BlackVue experience. 4. Press the [Save & Close] button. You cannot set configuration for BlackVue if the settings are not saved in the Micro SD card.
Basic Settings [ DR400G-HD II ] [ DR400G-HD ] 25 BlackVue_Eng_0726.
BlackVue Software Configuring BlackVue Settings [ DR380G-HD ] [ DR380-HD ] 26 BlackVue_Eng_0726.
Time Zone Select the time zone where the BlackVue is used. This will be used as time information for recorded files. Image Setting XX Image Quality : Set the image quality of a file to record. Higher image quality will increase the file size. Supported Image qualify differs depending on the model. XX Video Compression : Set the video compression. Higher image compression will reduce the file size. Some mobile devices may not be able to play recorded files with a high image compression.
BlackVue Software Configuring BlackVue Settings Recordable Time by Memory Capacity The recordable time is one hour on the basis of continuous recording. In actuality, the time may be slightly different. DR400G-HD / DR400G-HD II Image Quality Memory Capacity Image Compression : Normal Full HD 30frames Full HD 15 frames HD 30 frames HD 15 frames D1 30frames 8GB 2 hr. 15 min. 3 hr. 23 min. 3 hr. 23 min. 5 hr. 41 min. 8 hr. 30 min. 16GB 4 hr. 37 min. 6 hr. 54 min. 6 hr. 54 min. 11 hr. 29 min.
XX Voice Recording Settings: Whether to use the voice recording function or not. XX Date and Time Display: Displays date and time in the bottom left corner of the screen while recording. XX Speed Display GPS models only : Displays the speed of a vehicle in the bottom left corner of the screen. Select the desired speed unit to display. If you select [Display Off], the speed of a vehicle will not be displayed in the recorded files. XX Record File Unit : You can set the file saving unit when recording.
BlackVue Software Configuring BlackVue Settings Setting the Sensitivity Normal Recording Mode Set the sensitivity of G-sensor by which event recording starts in the Normal Recording mode. Parking Mode Set the sensitivity of G-sensor and motion detection by which event recording starts in the Parking mode. 30 BlackVue_Eng_0726.
Advanced Settings of Sensitivity Press the Advanced Setting for each setting. You can easily set sensitivity viewing recorded video. 1. Load a recorded file (). Play the loaded file (). 2. Set sensitivity viewing the video being played. Adjust the sensor area by moving the control bar up and down. () XX If the sensor area is wide, "insensitive", and if it's narrow, "sensitive".
BlackVue Software Configuring BlackVue Settings Other Settings [ DR400G-HD ] XX LED On : You can turn on/off LED in the recording status display section. XX Button LED : You can change the color of LED in the button section or turn it off. XX Voice Alarm : The BlackVue product plays voice messages during certain events. This option allows you to selectively enable/disable the voice messages.
[ DR380-HD / DR380G-HD / DR400G-HD II ] XX Recording Status LED : You can turn on/off LED in the recording status display section. XX Button LED : You can turn on/off LED in the button section where appropriate. XX Voice Alarm : The BlackVue product plays voice messages during certain events. This option allows you to selectively enable/disable the voice messages. XX Alarm Volume : Adjust the volume of voice guide.
Others Installing the BlackVue Software You can install the BlackVue software in your PC. 1. Connect the Micro SD card to your PC. ( See Page 16) 2. Double-click the BlackVueSetup(HD). exe file in the ‘Software’ folder in the Micro SD card. 3. Complete the program installation as directed by the installation program. 4. heck to see if a BlackVue software C shortcut is installed on your desktop. Double-click the BlackVue software shortcut to run the program. 34 BlackVue_Eng_0726.
Others Upgrading the Firmware Firmware upgrade means upgrading the existing product by downloading a new version of firmware. Upgrading to the latest firmware allows you to use the BlackVue in a more optimum environment. 1. Insert the Micro SD card into your PC. ( See Page 16) 2. Download the firmware upgrade file at our website. (www.blackvue.com) 3. Double-click the firmware upgrade file. Execute the upgrade as directed by the program. Upgrade the SD card with a new firmware.
Others Product Specifications Model Name DR400G-HD II / DR400G-HD Camera Resolution DR380G-HD DR380-HD CMOS Sensor / 2,073,600 Pixels FULL HD(1920x1080) / Up to 30fps HD(1280X720) / Up to 30fps HD(1280X720) / Up to 30fps Compression Type H.
Others Product Specifications ❏❏ LED Status Display LED Status On Boot REC Button Section GPS GPS models only Off Blinking - Normal Blinking (Orange) - - Event Blinking (Red) - - Parking Blinking (Green) - - No SD Card Off Rapid Blinking - Power Off Alternate Blinking (Red/Green) - - Insufficient Storage Space On (Orange) - - Recording GPS Reception - Green No Reception - - 37 BlackVue_Eng_0726.
Memo 38 BlackVue_Eng_0726.
Memo 39 BlackVue_Eng_0726.
Memo 40 BlackVue_Eng_0726.
Warranty Certificate yy The warranty period of this product is one year from the purchasing date. (6 months for accessories such as battery/Micro SD card) yy yy We provides warranty for our products in accordance with the Consumer Complaints Settlement Standards (Notification of the Fair Trade Commission). After-sales service will be offered by Pittasoft or our designated contractors. If the product is used for business purposes, its warranty period shall be reduced by half.
Pittasoft Headquarters in Korea Address #371-17, 7th fl., BYC Hi City Center A, Gasan-dong, Geumcheon-gu, Seoul, Korea Home Page www.blackvue.com E-mail as@pittasoft.com Service Center 1599-2772 Fax 02-6947-4697 BlackVue_Eng_0726.