
User Manual


5
EN
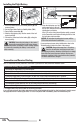
Installing the Transmitter Batteries (RTF)
Replace the transmitter batteries when the
transmitter beeps.
Transmitter Setup (BNF)
Program your transmitter before attempting to bind or fl y
the helicopter. Transmitter programming values are shown
below for the Spektrum DX6i, DX7s, DX6, DX7, DX8, DX9
and DX18.
The fi les for models using Spektrum
™
transmitters with
Spektrum AirWare
™
software are also available for down-
load online at www.spektrumrc.com.
Your helicopter is also compatible with Spektrum DXe radios
with software version 1.3 or higher. Use the directions below
to reverse channel 6, or use the appropriate programming
cable and the PC or mobile app to program the DXe. We
recommend downloading the Blade 120 S DXe model setup
available at www.spektrumrc.com.
If you are programming your DXe using the PC or mobile
app, make sure the "Transmitter Channels" value is set to
the default of 7. If for any reason this value is changed
to 9, the 120 S will bind to the DXe, but will not respond to
control inputs.
If your DXe was included in another Blade
®
Ready To Fly (RTF)
helicopter, the transmitter software will have to be updated
using the appropriate programming cable and either the PC or
mobile app available at www.spektrumrc.com.
Please note, the switch confi guration used for DXe transmit-
ters included with the Blade 230 S RTF and Micro AH-64
Apache™ RTF varies from the standard DXe layout.
After reversing channel 6, bind the transmitter and
helicopter normally.
Flight modes are controlled by the Flight Mode switch.
Panic Mode is controlled by the Bind/Panic/Trainer button.
Once bound, the LED in the helicopter should glow blue for
fl ight modes 0 and 1 (Stability, Low-Angle and High-Angle
Modes), and glow red for fl ight mode 2 (Agility mode).
If the LED glows blue in all three fl ight modes, channel 6
has not been reversed correctly. Use the directions above
to reverse channel 6.
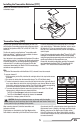
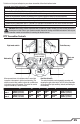
To use the DXe transmitter with the Blade 120 S, channel 6 must be reversed.
To reverse channel 6:
1. While powering on the DXe, hold the left and right sticks in the top-inside corners
as shown.
2. Re-center the sticks after the transmitter beeps. The LED will fl ash slowly.
3. To select a channel to reverse, move the right stick to the left or right and allow it
to re-center. Move the stick to the right to select the next channel. Move the stick
to the left to select the previous channel. The LED will fl ash rapidly corresponding
to the channel selected, as shown in the table. Select channel 6.
4. To reverse the selected channel, move the right stick up or down. The LED will
change color to indicate the new channel direction.
The LED will fl ash Orange to indicate the channel is normal.
The LED will fl ash Red to indicate the channel is reversed.
5. To store the changes, power off the DXe.
CAUTION: During the subsequent power up, always verify the throttle
direction is correct and keep clear of the motor and rotor blades. Failure to do
so may result in injury or damage to the product.
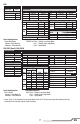
DXe
LED Flashes Channel
1 1-Throttle
2 2-Aileron
3 3-Elevator
4 4-Rudder
5 5-Flight Mode
6 6-Panic
7 7-Flaps
8 8-Aux Channel