
Service manual

XTR Electric Powerboard
Service Manual
www.tanaka-usa.com custsvc@tanaka-ism.com
Revison 002
7
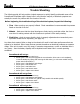
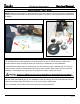
Wheel Removal - Front Wheel
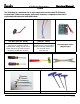
Figure 5 Figure 6
The front wheel is held in place with a solid axle, and can be removed with two 17mm wrenches and/or
sockets. Remove the locking nut from one side of the wheel, and gently tap the axle through the wheel. This
will free the wheel assembly from the frame. (Fig. 5)
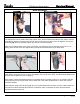
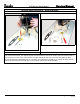
To disassemble the wheel for servicing the tire and/or tube, you must first remove the brake disc. Removal
requires a 4mm hex wrench. Note that each of the four bolts use spacers between the disc and the wheel.
With the disc removed, it is possible to access the four bolts and nuts that secure the two halves of the wheel
assembly together. (Fig. 6) The hardware securing the two wheel halves will require a 13mm wrench or
socket and a 6mm hex wrench.
CAUTION: Be sure to deflate the tire prior to attempting to disassemble the two wheel
halves. Tire and components can cause serious injury if you attempt to separate while inflated.
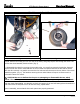
With the wheel disassembled, it is advisable to check the integrity of the two ball bearings that ride within the
hub of the wheel. If they feel worn or do not turn freely, replace them.
Upon re-assembly, ensure that the three axle spacers are properly positioned.