
Service manual

XTR Electric Powerboard
Service Manual
www.tanaka-usa.com custsvc@tanaka-ism.com
Revison 002
8
Wheel Removal – Rear Wheel
NOTE
: Extreme caution should be used when servicing the drive chain or rear wheel. Service or maintenance
involving the chain should ONLY be performed when power to the electric motor has been disconnected from
the battery.
Figure 7
Figure 8
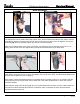
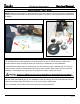
Begin by removing the axle lock-nut with a 17mm wrench or socket. Gently tap the axle through the wheel.
This will allow the rear wheel assembly to be slid forward far enough to remove the chain from the rear
sprocket. With the chain removed the entire rear wheel can be separated from the PowerBoard.
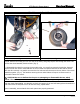
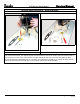
To disassemble the wheel, begin by removing the rear drive sprocket, which is attached with four hex-hole
screws on newer models, and is threaded to the hub on earlier versions. Next, remove the four large allen
head bolts. The hardware securing the two wheel halves will require a 6mm hex wrench.
CAUTION: Be sure to deflate the tire prior to attempting to disassemble the two wheel
halves. Tire and components can cause serious injury if you attempt to separate while inflated.
With the wheel disassembled (Fig. 8), it is advisable to check the integrity of the two ball bearings that ride
within the hub of the wheel. If they feel worn or do not turn freely, replace them.
Upon re-assembly, ensure that the three axle spacers are properly positioned.