A WARNING: if the information in this manual is not followed exactly, a fire or explosion may result causing property damage, personal injury or death, Anti-Tip stability device A\ WARNING: *A child or adult can tip the range and be killed. “Failure to do so can resell in deal or serious burns to children or adults.” install the anti-tip device 1o the structure and/or the range.” "Engage the range to the anti-tip advice by anti-IP brackets given with oven as shown in Figure.2.
/\ Please read these instructions before installation or using your appliance! Dear Customer, We would like you to obtain best performance with your product that has bean manufactured in modern facilities and passed through strict quality control procedures, Therefore, we advise you to read through this user manual carefully before using your product and keep it for future reference. If you hand over the product to someone else, deliver the user manual as well.
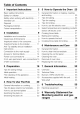
Table of Contents 1 Important Instructions 5 § How to Operate the Oven 23 Casio safely instructions for children . Safely when workman with Neut 7 Intended use . ..o 7 Disposal Packaging menial ., . Future transportation. .. 8 2 Installation 9 Installation and connection Clearances & Dimensions Important noels to the consumer. . .. Important Notes 1o the installer 11 Anti-Tip stability device installation instructions Connection to the main sup Access to Terminal Block RPaower.cord conceptions.
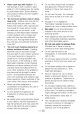
n Important Instructions Basic safety instructions * This appliance is not intended for use by persons including children) with reduced physical, sensory or mental i or lack of experience and knowledge, unless they have been given supervision or instruction concerning use of appliance by a person responsible for their safety. Children should be supervised to ensure that they do not play with the appliance.
Clean cook-top with caution if & wet sponge or cloth is used to wipe spills on a hot cocking area. be careful to avoid steam burn. Some cleaners can produce noxious furies if applied 1o a hot surface.
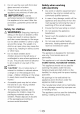
* Do not use the oven with front door glass removed or broken, » Heck that all controls on the appliance are switched off after use. (& IMPORTANT: car tne authorized service for Installation of the appliance to be used, After this procedures, guarantee period will be started, Safety for children A WARNING: Stepping, leaning or sitting on the door or drawers of this range can result in serious injuries and also cause damage to the range. Do not allow children o climb or play around the range.
Disposal Packaging material N\ DANGER: Risk of suffocation by the packaging materials! Packing elements {L.e. plastic bags, polystyrene foam, nails, packing straps, etc.) should not be eff around within easy reach of children, as these may cause serious injuries. The packaging material and transport locks are made from materials that are not harmful to the environment, Please dispose of all parts of the packaging according fo environmental standards, This Is beneficial to the environment.
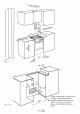
E Installation To ensure that critical alr gaps are maintained under the appliance, we recommend that this applier is mounted on & solid base and that the feet do not sink into any carpet or soft flooring. The kitchen floor must be able to carry the weight of the appliance plus the additional weight of cookware and bake ware and food. * [fan appliance hood is to be fitted, refer to the manufacturer's Instructions regarding fixing height.
Fig. 1 / Proper positioning of outset must be flush . Nothing located in shaded area can extend more than 27 (5, 1cm} from wall or tangs will not slide all the way Fig.
Important Notes to the Installer Read manual before installing the range. Observe all governing codes and ordinances. Be sure to leave these instructions with the consumer.
Anti-Tip stability device installation instructions Hers is only one arthritis-tip stability device within product, You can use it for right back foot or left back foot. 1. The anti-tip device has to be attached to the rear wall as shown in Figure 3.
appliance from the mai LRl Disconnect power before servicing. Use 8 gauge copper for 6 gauge aluminum wire. Electrically ground range. Failure to follow these instructions can result in death, fire, or electrical shock. A\ IMPORTANT: Eclectic installation should comply with national and local codes. A IMPORTANT: Thai appliance must be properly grounded to avoid shack hazard! Our company shall not held responsible for any damage caused by using the appliance without grounded receptacle.
A) 4-wire wall B} 3-wire wall traceable receptacle (14-50R (10-50R) Access to Terminal Block 1. Terminal block 2, Terminal holder 3. Terminal block cover 4, Supply cord Loosen the screws on rear aces cover and take out the terminal block cover see Figure 4. After compelling connections put intermingle block cover to the original location and lighten the screws, Power cord connections A WARNING Risk of electric shock! Frame grounded to neutral of appliance microlight a link.
3. You must disconnect the ground strap. Remove the factory installed ground screw and plate to release the copper ground strap from the frame of the range, Cut and discard the copper ground spar and plate, Keep the ground craw, 4. Connect to line 1 and fine 2 to the terming block. Connect the neutral to the terminal block as shown in figure 10.
Note: For wire permanent connection skip steps 3 and 4 and continue with step 5. 3 Disconnect the ground strap. Remove the factory installed ground screw and lug connector to release the factory installed copper ground strap from frame of the range. Cut and discard the copper strap from the terminal black. Keep the ground craw, lug connector and go to step 4. 4 Connect the green ground wire lead to the frame of the range using the: ground screw and lug connector as shown in figure 6.
3-Wire Connection germinal block Connect line T here. Connect fine 2 here. N A user supplied strain Round relief clamp must strap be installed at this location, It requires 1 cinches (3,5 cmy la meter cord kit hole. Note: Install strain relief clamp. Center must always be attached to the central terminal on block. * To deign the appliance with the worktop, adjust the feet turning right or left hand as required.
Preparation Tips for saving energy The following tips will help you to use your appliance in an ecological way and o save energy: » Use dark colored and enamel coated trays, since the heat transmission will be better. * While cooking your meals, perform a preheating operation it it is advised in the user manual or cooking instructions. ® During cooking, do not open the oven door frequently.
Do not south the hot surfaces of the appliance. Use oven gloves. Keep children away from the appliance. A IMPORTANT: Smelt and smoke may emit during first healing. Ensure that the room Is well ventilated. Any production residues or conservation layers must be bur mi off before the first use, Heat up the appliance for about 30 minutes and then switch it off, Electric oven 1. Take all baking trays and racks from the oven, 2. Close oven door. 3. Select top and bottom heat with the function knob. 4.
n How To Use The Hob General information on cooking A DANGER:Risk of fire by overheated oil! When you heat oll, do not leave it unattended. Never try to extinguish the fire with water! When oll has caught fire, immediately cover the pot o pan with a lid. Switch off the burner/plate if safe to do 50 and phone the firs service. Only use flat bottomed pots or pans. * Use pans which have sufficient capacity for the amount of food being cooked so they don’t boll over and cause unnecessary clearing.
not extend over adjacent surface units, To reduce the risk of burns, ignition of flammable materials, and spillage due to unintentional contact with the utensil, the handier of a utensil should be positioned so that iris muted inward, and does not extend over adjacent surface units. Plashes may damage the ceramic surface and can cause fire, Do not use pots that have concave or convex bottoms, Use pot and pans with smooth ottomans. They ensure a good heat transfer.
The glass ceramic burner/plate is equipped with an aerating lamp and & residual heat indicator The residual heat indicator indicates the position of the switched on plate and reaming fulminated after switching off, (When the temperature of the plate falls below touchable temperature the indicator light will go off). Weak flicker fulmination is not a problem at residual heat indicator light. [ENTICE Quick heating glass-ceramic plates emit & bright light when they are switched on.
E How to Operate the Oven General information on baking, roasting and broiling /A DANGER: Risk of scalding by hot steam! Stand away from the range wham opening oven door. Hot air or steam which escapes can cause burns 1o hands, Ace, and/or eyes. L&t hot afr or steam escape before reproving or replacing food. Tips for baking *« Use non-stick coated appropriate metal plates or aluminum containers or hesitant silicone molds. » Make best use of the space on the rack.
Select temperature and operating mode 2. Function knoll 1. Function lamp 3.Thermostat knee 4. Thermostat lamp The operating modes of the electric oven are selected with the function knob. The temperature is adjusted with the thermostat knob. All vane functions are turned off by firming the relevant knob o off upper) position. 1. Set thermostat knob to the desired temperature. 2. Set function knot to the required operating mode., The oven heats.up.to.the adjusted temperature and maintains it.
Tips for baking cakes 1. ¥ pastry is too dry, » Increase the temperature by 80°F and reduce the cocking time. 2. I pastry dropped, » Use less liquid or lower the temperature by 50°F. 3. pastry Is too dark on top, » Place it on a lower rack, lower temperature, and increase the cooking time. 4, i cocked well on the inside but sticky on the outside, » Lase less liquid. lower the temperature, and increase the cooking time Tips for baking pastry 1.
» Make sure that the amount of sauce you have used for the pastry is not too much at the bottom of the pastry, Try to scatter the sauce equally between and on the dough layers for an even browning. » Gook the pastry in accordance with the mode and temperature given in the cooking table. I the bottom part is steel not browned enough, place it on one layer-lower shelf next time. Tips for cooking vegetables 1.
Fahd Cooking label Rack Temperature ¥ Cooking number position time fir} {approx. Cal in tray Ionize label 4 350 25 .30 Cake in mold One level 2 355 40 .. 50 Ales in papa | One label 3 350 25..80 2 levels 1-5 350 loves 1-3-8 360 45 .. B85 Pongs cake One love 3 30 5..10 2 loves 350 20 .30 Cookies One level 3 350 25..30 2 loves 1-5 350-37% 80 .. 40 gravels 1-3-5 350 35 .45 ugh pastry One label 2 390 30,40 2 levels 1-5 390 loves 1-3-8 390 55 .. 65 Fined savory One love 2 30 25..
How to operate the broil N\ IMPORTANT: Before using the oven the clock time must be set. If the clock time is not set, the main vane will not work. A\ WARNING: Hot surfaces may cause bums! Close oven door during broiling, Switch on broil 1. 8et the function knob onto the broil symbol. 2. Set biol temperature, 3. Preheat for approximately 5 minutes, if it is necessary. » The thermostat lamp is switched on. Switch off broil 1.
fl Maintenance and Care General information /A DANGER: Risk of electric shock! Switch off the electricity before cleaning appliance to avoid an electric shock. DANGER: Hot effaces may cause bums! Allow the appliance to cool down before you clean it. A NOTICE: The surface might get damaged by some detergents or cleaning materials, Do not use aggressive detergents, cleaning powder/cream or any sharp objects. Be careful to avoid steam burn. Some cleaners can produce noxious fumes i applied to a hot surface.
Cleaning the control panel A NOTICE: Carnage of the control panel Do not removal the control nabs for control panel cleaning. Clean control pane and control knobs, Cleaning the oven No oven cleaner or any other special cleaning agent is required for cleaning the oven. It is rerecorded o wipe the ova with a damp lath while it is steel warm. Do not allow fat or ills te build up in the oven base, of Oven access ones, To clean the side wall, 1.
A NOTICE: Steps carted out during removing process should be performed in reverse order {steps 4, 3, 2 and 1) o reattach the door. Do not forget to close the clips at the hinge housing when reinstalling the door.
General Information Overview 1 Ceramic hotplate 2 Wig shelf 3 Handle 4 Front door & Bottom drawer Foot Shelf positions Control panel Eviscerate surface 1 Function lamp 2 Function knob 3 Thermostat knob 4 Thermostat lamp & single-circult cooking plate rear left Single-circuit caking plate front left Single-cir Clit cooking plate Front right Single-circuit cooking plate Rear right Hotplate warning lamp
Technical Data GENERAL Outer dimensions theight/width/depth) 172 inches Voltage/frequency 1207240V ~ 80 Hz Total electric power B8 kw Fuse protection min. 40 A Cable ype / pros notion DTR 4x10 AWG Maple length max. 6 ft Burnisher 24200 88 Rear fell Single-circuit cooking plate Size 5.5 inches Power 1200 W Front left Single-circuit cooking plate Size 7 inches Power 1800w Fran right Single-circuit cocking plate Size 5.
1. Oven rifler 2 Rawer rifler A IMPORTANT: Do not remove drawer while hot or during operation. Be suite drawer Is empty before removing. Placing drawer Position drawer roller (2) on top of vane roller {1} and slide drawer between two rails. * Do not use the warming drawer as a storage drawer. ¢ Touchdown the interior surface of the range. Proper positioning of the wire shelf on sliding shelves tits Important to position the broil and/or dripping pan on the wire shelves correctly.
E Troubleshooting /A DANGER Risk of electric shock, short circuit or fire by unprofessional repairs! Repairs on the appliance must be carder out by an approved service center, Electrical equipment Normal operating conditions . Smoke and smell may emit for a couple of hours during the first operation. iris normal that steam escapes during operation. When the metal parts sre heated, they may expand and cause noise.
E Warranty Statement for Bloomer electric and gas ranges The warranties provided by Bloomer in these statements only apply to Bloomer electric and gas ranges sold to the original purchaser or homeowner in the US and Canada. This warranty Is not transferable, To ol warranty service, please contact our nearest distributor as listed by state or call 1800-459-8848. You will ends your electric or gas range mode! nurturer, serial number, retailer name and where purchased and purchase date / installation date.
TO THE EXTENT PERMITTED BY LAW, THIS WARRANTY 1S IN LIEU OF ALL OTHER EXPRESSED AND IMPLIED WARRANTIES, INCLUDING THE IMPLIED WARRANTIES Of MERCHANT ABILITY AND FITNESS FOR A PARTICULAR PURPOSE. BLOOMER UNDERTAKES NO RESPONSIBILITY FOR THE QUALITY OF THIS PRODUCT ACCEPT AS OTHERWISE PROVIDED IN THIS WARRANTY STATEMENT, BLOOMER ASSUMES NO RESPONSIBILITY THAT THE PRODUCT WILL BE FIT FOR ANY PARTICULAR PURPOSE FOR WHICH YOU MAY BE BUYING THIS PRODUCT, EXCEPT AS OTHERWISE PROVIDED IN THIS WARRANTY STATEMENT.