Refrigerator FNT 1670 XT D Bedienungsanleitung
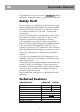
GB Index Safety first /1 Technical Features /1 Electrical requirements /2 Transportation instructions /2 Installation instructions /2 Temperature control and adjustment /3 Before operating /3 Indicator lights /4 Storing frozen food /4 Freezing fresh food /4 Fast freeze /4 Making ice cubes /5 Defrosting /5 Getting to know your appliance /5 Cleaning and care /6 Repositioning the door /7 Do’s and don’ts /7 Trouble - shooting /8 1-8
1 2 3 2 4 9 5 9 4 4 6 7 8 Fig.
5 6 Fig. 2 Fig.
1 3 5 4 3 5 6 2 45 ° 9 7 8 10 20 18 17 16 180° 18 24 22 21 23 19 13 Fig.
48 1010 0000
GB Instruction Manual Congratulations on your choice of a Quality Appliance, designed to give you many years of service. Safety first! Do not connect your appliance to the electricity supply until all packing and transit protectors have been removed. • Leave to stand for at least 4 hours before switching on, to allow compressor oil to settle, if transported horizontally.
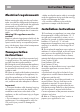
GB Instruction Manual Electrical requirements • Make sure that the mains cable is not caught under the appliance during and after moving, as this could damage the cable. • Do not allow children to play with the appliance or tamper with the controls. Before inserting the plug into the wall socket make sure that the voltage and the frequency shown in the rating plate inside the appliance corresponds to your electricity supply. Ensure that the plug remains readily accessible.
GB Instruction Manual Before operating Temperature control and adjustment Final Check Before you start using the freezer check that: 1. The feet have been adjusted for perfect levelling. 2. The interior is dry and air can circulate freely at the rear. 3. The interior is clean as recommended under "CLEANING AND CARE." 4. The plug is inserted into the wall socket and the electricity supply is switched on. Avoid accidental disconnection by taping over the switch.
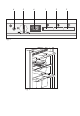
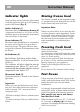
GB Instruction Manual Indicator lights Storing frozen food There are three coloured indicator lights located inside the appliance which show the operating mode of the freezer (Fig. 2). Your freezer is suitable for the long-term storage of commercially frozen foods and also can be used to freeze and store fresh food.
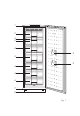
GB Instruction Manual Making ice cubes Getting to know your appliance (Fig 3) Fill the ice - cube tray 3/4 full with water and place it in the freezer. Loosen frozen trays with a spoon handle or a similar implement; never use sharp-edged objects such as knives or forks. (Fig. 1) 1.Control Panel 2.Flap (Fast-Freeze compartment) 3.Ice cube tray & Ice bank 4.Big drawer (190 mm. height) 5.Big drawer (250 mm. height) 6.Small drawer (190 mm. height) 7.Air grille 8.Adjustable front feet 9.
GB Instruction Manual Cleaning and care • Lift it up. • Clean and wipe it dry • Reassemble, reversing the sequence and operations 12. To remove a drawer, pull it as far as possible, tilt it upwards and then pull it out completely. 1. We recommend that you switch off the appliance at the socket outlet and pull out the mains plug before cleaning. 2. Never use any sharp instruments or abrasive substances, soap, household cleaner, detergent or wax polish for cleaning. 3.
GB Instruction Manual Don’t- Leave the door open for long periods, as this will cause electricity waste and excessive ice formation. Don’t- Use sharp-edged objects such as knives or forks to remove the ice. Put hot food into the freezer. Let it cool down first. Don't- Put liquid-filled bottles or sealed cans containing carbonated liquids into the freezer, as they may burst. Don't- Store poisonous or dangerous substances in the freezer.
GB Instruction Manual Trouble - shooting If the appliance does not operate when switched on, check; • That the plug is inserted properly in the socket and that the power supply is on. (To check the power supply to the socket, plug in another appliance) • Whether the fuse has blown/circuit breaker has tripped/main distribution switch has been turned off. • That the temperature control has been set correctly. • That the new plug is wired correctly, if you have changed the fitted, moulded plug.