
User manual
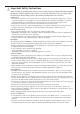


Prior to Initial Start–Up
Please clean the appliance interior and all accessories prior to initial start-up (see section: “Cleaning and
Care”).
Remove the ice packs from the appliance.
Only put the ice packs to freeze in the top drawer after the optimal storage temperature of –18°C has
been reached.
Re-freeze thawed ice packs in the same way, e. g. after cleaning the appliance.
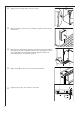
☞
☞
☞
☞
25
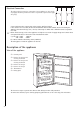
Ice packs
There are three ice packs in one drawer of the freezer.
Refer to the section “Prior to Initial Start–Up” concerning freezing of the ice pack.
In the event of a power failure or malfunction, the ice packs will lengthen the amount of time it takes
for the frozen food to defrost by several hours.
The ice packs can only fulfil this task optimally if they are placed in the uppermost drawer, at the front,
above the frozen food.
You can use the ice packs for cooling cold bags.
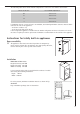
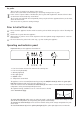
Operating and indicator panel
Important! Only use the appliance when built-in!
1 Fast freeze button and used to switch off the warning tone
2 Fast freeze light (amber)
3 Warning light (red)
4 Pilot light (green)
5 ON/OFF switch
6 Temperature control knob
The appliance can be activated/deactivated by pressing the
ON/OFF switch (5). When the green pilot
light (4)
is illuminated this shows that the appliance is on.
A coin in needed to turn the
thermostat control knob (6). This makes it is more difficult to change the
temperature setting accidentally (child protection).
➁ ➂ ➃ ➄➀ ➅
The optimum storage conditions occur at -18°C and can be checked
at the
thermometer (fig.).
The green pilot light (4), which comes on when the panel is switched on and the mains voltage is avail-
able. In this switch position, the refrigerating unit operates automatically.
The
thermostat control knob (1) can be used for variable setting of the storage temperature for your
frozen food.
The
fast-freeze button (1) with its yellow pilot light (2). The yellow pilot light comes on when the