
Installation Guide


Suboor Construction
These types of wood suboors are acceptable.
Plywood that is a minimum of 5/8” thick (3/4” is preferable
and recommended), installed with long edges at a right angle to
16” on center oor joists and staggered so that the end
joints in adjacent panels meet over different joists.
Nail at each bearing with 6d threaded or 8d common nails
spaced 10” on center along intermediate joists
1” x 4” to 6” wide, square edge, kiln dried coniferous
lumber, laid diagonally over 16” center wooden
joists. The ends of all boards should be cut parallel to the center
of the joists for solid bearing. Face nail each board at every
bearing on the joists with two nails (7d threaded or 8d common).
23/32” minimum OSB on 19.2-inch maximum center oor
joists properly nailed or minimum 7/8” Plywood or 33/32 OSB
suboor on 24” center oor joists or trusses.
Particle board of any thickness is NOT allowed.
Installing a solid oor over concrete. Additional suboor
is required.
Moisture Test the Concrete rst. Test several areas including
near exterior walls. Acceptable tests for suboor moisture
include:
Electrical Impedance Test and Electrical Resistance
Test (Concrete Moisture Meters). Follow the manu-
facturer’s instructions and do not install the oor if the
meter shows there is excess moisture.
Relative Humidity Test (standard test method for
determining relative humidity on concrete slabs is
utilizing Situ Probes). If test shows over 75%, a vapor
retarder must be used or wait for further curing.
Calcium Chloride Test (ASTM F-1869). Reading over
5 lbs. are unacceptable and must be corrected prior to
installation.
This oor may not be installed directly over concrete.
An additional wood suboor is required over the concrete. Refer
to the National Wood Flooring Association’s SubFloor Guidelines
for additional information and guidance.
Tools Needed
• Moisture meter for wood and/or concrete
• Moisture inhibiter (such as 15 lb. asphalt saturated felt, Silicone
Vapor Shield paper and Aquabar ®B)
• Premium grade urethane
(if using, see under Suboor and Preparation)
• Tongue and groove adhesive or wood glue (if installing any
boards that have been ripped lengthwise to a width of 1” or less)
• Chalk line and chalk
• ¾” Wood or plastic spacers
• Pencil
• Tape measure
• Hammer
• Safety glasses
• Dust mask
• Circular/rip saw-80 tooth blade
• Jamb saw
• Flooring nailer with proper size fasteners
(see Installation Methods)
• Electric drill and bits
• 6-8d nish nails
• Putty / Stain repair pen
Suboor and Preparation
Suboors must be at to within 3/16” in a 8’ radius. Use a straight edge to
determine atness throughout. Suboor irregularities may cause any wood
ooring installation to develop hollow spots between the oor and suboor.
Irregularities should be corrected before proceeding with the installation. If
the oor exes, it may cause squeaking or over time the fasteners may work
loose.
Clean the suboor by removing any paint, wax, plaster, sheetrock, mud, etc.
Sweep or vacuum thoroughly.
As part of your suboor prep, remove any existing quarter round, shoe
molding or doorway thresholds. They can be replaced after installation in
such a way as to allow the required expansion space around the perimeter of
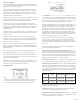
the room. All door casings should be notched
out or undercut to avoid difcult scribe cuts
and allow the ooring to easily go under the
casings. Use a piece of the new ooring on
the suboor as a height guide for your hand-
saw or jamb saw (See Figure 2).
Once an acceptable suboor is prepared, cover the suboor wall-to-wall
with an acceptable moisture inhibiter such as 15 lb. asphalt saturated felt,
Silicone Vapor Shield paper and Aquabar ®B. Overlap the edges by 4” and
put a double layer around all heat ducts in the oor. Red rosin paper, Kraft
paper and wax paper are not acceptable moisture inhibiters. A moisture
inhibiter must be used over wood suboors. They help slow down moisture
ow from suboors and lessen the chance the oor will cup, cracking, etc.
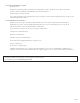
When installing wider plank wood oors (4” and wider) ooring move-
ment due to seasonal changes may be reduced by utilizing both glue and
the mechanical fasteners (nails/staples) specied. Do NOT
use a moisture inhibiter with this application since glue
assisted applications must have direct contact with the wood
suboor. Utilize a premium grade urethane construction
glue (such as Liquid Nails® or Locktite® Urethane Wood
to Wood Glue ) and apply glue in a serpentine fashion to the
suboor (see Figure 3).
04/23/20
•
•
SubFloor Guidelines
•
•
•
•
•
•
•
•
•
•
Subfloor and Prepara<on
•
•
•
•
•
When installing wider plank wood floors (4” and wider)
andNOT
Plan Your Installa<on
Fig.3
Fig.2