
Instructions / Assembly
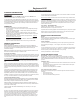

FLOATING INSTRUCTIONS
Engineered LOC
Floating Installation Instructions
ATTENTION
Inspect ALL materials carefully BEFORE installation. Warranties DO NOT cover
materials with visible defects once they are installed.
It is the responsibility of the installer/owner to determine if the job site subfloor and job
site conditions are environmentally and structurally acceptable for wood floor installation.
Flooring manufacturer declines any responsibility for wood floor failure resulting from or
connected with subfloor, subsurface, job site damage or deficiencies after hardwood
flooring has been installed.
CHECKLIST
You find additional information to each section further below:
• Store the packages in the future room climate and open package after package
when you install.
• This floor will be floating installed, i.e. always keep a minimum 3/8” distance to
all walls and vertical obstructions.
• Check your subfloor, it must be dry (measure always!), clean, firm, and flat.
• Measure the room, decide installation direction. Note the limitations as per below
– due to natural behavior of wood!
• Radiant Heat (OAK Only) – see special advices and requirements – follow the
instructions from the system supplier!
• Check your floor continuously during the installation. Defective boards that are
installed are not covered by warranty.
• Keep room climate 35-55% RH at 64-78ºF, before, during, and after install.
GENERAL INFORMATION
Preparation of subfloor
Subfloor irregularities and undulation may cause any wood flooring installation to
develop hollow spots between the flooring and subfloor. These hollow spots are NOT
the result of any wood floor manufacturing defect and are NOT covered by the
manufacturer warranty.
Note: Normal expansion space around the room should be the same distance as the
thickness of the hardwood flooring or a minimum of 3/8”.
Thoroughly clean subfloor:
Remove paint, wax, oil, plaster, “sheetrock mud” and other foreign materials, as well as
obvious surface irregularities. #3-1/2 grit open coat paper may need to be used to grind
a concrete subfloor. This will loosen any dirt, loose concrete or contaminates. Sweep
or vacuum thoroughly. All previous or existing glues or adhesives must be removed
before installing new hardwood floor. Concrete subfloors must be clean, flat, sound and
sufficient compression strength (3000 lbs. P.S.I.) being sure that the surface is NOT
slick.
Sections not flat due to waviness, trowel marks, etc. are to be flattened by grinding or
the use of leveling compound. Especially along the walls, the subfloor flatness must be
checked and if necessary improved. Flatten to 3/16” in 10’ radius. In addition to cement
subfloors, these wood flooring products can be installed over dry, flat subfloors such as
plywood.
Time at which to install hardwood flooring: Lay only after sheetrock and tile work are
thoroughly dried and all but the final woodwork and trim have been completed. The
building interior should have been dried and seasoned and a comfortable working
temperature (at least 60° F) and a relative humidity of 35 – 55% should exist during
installation. If subfloor is concrete, check for dryness see below. If moisture is present,
do not lay. All concrete subfloors on or below grade need to be tested.
Concrete subfloor Moisture Testing:
Electrical Impedance Test and Electrical Resistance Test (Concrete Moisture Meters)
Follow Moisture Meter MFG Guidelines. If Meter shows possibility of excess moisture
further testing is required. Calcium Chloride Test. See below.
Relative Humidity Test (Standard test method for determining relative humidity on
concrete floor slabs using Situ Probes. If test shows over 75% vapor retarder must be
used or wait for further curing.
Calcium Chloride Test ASTM F-1869 Readings over 3 lbs and up to 7 lbs vapor
retarder needed.
As part of your subfloor preparation remove any existing base, shoe mold or doorway
thresholds. These items can be replaced after installation, but should be replaced in
such a way as to allow at least 3/8” room for expansion around the perimeter of the
room. All door casings should be notched out or undercut to allow 3/8” room for
expansion and to avoid difficult scribe cuts. This is easily done by placing a piece of
the engineered product on the subfloor as a height guide for your handsaw or jamb
saw.
The use of flooring putty to cover small cracks or face nail holes should be considered
normal in hardwood flooring installation.
New wood type subfloors should also be checked for moisture using a moisture meter.
In general, wood or plywood subfloors should not exceed 14% moisture content and no
more than 4% MC difference between wood flooring and subfloor. Check with your local
distributor for your geographical variances. If the plywood is used as an overlay over
the existing subfloor, the thickness of the overlay material must be such as to yield a
total ¾” subfloor thickness.
Floor Heating – OAK SPECIES ONLY
Installation over subfloor heating – some important issues.
Max allowed temperature on top of the wood is 75ºF.
Important: Follow the heating regulation recommendations given by the system supplier.
Please note two-in-one foam underlay must be placed on top of the sub-floor either
made of cement screed/concrete, etc. or also over wood!
INSTALLATION PREPARATIONS
General
Measure the area to be installed and define the installation direction.
It is recommended to install the length direction of the planks parallel to the main light
direction. (See figures on page 2.)
Floating Installation
Your floor is made to be installed floating. Leave an open expansion gap around the
whole perimeter (use wedges), i.e. also at pipes, stairs, columns, door frames and
thresholds.
The floor must be able to move free – do not connect or install tight to any construction
part. Rooms with off square areas like for example L, T, U shapes, separate the areas
with an expansion joint and especially always in door openings.
Contact your distributor for further information.
AFTER THE INSTALLATION
Room climate – humidifier or de-humidifier needed?
At all times, before, during and after installation, the recommended room relative
humidity (RH) of 35-55% and temperature of 68-78ºF should be kept. If necessary
install a humidifier/dehumidifier to ensure the best climate for yourself, furniture, and
your floor.
Installing the floor:
• The floor should be installed from several cartons at the same time to ensure color
and shade mix.
• End joints should never be closer than 9 inches or half the distance of the plank
from each other. (See figure 8.)
• Install base and molding after floor installation.
Floor protection furniture, entrances
Stick felt pads to chair and other pieces of furniture legs. Place doormats at out door
entrances.
• Do not wet mop floors.
• Do not use tape on finish.
• Do not use automated cleaning machines.
(Gen-LK-50
(1/24/2017)
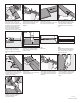
Fig 1.
First plank, first row. Start in a left-
hand corner of the room with the
locking strip (groove) facing the room.
Remember to leave a gap between
the wall (left) and the board. It is
practical to adjust the gap between
the long sides and the wall later,
when three rows have been installed.
Fig 2.
Joining length cut panels. First row(s).
Glue the joint with white glue, put a
weight over until the glue has
hardened.
Fig 4.
Then fold down with a single action
movement. Make sure the long sides
of the planks make a straight line.
Complete the first row in the same
way.
Fig 3.
Second plank, first row
Place next floorboard tight to the short
end of the first one in the corner.
Fig 5.
At the end of the first row, put a
distance of 3/8”, to the wall and
measure the length of the last plank
to fit.
Fig 10.
After 2-3 rows.
Adjust the distance to the front wall by
placing distances ≈ 3/8”.
Fig 11.
Joining length cut panels. First/last
row(s). Glue the joint with white glue,
put a weight over until the glue has
hardened.
Fig 12.
Horizontal installation (where angling
is
not possible). Cut off the locking
element by using for example a
chisel.
Fig 13.
Put white glue along the adjusted
profile and press the panels
horizontally together.
Fig 6.
Cut with a saw – hardwood turned
down or with a hand saw with the
hardwood visible.
Fig 7.
Second row.
Fig 8.
General. Minimum distance between
short ends of planks in parallell rows
shall not be less than 9” or half the
distance of the plank.
Fig 9.
Second plank second row. Place the
floorboard tight to the short end of the
previous panel and fold down in a
single action movement.
Gen-LK-50
(1/24/2017)
GEN-LK-LT 02/08/18
FLOATING INSTRUCTIONS
Engineered LOC
Floating Installation Instructions
ATTENTION
Inspect ALL materials carefully BEFORE installation. Warranties DO NOT cover
materials with visible defects once they are installed.
It is the responsibility of the installer/owner to determine if the job site subfloor and job
site conditions are environmentally and structurally acceptable for wood floor installation.
Flooring manufacturer declines any responsibility for wood floor failure resulting from or
connected with subfloor, subsurface, job site damage or deficiencies after hardwood
flooring has been installed.
CHECKLIST
You find additional information to each section further below:
• Store the packages in the future room climate and open package after package
when you install.
• This floor will be floating installed, i.e. always keep a minimum 3/8” distance to
all walls and vertical obstructions.
• Check your subfloor, it must be dry (measure always!), clean, firm, and flat.
• Measure the room, decide installation direction. Note the limitations as per below
– due to natural behavior of wood!
• Radiant Heat (OAK Only) – see special advices and requirements – follow the
instructions from the system supplier!
• Check your floor continuously during the installation. Defective boards that are
installed are not covered by warranty.
• Keep room climate 35-55% RH at 64-78ºF, before, during, and after install.
GENERAL INFORMATION
Preparation of subfloor
Subfloor irregularities and undulation may cause any wood flooring installation to
develop hollow spots between the flooring and subfloor. These hollow spots are NOT
the result of any wood floor manufacturing defect and are NOT covered by the
manufacturer warranty.
Note: Normal expansion space around the room should be the same distance as the
thickness of the hardwood flooring or a minimum of 3/8”.
Thoroughly clean subfloor:
Remove paint, wax, oil, plaster, “sheetrock mud” and other foreign materials, as well as
obvious surface irregularities. #3-1/2 grit open coat paper may need to be used to grind
a concrete subfloor. This will loosen any dirt, loose concrete or contaminates. Sweep
or vacuum thoroughly. All previous or existing glues or adhesives must be removed
before installing new hardwood floor. Concrete subfloors must be clean, flat, sound and
sufficient compression strength (3000 lbs. P.S.I.) being sure that the surface is NOT
slick.
Sections not flat due to waviness, trowel marks, etc. are to be flattened by grinding or
the use of leveling compound. Especially along the walls, the subfloor flatness must be
checked and if necessary improved. Flatten to 3/16” in 10’ radius. In addition to cement
subfloors, these wood flooring products can be installed over dry, flat subfloors such as
plywood.
Time at which to install hardwood flooring: Lay only after sheetrock and tile work are
thoroughly dried and all but the final woodwork and trim have been completed. The
building interior should have been dried and seasoned and a comfortable working
temperature (at least 60° F) and a relative humidity of 35 – 55% should exist during
installation. If subfloor is concrete, check for dryness see below. If moisture is present,
do not lay. All concrete subfloors on or below grade need to be tested.
Concrete subfloor Moisture Testing:
Electrical Impedance Test and Electrical Resistance Test (Concrete Moisture Meters)
Follow Moisture Meter MFG Guidelines. If Meter shows possibility of excess moisture
further testing is required. Calcium Chloride Test. See below.
Relative Humidity Test (Standard test method for determining relative humidity on
concrete floor slabs using Situ Probes. If test shows over 75% vapor retarder must be
used or wait for further curing.
Calcium Chloride Test ASTM F-1869 Readings over 3 lbs and up to 7 lbs vapor
retarder needed.
As part of your subfloor preparation remove any existing base, shoe mold or doorway
thresholds. These items can be replaced after installation, but should be replaced in
such a way as to allow at least 3/8” room for expansion around the perimeter of the
room. All door casings should be notched out or undercut to allow 3/8” room for
expansion and to avoid difficult scribe cuts. This is easily done by placing a piece of
the engineered product on the subfloor as a height guide for your handsaw or jamb
saw.
The use of flooring putty to cover small cracks or face nail holes should be considered
normal in hardwood flooring installation.
New wood type subfloors should also be checked for moisture using a moisture meter.
In general, wood or plywood subfloors should not exceed 14% moisture content and no
more than 4% MC difference between wood flooring and subfloor. Check with your local
distributor for your geographical variances. If the plywood is used as an overlay over
the existing subfloor, the thickness of the overlay material must be such as to yield a
total ¾” subfloor thickness.
Floor Heating – OAK SPECIES ONLY
Installation over subfloor heating – some important issues.
Max allowed temperature on top of the wood is 75ºF.
Important: Follow the heating regulation recommendations given by the system supplier.
Please note two-in-one foam underlay must be placed on top of the sub-floor either
made of cement screed/concrete, etc. or also over wood!
INSTALLATION PREPARATIONS
General
Measure the area to be installed and define the installation direction.
It is recommended to install the length direction of the planks parallel to the main light
direction. (See figures on page 2.)
Floating Installation
Your floor is made to be installed floating. Leave an open expansion gap around the
whole perimeter (use wedges), i.e. also at pipes, stairs, columns, door frames and
thresholds.
The floor must be able to move free – do not connect or install tight to any construction
part. Rooms with off square areas like for example L, T, U shapes, separate the areas
with an expansion joint and especially always in door openings.
Contact your distributor for further information.
AFTER THE INSTALLATION
Room climate – humidifier or de-humidifier needed?
At all times, before, during and after installation, the recommended room relative
humidity (RH) of 35-55% and temperature of 68-78ºF should be kept. If necessary
install a humidifier/dehumidifier to ensure the best climate for yourself, furniture, and
your floor.
Installing the floor:
• The floor should be installed from several cartons at the same time to ensure color
and shade mix.
• End joints should never be closer than 9 inches or half the distance of the plank
from each other. (See figure 8.)
• Install base and molding after floor installation.
Floor protection furniture, entrances
Stick felt pads to chair and other pieces of furniture legs. Place doormats at out door
entrances.
• Do not wet mop floors.
• Do not use tape on finish.
• Do not use automated cleaning machines.
(Gen-LK-50
(1/24/2017)