
Product Manual


10
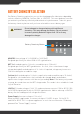
Float
This final stage keeps the battery at optimum charge without overcharging or
damage to the battery. This allows the battery to be connected to the charger at all
times, if required.
All 6 green LEDs in the top row are constantly lit when in Float mode.
Note: If user connected a battery greater than 90AH to a BC15 (or 150AH to a BC25),
Float mode may not necessarily mean that the battery has been fully charged. It may
require another cycle of charge modes to fully charge the battery.
CHARGING INSTRUCTIONS
Step 1: Check the Electrolyte Level
Before charging your battery, the battery’s electrolyte level needs to be checked.
This does not apply to all batteries and is only possible if removable venting caps
are present. Remove the vent caps and ensure that the level is 6mm or ¼” above the
battery plates. If not, then top up with distilled water to bring it up to this level and
replace caps.
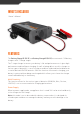
Step 2: Connect to 240V Mains Power
Plug the battery charger into the 240V mains power and turn on mains power.
Step 3: Select Battery Chemistry Type
Setting the battery chemistry on the charger depends upon the type of battery that
is being charged. Refer to battery manufacturer’s details to confirm type. To select
type:
Press the Battery Chemistry mode button for 3 seconds to change options
Continue to press the mode button until the correct type is shown
Step 4: Set Charge Rate
Select the charge rate relevant to the size of the battery. A guideline is shown in the
section “Adjustable Charge Rate”. To set the rate:
Press the Charge Rate mode button for 3 seconds to select the mode
Press the Charge Rate button until the setting required is shown
Note: Ensure the 3rd LED is not illuminated Orange indicating the Power Supply
mode has been entered as this is not suitable for charging batteries.