
Product Manual


11
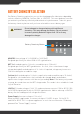
Step 5: Connect to Battery
Attach the RED clamp from the charger to the Positive (+) battery post first, then
attach the BLACK lead clamp from the charger to the Negative (-) battery post.
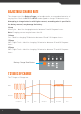
Step 6: Charging
During this process, the charging and ‘Fully Charged’ indicator lights will flash in
various patterns. This indicates the various stages of charge for your battery.
When all of the top row LEDs remain steady, this indicates that the charger is now
in float stage and can remain connected to the battery indefinitely, without over
charging. If at any point the Red LED begins to flash, this indicates that there is a
fault. Refer to “Fault Codes” Section of this document.
Step 7: Disconnecting
To disconnect from the battery once a full charge has been attained, remove mains
power to BC15/BC25. Disconnect the negative battery terminal first, then disconnect
the positive battery terminal.
Note: This battery charger is not intended for charging a vehicle battery whilst
vehicle is running. For charging batteries installed in a parked vehicle, procedure is;
1. The battery positive terminal has to be connected first. With the negative
terminal of the battery connected to the car chassis, connect negative terminal
of the charger to the chassis, remote from the battery and fuel line.
2. Connect charger to the supply mains.
3. After charging, disconnect the battery charger from the supply mains, then
disconnect the charger terminal from the chassis connection and from battery
positive termination.
BATTERIES
This battery charger is rated to charge 12V lead-acid battery types of GEL/
AGM, Calcium, WET, Lead Crystal or LiFePO4 from 5-400Ah, single units or in
parallel. Choose charging current according to what is recommended by battery
specifications.