TR1140, TR1160, TR1180 OWNER’S MANUAL IMPORTANT: For maximum effectiveness and safety, please read this owner’s manual before using your BodyCraft treadmill. Retain this owner’s manual for future reference.
1. It is the responsibility of the owner to be sure that all users of this treadmill are informed of all warnings and precautions. 2. Keep the treadmill indoors, away from moisture and dust. Do not put the treadmill in a garage or covered patio, outdoors or near water. 3. Keep pets and small children away from the treadmill at all times. 4. Never start the treadmill while you are standing on the walking belt. 5. Always hold the handrails while using the treadmill. 6. The treadmill is capable of high speeds.
12. Remove the safety key and store it away in a safe place when the treadmill is not in use. Keep the safety key away from children. 13. Wear the proper exercise clothing and shoes for your workout. Do not wear loose clothing or shoes with leather soles or heels. Be sure to tie long hair back. 14. Keep all loose clothing and towels away from running surface. The belt will not stop immediately if an object becomes caught in the rollers or belt. Should an object become caught, turn the unit off immediately.
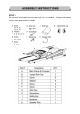
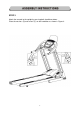
STEP 1 Do not move the treadmill out of the box until unit is assembled. Collapse box bottom and lay sides down before assembly.
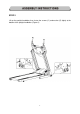
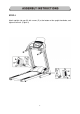
STEP 2 Lift up the upright handlebar, then fasten the screws (C) and washer (D) tightly at the bottom of the upright handlebar.
STEP 3 Attach the console to the upright by pressing both handlebars down. Place the washers (D) and screws (C) on the handlebar as shown in Figure 3.
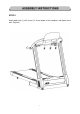
STEP 4 Attach upright side cap (B) with screws (E) at the bottom of the upright handlebar, and tighten them well.
STEP 5 Attach book rack (J) with screws (F) at the bottom of the computer, and tighten them well.
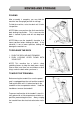
FOLDING After assembly is complete, you may fold the machine into the upright position for storage. To fold the machine, raise the deck until it locks into position. NOTE! Make sure you hear the click sound of the deck locking into position. This is to ensure the deck is locked in place and will not drop back down. NOTE! Make sure the treadmill’s elevation is at lowest position before folding the deck. If the elevation is not at lowest position, folding will damage the mechanism. TO RELEASE THE DECK 1.
*** THE TREADMILL CIRCUIT BREAKER WILL SHUT OFF POWER WHEN THE ELECTRIC CURRENT IS OVERLOADED. A. Pull out the plug from the electrical socket on the front of the treadmill. B. Push in the circuit breaker switch. C. Insert the plug back into the electrical socket. Note:Do not push in the circuit breaker switch before you pull out the plug from the treadmill.
NOTICE : The treadmill should be placed on a level surface. If the treadmill is not level, the belt will continuously track to low side of the treadmill. WALKING BELT TENSION As walking belts tend to stretch slightly with use, the belt may occasionally need to be tightened. If belt is too loose, you may find the belt stops while running or walking, while the motor continues to run. DO NOT OVERTIGHTEN THE BELT. This will cause reduced motor performance and roller damage.
WALKING BELT CENTERING The walking belt may occasionally need to be centered. First be certain that the belt is tensioned properly. Start the treadmill and run it at about 4 mph. Place the hex key through the hole in the left rear end cap and into the socket of the adjustment screw. (See picture below) 1. If belt has moved too far to the right: Turn the left adjustment screw ½ turn counter clockwise. Let the treadmill run for 30 seconds and the belt should move to the left.
WARNING: ALWAYS UNPLUG THE TREADMILL FROM THE ELECTRICAL OUTLET BEFORE CLEANING, LUBRICATING OR SERVICING THE UNIT. CLEANING General cleaning of the treadmill will prolong the life of the treadmill and improve performance. Keep the unit clean by dusting regularly. Be sure to dust the exposed part of the deck on either side of the walking belt and also the side rails. For best performance, we recommend your treadmill be placed on a treadmill mat.
WALKING BELT AND DECK LUBRICATION It’s important to take good care of your treadmill deck (the walking surface underneath the belt), because the belt/deck friction may affect the function and life of your treadmill and requires periodic lubrication. Your treadmill belt has been lubricated at the factory, but periodic lubrication will extend the life of your treadmill belt, board, and electrical components. We recommend the following lubrication schedule based on weekly usage: LUBRICATION APPLICATION 1.
14
BEFORE STARTING Straddle the belt and stand on the plastic side rails. Place the safety key onto the circle on the overlay and attach the rope to your clothing. Do not stand on the walking belt while starting or stopping the treadmill. If you are a new user, stay at a slow speed and hold onto the handrails until you become comfortable. KEY FUNCTIONS Safety Key: The monitor can be operated only with the key attached to the treadmill. The monitor shuts off and the treadmill stops when this key is removed.
INCLINE +: Increases the incline. This button is also used to scroll the programs. INCLINE -: Decreases the incline. This button is also used to scroll the programs. SPEED QUICK KEYS 2 – 10 MPH: Pressing these keys gradually changes the speed to that value. INCLINE QUICK KEYS 1 – 12 %: Pressing these keys slowly changes the incline to that value. FAN: Turns the fan on/off.
SPEAKER FUNCTION The user can connect a MP3 or IPOD with the internal speakers using the included speaker wire.
DISPLAYS DOT MATRIX: The 8 X10 dot matrix reflects incline on the elevation programs (Program 1-4) and speed on the speed programs (Program 5-6) and the user programs. On programs 7-10 and in the manual mode, the dot matrix displays a 400 meters running track. INCLINE/PULSE: Displays pulse rate except when elevation is changed or SELECT key is pressed. To get a pulse rate, place both of your hands on the pulse grip bars. It is recommended to straddle the walking belt to get an accurate reading.
OPERATION INSTRUCTION (Please read carefully before using the treadmill): Safety Tips: To Start attach the safety key to the monitor. The treadmill will not operate without the safety key. Please clip the other end of the safety key to your clothing before exercising to ensure the machines will stop in case the user accidentally walks off the treadmill. If the user falls off the treadmill, the safety key will come off the monitor and the treadmill will stop at once to avoid further injury.
P-4 Calorie Burn : This is an interval elevation program where the elevation alternates between 0% and 3%. The user controls the speed. P-5 Walking: This is a speed controlled program that goes up to 3.4 mph, and is an excellent program for intermediate walkers. The user controls the elevation. P-6 Jogging: This is a speed program that varies the speed up to 4.5 mph. This is a good program for beginner joggers and very fast walkers. The user controls the elevation.
U-1/U-2 User Programs: After selecting one of the user programs, press ENTER to confirm. Adjust the speed and incline for segment one and press ENTER. Continue to adjust the speed and incline for each segment and press ENTER. Press START to begin the workout. If a speed or incline value is changed during usage, the monitor will store the value of the speed and incline at the end of each segment and will retain these values.
22
] 23
24
25
26
BEFORE STARTING Straddle the belt and stand on the plastic side rails. Place the safety key onto the circle on the overlay and attach the rope to your clothing. Do not stand on the walking belt while starting or stopping the treadmill. If you are a new user, stay at a slow speed and hold onto the handrails until you become comfortable. KEY FUNCTIONS Safety Key: The monitor can be operated only with the key attached to the treadmill. The monitor shuts off and the treadmill stops when this key is removed.
INCLINE +: Increases the incline. This button is also used to scroll the programs. INCLINE -: Decreases the incline. This button is also used to scroll the programs. SPEED QUICK KEYS 2 – 11 MPH: Pressing these keys gradually changes the speed to that value. INCLINE QUICK KEYS 1 – 12 %: Pressing these keys slowly changes the incline to that value. FAN: Turns the fan on/off.
SPEAKER FUNCTION The user can connect a MP3 or IPOD with the internal speakers using the included speaker wire.
DISPLAYS DOT MATRIX : The 8x10 dot matrix reflects incline on the elevation programs (Program 1-4, 7, 10-11) and speed on the speed programs (Program 5-6, 8-9) and the user programs. On programs 12-15 and in the manual mode, the dot matrix displays a 400 meters running track. INCLINE/PULSE : Displays pulse rate except when elevation is changed. To get a pulse rate, place both of your hands on the pulse grip bars. It is recommended to straddle the walking belt to get an accurate reading.
OPERATION INSTRUCTION (Please read carefully before using the treadmill): Safety Tips: To Start attach the safety key to the monitor. The treadmill will not operate without the safety key. Please clip the other end of the safety key to your clothing before exercising to ensure the machines will stop in case the user accidentally walks off the treadmill. If the user falls off the treadmill, the safety key will come off the monitor and the treadmill will stop at once to avoid further injury.
P-4 Calorie Burn : This is an interval elevation program where the elevation alternates between 0% and 4%. The user controls the speed. P-5 Walking I : This is a speed controlled program that goes up to 3.4 mph, and is an excellent program for intermediate walkers. The user controls the elevation. P-6 Jogging: This is a speed program that varies the speed up to 4.8 mph. This is a good program for beginner joggers and very fast walkers. The user controls the elevation.
P-12 Target Distance: This program counts down the distance goal that the user sets before exercising. After confirming the program, the user enters the distance goal using the speed or incline arrow keys. Increments are 0.5 miles. Press ENTER to confirm the distance goal, press START, the treadmill belt starts and the user controls the speed and incline. The distance will count down in the distance window. P-13 Target Calories: This program counts down the calorie goal that the user sets before exercising.
HR-1 Weight Loss Heart Rate Program: The user must wear the heart rate chest strap to use this program. After the program is confirmed, AGE appears on the dot matrix. Using the speed or incline arrow keys, the user enters his/her age. Target heart rate (THR) is computed at 65% of maximum (220 – AGE) and appears in the heart rate window. THR can be changed at this time using the elevation keys. Press START and the treadmill starts at 0.5 mph, and the user controls in the speed.
Odometer: An odometer showing accumulated distance will appear in the time window for one second when the safety key is placed on the monitor. Time-Out: If the treadmill is turned on, and the belt is not moving, the monitor will shut off after five minutes. Re-start : If the treadmill is stopped during use, when the START button is pressed again, the treadmill will ramp-up the speed to where it was stopped.
36
37
38
BEFORE STARTING Straddle the belt and stand on the plastic side rails. Place the safety key onto the circle on the overlay and attach the rope to your clothing. Do not stand on the walking belt while starting or stopping the treadmill. If you are a new user, stay at a slow speed and hold onto the handrails until you become comfortable. KEY FUNCTIONS Safety Key: The monitor can be operated only with the key attached to the treadmill. The monitor shuts off and the treadmill stops when this key is removed.
INCLINE +: Increases the incline. This button is also used to scroll the programs. INCLINE -: Decreases the incline. This button is also used to scroll the programs. SPEED QUICK KEYS 2 – 12 MPH: Pressing these keys gradually changes the speed to that value. INCLINE QUICK KEYS 1 – 12 %: Pressing these keys slowly changes the incline to that value. FAN: Turns the fan on/off.
SPEAKER FUNCTION The user can connect a MP3 or IPOD with the internal speakers using the included speaker wire.
DISPLAYS DOT MATRIX : The 10x12 dot matrix reflects incline on the elevation programs (Program 1-4, 7, 10-11) and speed on the speed programs (Program 5-6, 8-9) and the user programs. On programs 12-15 and in the manual mode, the dot matrix displays a 400 meters running track. INCLINE/PULSE : Displays pulse rate except when elevation is changed. To get a pulse rate, place both of your hands on the pulse grip bars or use a heart rate chest strap.
OPERATION INSTRUCTION (Please read carefully before using the treadmill): Safety Tips: To Start attach the safety key to the monitor. The treadmill will not operate without the safety key. Please clip the other end of the safety key to your clothing before exercising to ensure the machines will stop in case the user accidentally walks off the treadmill. If the user falls off the treadmill, the safety key will come off the monitor and the treadmill will stop at once to avoid further injury.
P-4 Calorie Burn : This is an interval elevation program where the elevation alternates between 0% and 4%. The user controls the speed. P-5 Walking I : This is a speed controlled program that goes up to 3.4 mph, and is an excellent program for intermediate walkers. The user controls the elevation. P-6 Jogging: This is a speed program that varies the speed up to 4.8 mph. This is a good program for beginner joggers and very fast walkers. The user controls the elevation.
P-12 Target Distance: This program counts down the distance goal that the user sets before exercising. After confirming the program, the user enters the distance goal using the speed or incline arrow keys. Increments are 0.5 miles. Press ENTER to confirm the distance goal, press START, the treadmill belt starts and the user controls the speed and incline. The distance will count down in the distance window. P-13 Target Calories: This program counts down the calorie goal that the user sets before exercising.
HR-1 Weight Loss Heart Rate Program: The user must wear the heart rate chest strap to use this program. After the program is confirmed, AGE appears on the dot matrix. Using the speed or incline arrow keys, the user enters his/her age. Target heart rate (THR) is computed at 65% of maximum (220 – AGE) and appears in the heart rate window. THR can be changed at this time using the elevation keys. Press START and the treadmill starts at 0.5 mph, and the user controls in the speed.
Metric/Miles: If you want the treadmill to display the values in kiolmeters, you can switch to kilometers as follows: 1. During the power ON - manual mode, first hold the ENTER button then press the SELECT button together to enter the Engineering Mode. 2. Time window shows model no., Incline window shows software version, Distance window shows year. Calories window shows date. 3. Press ENTER button – Speed window shows ISP, Incline window shows ISP version, Time window shows 0.
48
49
50
51
52
PROBLEM POSSIBLE CAUSES 1. Not plugged in. 2. Safety key not attached correctly. Treadmill will not start Treadmill belt slipping Treadmill noisy CORRECTION 1. Plug into suitable outlet. 2. Insert safety pull pin. 3. Treadmill circuit breaker tripped. 3. Reset circuit breaker. 4. On/Off Switch not turned on. 5. Auto Shut Down Time Out. 5. Unplug and replug electrical cord. 1. Walking belt too loose 1. Tighten walking belt. 2. Deck needs lubrication. 2. Lubricate belt and deck. 1.