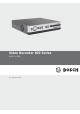
Video Recorder 600 Series 8/16 Ch.
Video Recorder 600 Series Operating instructions | en 2 Operating instructions These instructions explain the purpose of the front panel keys. The functions available can be limited by setting passwords. Access to the units functions are determined by the user level of the user logged in.
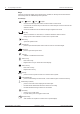
en | Operating instructions Video Recorder 600 Series Keys The keys on the front panel control all functions. Symbols on the keys show the functions. Inactive keys emit an audible beep when pressed.
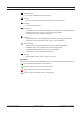
Video Recorder 600 Series Operating instructions | en 4 Multi-screen key – press to go to different multi-screen modes OSD key – press to view date/time and camera information, or date/time only Pause key – press to freeze the picture Reverse key – in live mode, press to start reverse playback of recordings for the displayed cameras – in playback mode, press to start or speed up reverse playback – in pause mode, press to step back one frame Play key – in live mode, press to resume playback f
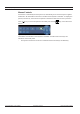
en | Operating instructions Video Recorder 600 Series Mouse Controls All functions controlled by the front panel can, alternatively, be accessed using the supplied USB mouse. All main DVR functions are accessible via the System Control Bar. To display the panel (on monitor A), move the mouse pointer to the bottom left of the screen or press the menu key. To close the System Control Bar press the exit key, or the left mouse button.
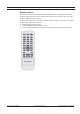
Video Recorder 600 Series Operating instructions | en 6 Remote control All functions controlled by the front panel and USB mouse can, alternatively, be accessed using the supplied remote control. The IR remote control allows control of up to nine units without interfering with one another. An ID number must be set on the remote control and in the system. See Section 6.6.7 System for setting the system ID for the unit. To set the ID on the remote control: 1. Press the ID button on the remote control. 2.
en | Operating instructions Video Recorder 600 Series Viewing pictures The unit has two monitor outputs, A and B. The way in which these monitors display pictures depends on how the system is configured. Monitor A Monitor A is the main monitor. It shows full-screen, quad or multiscreen live or playback camera pictures. Status messages, alarms, motion, and video loss warnings are also displayed on this monitor. When the menu system is activated, it is displayed on this monitor.
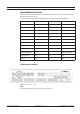
Video Recorder 600 Series Operating instructions | en 8 Viewing The tables show all possible views for monitor A. The set of muti-screen views available depends on the resolution (aspect ratio) setting and the model type (8 or 16 channels). Resolution (aspect ratio) 800x600 (4:3), 1024x768 (4:3), 1280x1024 (5:4) Full screen Quad 1+5 1+7 1+12 3x3 4x4 (Not for 8-channel model) Table 5.
en | Operating instructions Video Recorder 600 Series Quad screen To view quad displays: – Press the quad – key. A quad display of camera pictures appears on the active monitor. Full-screen To view a full-screen shot of a camera: – Press a camera key. – A full-screen shot of the camera that was selected appears. Multi-screen To view multi-screen displays on monitor A: – Press the multi-screen – key. A multi-screen display of camera pictures appears on the active monitor.
Video Recorder 600 Series Operating instructions | en 10 Freeze image Freezing a camera shot on monitor A: 1. Press the pause key to freeze all the picture in the active cameo. 2. Press the stop 3. Alternatively, right click in the active cameo and select Freeze or Unfreeze from the key to return to live viewing. context menu using the mouse. Zoom To zoom in on a video image: 1. Press the zoom in – key. The picture is enlarged by a factor of 2. 2.
en | Operating instructions Video Recorder 600 Series Live and playback Live mode The live mode is the normal operating mode of the unit where live pictures are viewed from the cameras. From live mode, switch to playback mode or the system menu. Playback mode Access to playback functions requires the right user level. Discuss this with your administrator. To enter playback mode: 1.
Video Recorder 600 Series Operating instructions | en 12 Overview of the menu system The Main menu gives access to several functions to help use the unit. Access to the Main menu is only possible with a User Account at the Administrator User Level. There are three ways of accessing the Main menu: – via the front panel keys, – a USB mouse, – via the remote control. Slight differences in navigation and selection are only due to the differences between the keys on the unit and the mouse.
en | Operating instructions Video Recorder 600 Series Main menu Camera The Camera menu is used to configure recording settings for the unit.
Video Recorder 600 Series – Operating instructions | en 14 Configuration - Import and Export configuration, reset to Factory defaults, Update firmware and Quick install – Hard Disk - set Overwrite, Disk full warning, Event partition, Auto delete, and format the disk – System - set the IR remote control, DVR ID, Auto user logout time. Search To Search, press the search key. To Search using the mouse: 1. 2. Move the cursor to the bottom of the screen to access the System Control Bar.
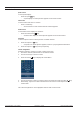
en | Operating instructions Video Recorder 600 Series Date/time search Select the start date. Once the start date has been selected, the timeline will update to show the full 24 hour period. 1. 2. 3. Use the Zoom In button to magnify the timeline. Enter the start time: – Enter the hour and minute. – With a mouse, click directly on the timeline to set the start time. Click Play to start playback: – Figure 6 F.01U.169.663 | v1.0 | 2010.09 Playback in all displayed cameos will start.
Video Recorder 600 Series Operating instructions | en 16 Event search 1. From a Date/Time search, press the exit 2. Press the left/right arrow keys to select Event Search. 3. Press the enter – key to select the Search Tabs. key to activate the search. With the mouse, click the Event Search tab to make it active. Search criteria – Under Start and End, fill in date and time values to determine the time span of the – Under Channel, specify the camera input to search for.
en | Operating instructions Video Recorder 600 Series Smart search 1. From a Date/Time search, press the exit 2. Press the left/right arrow keys to select Smart Search. 3. Press the enter – key to select the Search Tabs. key to activate the search. With the mouse, click the Smart Search tab to make it active. Search criteria – Under Channel, specify the camera input to search for. The selected input will be shown.
Video Recorder 600 Series Operating instructions | en 18 Export The export menu is accessed by pressing the Export key on the Front Panel or from the System Control Bar. It allows writing segments of recorded video and audio to a USB storage device or recordable DVD. Figure 9 Export menu 1. Choose to record to either USB or CD/DVD from the Target Device selection box. 2. Select the Channel to archive ( ... for all channels). 3.
en | Operating instructions Video Recorder 600 Series System information The System information screen is accessed from the System Control Bar by pressing the System Information icon. The System information menu contains: – Model Name – Serial Number – Video Format – MAC Address – IP Address – Software Version – Hard Drive size and usage data Figure 10 System Control Bar - System information Note: Only Bosch hard disks with a signature can be used.
Video Recorder 600 Series Operating instructions | en 20 Log The Log displays historic system events and is accessed from the System Control Bar by pressing the Log icon. Logbook filter From the Log display, make a selection of which system events to show. – The Log shows the date, time, and event type of various system events. – Log contents are ordered from latest to earliest. Export log click Export to save the log file to a USB device.
en | Operating instructions Video Recorder 600 Series Triggers and alarms Various types of events change the way the unit works. These events are: – an alarm input signal applied to the unit – motion detection in a camera signal – a loss of video from one of the cameras – an internal alert from the unit itself (i.e. disk failure, temperature alarm) The way the unit reacts to events depends on how it is programmed. An event can cause either a trigger or an alarm.
Video Recorder 600 Series Operating instructions | en 22 Acknowledging an input alarm Press the acknowledge key to acknowledge the alarm. – The beeper is silent. – The alarm – The alarm status message disappears. – The last-used view mode is restored. indicators are no longer lit. The alarm icon remains visible as long as the input causing the alarm is active. If an alarm is not acknowledged, the beeper switches off after the dwell time but the alarm still needs to be acknowledged.
Bosch Security Systems www.BoschSecurity.