
Installation instructions


Page 10
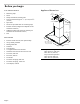
Mounting the extractor hood on the wall
WARNING
RISK OF INJURY
The appliance is heavy. To move the appliance, 2 people
are required. Use only suitable tools and equipment.
1. Initially remove the protective foil from the back of the
appliance and, following installation, remove foil
completely.
2. Mark the upper holes on the wall.
Note: Ensure that the holes are horizontal and aligned
centered on the center line.
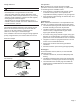
3. Drill the upper holes. Adhere to a distance of 1/4”
(6 mm) between the wall and screw head.
4. Remove grease lters.
5. Hang the extractor hood on the upper screws on the
wall.
6. Mark holes for the lower holes.
7. Remove the extractor hood from the wall.
8. Drill the lower holes.
9. Hang the extractor hood on the upper screws on the
wall.
10. Tighten the upper and lower screws by hand.
Mounting the back-pressure flap
Using 4 screws (4x8 mm), attach the back-pressure ap
to the extractor hood.
Connecting the air extractor (only for ducted operation)
Note: If an aluminum pipe is used, smooth the connection
area beforehand.
1. Attach exhaust air pipe and seal.
2. Check whether the back-pressure ap works.
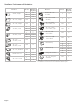
Mounting the recirculation model
(only for circulating-air mode)
1. Use 4 screws (4x8 mm) to screw the housing to the
angle bracket.
A
B
C
A Screws
B Recirculation module
C Angle bracket