
Installation Guide


English 4 9001062516 Rev A
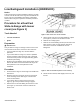
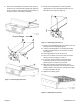
9. Place the Low Backguard in position A (See Figure 3)
and then move it to position B (engaging the alignment
device 1 inside the Low Backguard) (the appearance of
the devices may not be exactly as shown).
Figure 3: Low Backguard placement 1
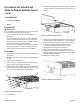
10. Rotate the Low Backguard to a vertical position,
aligning hole 2 in the Low Backguard with hole 3 on
both sides of the range (see Figure 4).
Figure 4: Low Backguard placement 2
11. Secure the Low Backguard with one screw at each end
(through holes 2 and 3) (lightly tighten).
12. Hold the Low Backguard in a vertical position while
installing and tightening the five screws in the back
(see Figure 2).
13. Finish tightening the screws at each end.
14. Place the rear louver cover into its slots and secure
with four screws (see Figures 1 and 2).
15. If necessary, have a qualified service technician
reattach the electrical or gas connections, while
performing the next step in the procedure.
16. Slide the range back into position, being sure to
engage the anti-tip bracket. See the Tip Over Hazard
Warning earlier in this instruction and also in the Slide-
In Range Installation Manual.
17. Replace the cooktop grates.
Figure 5: Low Backguard in position