
Installation Sheet


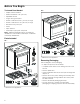
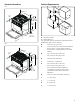
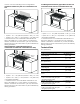
Table Of Contents
- Free-standing range
- ö Installation Instructions
- 9 Safety DefinitionsSafety Definitions
- IMPORTANT SAFETY INSTRUCTIONS
- READ AND SAVE THESE INSTRUCTIONS
- Appliance Handling Safety
- Safety Codes and Standards
- Electric Safety
- Gas Safety
- Propane Gas Installation
- Related Equipment Safety
- Conversion to Propane Gas
- High Altitude Installation
- Parts Included
- Removing Packaging
- General Information
- Cabinet Requirements
- Technical Data
- Installation Checklist
- How to Remove the Oven Door
- 9 WARNING
- 1. Open the oven door to its fully open position.
- 2. Lock the two hinges on the left and right using the locking pin. The locking pins must be fully inserted into the holes in the hinges.
- 3. Close the oven door until it catches on the hinge stop levers, locking the hinges at the correct angle for door removal. The door can be removed when it is pulled up from the open position by about 8 inches (203 mm). This takes the tension off the...
- 9 CAUTION
- Risk of pinching
- 4. The door is heavy. Use both hands to firmly grip it by the sides. Do not grip the door by the handle. Keeping the angle of the door the same, lift the door straight up approximately 3/4" (19 mm) to unhook the hinges from the slots, and then pull i...
- 5. Place the door in a convenient and stable location for cleaning.
- 6. Refit the door in the reverse order in which it was removed.
- Risk of pinching
- Fitting the Rear Vent Trim
- Fitting the Adjustable Feet
- Connect Gas Supply
- 9 WARNING
- A
- B
- 1. Turn on gas.
- 2. Apply a soap solution or non-corrosive leak detection fluid to all joints and fittings in the gas connection between the shut-off valve and the cooktop. Include gas fittings and joints in the cooktop if connections may have been disturbed during i...
- 3. If a leak appears, turn off supply line gas shut-off valve and tighten connections.
- 4. Retest for leaks by turning on the supply line gas shut- off valve. When leak check is complete (no bubbles appear), test is complete.
- 5. Wipe off all soap solution or detection fluid residue.
- Install Appliance
- 9 WARNING
- 1. Ensure that the electrical connection and the gas connection are in the correct position.
- 2. Assemble the bracket.
- 3. Align the base of the hook of the bracket with the base on the slot of the rear wall fastening bracket. Align the base of the fastening bracket with the ground and tighten the screws to fix the measurements.
- 4. For wall mounting, proceed with steps 5–7 and 10.
- 5. Use the specified distance from the side of the appliance to the bracket holes.
- 6. Move the bracket onto the wall and fix with the two washers and screws. A qualified technician must verify suitability of the materials in accordance with the type and condition of the wall.
- 7. Use the following distances for the distance from the side of the appliance to the bracket holes.
- 8. After having positioned and leveled the appliance, move the bracket close to the rear of the appliance and anchor it to the floor with the two washers and screws. A qualified technician must verify suitability of the materials in accordance with t...
- 9. Push the cooker towards the wall, and at the same time, insert the bracket in the plate fastened to the rear of the appliance.
- 10. Check for proper installation and use of the anti-tip bracket. Carefully tip the range forward pulling from the back to ensure that the anti-tip bracket engages the range leg and prevents tip-over. The range should not move more than 1” (2.5cm).
- Connect Electrical Supply
- Burner Cap Placement
- Check the Installation
- Test for Gas Leaks
- 9 WARNING
- 1. Turn on gas.
- 2. Apply a non-corrosive leak detection fluid. Include all joints and fittings between the shutoff valve and the appliance. Include gas fittings and joints in the appliance if connections may have been disturbed during installation.
- 3. Inspect for leaks. Bubbles appearing around fittings and connections indicate a leak.
- 4. If a leak appears, turn off supply line gas shutoff valve and tighten connections.
- 5. Retest for leaks. Turn gas back on at supply line shutoff valve and reapply leak detection fluid.
- 6. When no bubbles appear, test is complete. Wipe off all detection fluid residue.
- Conversion to Propane Gas (LPG)
- 9 CAUTION
- Setting the pressure regulator for propane gas
- 1. Use tongue and groove pliers to remove regulator cap D.
- 2. Unscrew the plastic regulator stem from the regulator cap D.
- 3. Invert the plastic regulator stem and screw it in tightly.
- 4. Replace cover cap D and tighten with tongue & groove pliers.
- 5. When converting for propane gas use, the pressure supplied to the regulator must be between 11" and 13" water column.
- Replacing the main control nozzles
- 1. Remove the grates.
- 1. Remove the control knob and knob ring.
- 2. Turn the inner setting screw clockwise gently until it bottoms out.
- Note:
- 3. Replace the control knobs.
- 4. Light each burner individually and check for flame stability on low setting.
- 5. If required, loosen the setting screw to increase the gas flow.
- 6. Ensure that the flame does not go out when the gas flow is quickly changed between maximum and minimum, and vice versa. The optimum setting is achieved when the height of the small flame is approx. 1/8" (3 to 4 mm).
- 7. Refit the control knob and knob ring for the gas burner.
- 8. Repeat steps 2 to 8 until all of the gas burners have been set.
- 9. Connect the appliance to the power supply.
- Replacing the Oven Burner Nozzle
- 1. Open the appliance door.
- 2. Remove the screws on the bake chamber cover and lift the front of the bake chamber cover slightly and then pull it out towards you.
- 3. Remove the screws on the bake burner assembly and pull the burner forwards out of the gas connection.
- 4. Unscrew the bake burner nozzle and replace it with the LP nozzle number 120.
- 5. Reinsert the bake burner and screw tight.
- 6. Reinsert the bake chamber cover and screw tight.
- 7. Fill out the LP conversion label (included) and affix it to the appliance.
- Replacing the Broil Burner Nozzle
- 1. Open the appliance door.
- 2. Remove the screws on the broil burner sub assembly and pull the broil sub assembly forwards out of the gas connection. On the back wall, the burner is still connected to the gas supply and the electric ignition.
- 3. Carefully place the broil assembly on the floor of the oven cavity.
- 4. Unscrew the broil burner nozzle and replace it with the LP nozzle number 110.
- 5. Reinsert the broil burner & broil burner sub assembly and screw tight.
- 6. Fill out the LP conversion label (included) and affix to the appliance.
- Setting the minimum gas flow
- 1. Open the appliance door.
- 2. Press and hold the control knob for the oven and turn it to the maximum position. The gas burner ignites.
- 3. Keep the control knob pressed in for 15 seconds.
- 4. Close the appliance door.
- 5. Remove the control knob and knob ring.
- 6. Tighten the inner setting screw.
- Note:
- 7. Refit the control knob.
- 8. Heat up the oven for 15 minutes.
- 9. Remove the control knob again.
- 10. Adjust the internal setting screw until a stable flame is burning correctly. Loosen the setting screw to increase the gas flow or tighten it to decrease the gas flow. The setting is correct when the height of the small flame is approx. 1/8" (3 t...
- 11. Refit the control knob and knob ring.
- 12. Ensure that the flame does not go out when the gas flow is quickly changed between maximum and minimum, and vice versa.
- Note:
- Customer Service
- How to Obtain Warranty Service
- Õ Instructions d’installation
- 9 Définitions de sécuritéDéfinitions de sécurité
- CONSIGNES DE SÉCURITÉ IMPORTANTES
- LIRE ET CONSERVER CES INSTRUCTIONS
- Sécurité de manutention des appareils
- Codes et normes de sécurité
- Sécurité électrique
- Sécurité en matière de gaz
- Installation au gaz propane
- Équipement de sécurité
- Conversion gaz au propane
- Installation à altitude élevée
- Pièces comprises
- Pour enlever l’emballage
- Informations générales
- Exigences pour les placards
- Caractéristiques techniques
- Liste de contrôle pour l'installation
- Démontage de la porte du four
- 9 AVERTISSEMENT
- 1. Ouvrez complètement la porte du four.
- 2. Verrouillez les charnières gauche et droite à l'aide de la goupille de verrouillage. Les goupilles de verrouillage doivent être complètement insérées dans les trous des charnières.
- 3. Fermez la porte du four jusqu'à ce qu'elle s'enclenche sur les leviers d'arrêt des charnières tout en verrouillant ces dernières selon l'angle correct pour le retrait de la porte. La porte peut être retirée lorsqu'elle est soulevée d'enviro...
- 9 ATTENTION
- Risque de pincement
- 4. La porte est lourde. Saisissez les côtés de la porte fermement et des deux mains. Ne saisissez pas la porte par la poignée. En maintenant l'angle de la porte au même niveau, soulevez cette dernière d'environ 3/ 4 po (19 mm) vers le haut pou...
- 5. Placez la porte dans un endroit pratique et stable pour le nettoyage.
- 6. Replacez la porte dans l'ordre inverse dans lequel elle a été retirée.
- Risque de pincement
- Ajustement de la garniture de ventilation arrière
- Montage des pieds réglables
- Branchement du gaz
- 9 AVERTISSEMENT
- A
- B
- 1. Ouvrez le gaz.
- 2. Appliquez une solution savonneuse ou un liquide de détection de fuites non corrosif à toutes les jonctions et tous les raccords des conduites de gaz entre le robinet d’arrêt et la table de cuisson. Incluez les raccords et les jonctions de gaz...
- 3. En présence d’une fuite, coupez l’alimentation en gaz en fermant le robinet d’arrêt et serrez le ou les raccords qui fuient.
- 4. Testez de nouveau la présence de fuites en ouvrant le robinet d’arrêt de l’alimentation de gaz. Lors de la vérification des fuites est terminé (aucune bulle n'apparaît), le test est terminé.
- 5. Essuyez tout résidu de la solution savonneuse ou du liquide de détection de fuite.
- Pose de l'appareil
- 9 AVERTISSEMENT
- 1. Veillez à ce que le raccordement électrique et le raccordement du gaz soient en position correcte.
- 2. Assemblez les supports.
- 3. Orientez la base du crochet du support avec la base de la fente du support de fixation murale arrière. Alignez la base du support de fixation avec le sol et serrez les vis pour fixer les mesures.
- 4. Pour le montage mural, procéder aux étapes 5-7 et 10.
- 5. Respectez la distance spécifiée entre le côté de l'appareil et les trous des supports.
- 6. Déplacez le support sur le mur et fixer avec les deux rondelles et vis. Un technicien qualifié doit vérifier l'adéquation des matériaux en fonction du type et de l'état du mur.
- 7. Respectez les distances suivantes pour déterminer la distance entre le côté de l'appareil et les trous des supports.
- 8. Après avoir positionné et mis à niveau l'appareil, rapprochez le support à l'arrière de l'appareil et fixez-le au sol avec les deux rondelles et vis. Un technicien qualifié doit vérifier l'adéquation des matériaux en fonction du type et d...
- 9. Déplacez la cuisinière vers le mur et, en même temps, insérez le support dans la plaque fixée à l'arrière de l'appareil.
- 10. Vérifiez que le support anti-basculement est correctement installé et utilisé. Basculez avec précaution la cuisinière vers l'avant en tirant de l'arrière pour vous assurer que le support anti- basculement engage le pied de la cuisinière et...
- Brancher l'alimentation électrique
- Montage des chapeaux de brûleur
- Vérification de l'installation
- Test pour fuites de gaz
- 9 AVERTISSEMENT
- 1. Ouvrez le gaz.
- 2. Appliquez un liquide de détection de fuite non corrosif. Incluez tous les joints et raccords entre le robinet d'arrêt et l'appareil. Intégrez des raccords à gaz et des joints dans l'appareil si les connexions ont pu être perturbées pendant l...
- 3. Inspectez les fuites. Les bulles qui apparaissent autour des raccords indiquent une fuite.
- 4. En présence de fuite, coupez l’alimentation en gaz en fermant le robinet d’arrêt et serrez le ou les raccords qui fuient.
- 5. Vérifiez à nouveau s'il y a des fuites. Ré-ouvrez le gaz à la vanne d'arrêt de la conduite d'alimentation et re- injectez le fluide de détection de fuite.
- 6. Quand aucune bulle n’apparaît, le test de fuite est terminé. Essuyez tout résidu de liquide de détection de fuite.
- Conversion gaz au propane (LPG)
- 9 ATTENTION
- Réglage du régulateur de pression pour le gaz au propane
- 1. Utilisez une pince à rainure et languette pour retirer le bouchon régulateur D.
- 2. Dévissez la tige de régulation en plastique du bouchon régulateur D.
- 3. Inversez la tige de régulation en plastique et vissez-la fermement.
- 4. Replacez le chapeau D et resserrez-le à l'aide d'une pince à rainures et languettes.
- 5. Lors de la conversion au gaz au propane, la pression fournie au régulateur doit se situer entre 11 po et 13 po de la colonne d'eau.
- Remplacement des buses régulatrices principales
- 1. Retirez les grilles.
- 2. Retirez le capot du brûleur A et la coupelle du brûleur B du brûleur C.
- 3. Enlevez la buse D et remplacez-la par une buse adaptée au nouveau type de gaz.
- 4. Placez la coupelle du brûleur B sur le brûleur C et placez le capot du brûleur A sur la coupelle B du brûleur.
- 5. Remontez les grilles.
- Réglage du débit minimum de gaz
- 1. Retirer le bouton de commande et anneau de bouton.
- 2. Tournez doucement la vis de blocage intérieure dans le sens horaire jusqu'à ce qu'elle arrive au bout.
- Remarque :
- 3. Replacez les boutons de contrôle.
- 4. Allumez chaque brûleur individuellement et vérifiez si la flamme est stable en réglage bas.
- 5. Si nécessaire, desserrez la vis de réglage pour augmenter le débit de gaz.
- 6. Veillez à ce que la flamme ne s'éteigne pas lorsque le débit de gaz change rapidement entre maximum et minimum, et vice versa. Le réglage optimal est atteint lorsque la hauteur de la petite flamme est d'environ 1/ 8 po (3 à 4 mm).
- 7. Remettez le bouton de contrôle et anneau de bouton pour le brûleur à gaz.
- 8. Répétez les étapes 2 à 8 jusqu'à ce que tous les brûleurs à gaz soient réglés.
- 9. Branchez l'appareil à l'alimentation électrique.
- Remplacement de la buse du brûleur du four
- 1. Ouvrez la porte de l’appareil électroménager.
- 2. Retirez les vis de la chambre de cuisson du four, soulevez légèrement l'avant et tirez-la ensuite vers vous.
- 3. Retirez les vis du brûleur de cuisson et tirez le sous- ensemble de gril vers l'avant pour le sortir de la connexion de gaz.
- 4. Dévissez la buse du brûleur de cuisson et replacez-la par la buse GPL numéro 120.
- 5. Remettez le brûleur de cuisson en place et vissez-le bien.
- 6. Remettez le couvercle de la chambre de cuisson en place et vissez-le bien.
- 7. Remplissez l'étiquette de conversion LP (fournie) et collez-la sur l'appareil.
- Remplacement de la buse du brûleur de gril
- 1. Ouvrez la porte de l’appareil électroménager.
- 2. Retirez les vis du sous-ensemble du brûleur de gril et tirez le sous-ensemble de gril vers l'avant pour le sortir de la connexion de gaz. Sur le mur du fond, le brûleur est toujours connecté à l'alimentation en gaz et à l'allumage électrique.
- 3. Placez soigneusement le gril au fond de la cavité du four.
- 4. Dévissez la buse du brûleur de gril et replacez-la par la buse GPL numéro 110.
- 5. Remettez le brûleur de gril et le sous-ensemble brûleur de gril en place et vissez-les.
- 6. Remplissez l'étiquette de conversion LP (fournie) et collez-la sur l'appareil.
- Réglage du débit minimum de gaz
- 1. Ouvrez la porte de l’appareil électroménager.
- 2. Appuyez et maintenez le bouton de commande du four et tournez-le en position maximale. Le brûleur à gaz s'allume.
- 3. Gardez le bouton de contrôle enfoncé pendant 15 secondes.
- 4. Fermez la porte de l’appareil électroménager.
- 5. Retirer le bouton de contrôle et anneau de bouton.
- 6. Resserrer la vis intérieur de réglage.
- Remarque :
- 7. Remettez le bouton de contrôle.
- 8. Chauffez le four pendant 15 minutes.
- 9. Retirer le bouton de commande à nouveau.
- 10. Ajustez la vis intérieur de réglage jusqu'à ce qu'une flamme stable brûle correctement. Desserrer la vis de réglage pour augmenter le débit de gaz ou la serrer pour diminuer le débit de gaz. Le réglage est correct lorsque la hauteur de la...
- 11. Remontez le bouton de commande et anneau de bouton.
- 12. Veillez à ce que la flamme ne s'éteigne pas lorsque le débit de gaz change rapidement entre maximum et minimum, et vice versa.
- Remarque :
- Service après-vente
- Comment bénéficier du service de garantie

8
Before You Begin
Before You Begin
Tools and Parts Needed
▯ Phillips head screwdriver
▯ Slotted screwdriver 1/8" (3,5 mm)
▯ Adjustable wrench
▯ Tongue and groove pliers
▯ Socket or flat wrench 3/8” (10mm) or tongs
▯ Socket or flat wrench 7/8” (22mm) or tongs
▯ Drill with 5/16" (8mm) bit
▯ Pencil
▯ Tape measure
▯ Teflon tape or pipe-joint compound
Note: Additional materials may be necessary for
installation in solid surface countertops. Contact the
countertop manufacturer.
Parts Included
30”:
* Attached to the appliance.
36”:
* Attached to the appliance.
Removing Packaging
See the diagram on the packaging.
▯ If straps are present, cut the straps.
▯ Cut plastic down back of unit making sure not to cut
the unit.
▯ Remove plastic film.
▯ Lift the cardboard carton from the top of the range and
dispose of.
▯ Remove the corner posts, making sure that any other
packing materials running between the corner posts
are also removed.
▯ Remove all internal packaging and tape.
▯ The rear vent trim is nested in the styrofoam
packaging for shipping purposes. Do not throw away.
[[ [
[[ [