
Installation Guide
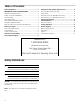
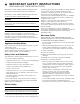
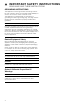
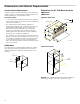
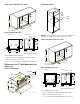
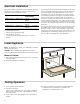

Table Of Contents
- Built-In Microwave Oven
- Table of ContentsInstallation instructions
- Safety Definitions
- IMPORTANT SAFETY INSTRUCTIONS
- READ AND SAVE THESE INSTRUCTIONS
- Before you begin
- Checklist for Installation
- 1. Before installing the appliance, be sure to verify the cabinet dimensions are correct for your appliance and that the required electrical connections are present. Make sure the electrical conduit provided on the appliance is able to reach to the p...
- 2. Move the appliance into place in front of the cabinet opening.
- 3. Remove packaging materials, leaving the bottom packaging on the appliance to avoid damage to the floor.
- 4. Team-lift the appliance directly into the cabinet cutout.
- 5. Slide the appliance all the way into place.
- 6. Fasten the appliance to the cabinet opening with the screws supplied.
- 1. Before installing the appliance, be sure to verify the cabinet dimensions are correct for your appliance and that the required electrical connections are present. Make sure the electrical conduit provided on the appliance is able to reach to the p...
- Removing Packaging
- Dimensions and Cabinet Requirements
- Electrical Installation
- Install Appliance
- Testing Operation
- Bosch® Support
- Table de MatièresInstructions d’installation
- Définitions de Sécurité
- CONSIGNES DE SÉCURITÉ IMPORTANTES
- LIRE ET CONSERVER CES CONSIGNES
- Avant de commencer
- Liste de contrôle pour l’installation
- 1. Avant d’installer l’appareil, assurez-vous de vérifier que les dimensions du caisson sont correctes pour votre appareil et que les connexions électriques requises sont présentes. Assurez-vous que le conduit électrique fourni sur l’appare...
- 2. Déplacez l’appareil devant l’avant de l’ouverture du caisson.
- 3. Retirez les matériaux d’emballage, en laissant l’emballage du fond de l’appareil pour éviter d’endommager le plancher.
- 4. L’équipe soulève l’appareil directement dans la découpe du caisson.
- 5. Glissez l’appareil en place complètement.
- 6. Fixez l’appareil dans l’ouverture du caisson avec les vis fournies.
- 1. Avant d’installer l’appareil, assurez-vous de vérifier que les dimensions du caisson sont correctes pour votre appareil et que les connexions électriques requises sont présentes. Assurez-vous que le conduit électrique fourni sur l’appare...
- Pour enlever l’emballage
- Exigences en matière de dimensions et d'armoire
- Installation électrique
- Installation de l’appareil
- Opération d’essai
- Soutien Bosch®
- ContenidoInstrucciones de instalación
- Definiciones de Seguridad
- INSTRUCCIONES DE SEGURIDAD IMPORTANTES
- LEA Y CONSERVE ESTAS INSTRUCCIONES
- Antes de empezar
- Lista de verificación de instalación
- 1. Antes de instalar el aparato, asegúrese de verificar que las medidas del gabinete sean correctas para su aparato y que estén presentes las conexiones eléctricas requeridas. Asegúrese de que el conducto eléctrico proporcionado en el aparato pu...
- 2. Mueva el aparato a su lugar, en frente de la abertura del gabinete.
- 3. Retire los materiales de embalaje, pero deje el embalaje de la parte inferior en el aparato para evitar daños al piso.
- 4. Con ayuda, levante el aparato y colóquelo directamente en el hueco del gabinete.
- 5. Deslice completamente el aparato en su lugar.
- 6. Sujete el aparato en la abertura del gabinete con los tornillos suministrados.
- 1. Antes de instalar el aparato, asegúrese de verificar que las medidas del gabinete sean correctas para su aparato y que estén presentes las conexiones eléctricas requeridas. Asegúrese de que el conducto eléctrico proporcionado en el aparato pu...
- Quitar el embalaje
- Dimensiones y requisitos del gabinete
- Instalación eléctrica
- Montaje del electrodoméstico
- Prueba del funcionamiento
- Soporte de Bosch®

6
Dimensions and Cabinet Requirements
General Cabinet Requirements
Cabinet requirements vary depending on the model to be
installed. Please consult the section Dimensions for the
details pertaining to your particular model.
All models require:
▯ ¼" (6.4 mm) space between the side of the appliance
and an adjacent wall or cabinet door when installed at
the end of a cabinet run.
▯ The cabinet base must be flat and capable of
supporting the weight of your appliance when in use.
See the appropriate weight for your model in the
Dimensions section pertaining to your particular
model. For combination units consult the section
Cabinet Dimension Requirements in the installation
manual of your combination appliance.
▯ The appliance door will overlap the furniture below by
approx. 3/16" (5 mm) when opened. If necessary, you
can elevate the appliance position by adding a panel
in the required thickness on top of the supporting
base. The supporting base must be level and securely
fixed to the cabinet.
Outlet Area
The outlet can be located anywhere within the shaded
area. Anywhere within the shaded area, the minimal
distance between the appliance and the wall is 1¾ in
(45 mm).
Dimensions for 30” Wall-Mounted Units
HMB50152UC
HMB50162UC
Appliance Dimensions
Cabinet Dimensions
NOTICE: The cabinet base must be flat and capable of
supporting a weight of at least 142 lbs (64.1 kg).
PP
PP
PP
ʌ¼ʚ
ʌ¼ʚ
ë
èç¼ʓʘ
ë
ʌ¼ʚ
ë
ê
é
é
PP