
Installation Guide
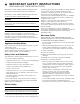
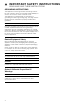
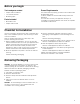
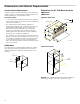
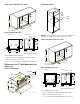
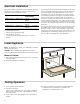

Table Of Contents
- Built-In Microwave Oven
- Table of ContentsInstallation instructions
- Safety Definitions
- IMPORTANT SAFETY INSTRUCTIONS
- READ AND SAVE THESE INSTRUCTIONS
- Before you begin
- Checklist for Installation
- 1. Before installing the appliance, be sure to verify the cabinet dimensions are correct for your appliance and that the required electrical connections are present. Make sure the electrical conduit provided on the appliance is able to reach to the p...
- 2. Move the appliance into place in front of the cabinet opening.
- 3. Remove packaging materials, leaving the bottom packaging on the appliance to avoid damage to the floor.
- 4. Team-lift the appliance directly into the cabinet cutout.
- 5. Slide the appliance all the way into place.
- 6. Fasten the appliance to the cabinet opening with the screws supplied.
- 1. Before installing the appliance, be sure to verify the cabinet dimensions are correct for your appliance and that the required electrical connections are present. Make sure the electrical conduit provided on the appliance is able to reach to the p...
- Removing Packaging
- Dimensions and Cabinet Requirements
- Electrical Installation
- Install Appliance
- Testing Operation
- Bosch® Support
- Table de MatièresInstructions d’installation
- Définitions de Sécurité
- CONSIGNES DE SÉCURITÉ IMPORTANTES
- LIRE ET CONSERVER CES CONSIGNES
- Avant de commencer
- Liste de contrôle pour l’installation
- 1. Avant d’installer l’appareil, assurez-vous de vérifier que les dimensions du caisson sont correctes pour votre appareil et que les connexions électriques requises sont présentes. Assurez-vous que le conduit électrique fourni sur l’appare...
- 2. Déplacez l’appareil devant l’avant de l’ouverture du caisson.
- 3. Retirez les matériaux d’emballage, en laissant l’emballage du fond de l’appareil pour éviter d’endommager le plancher.
- 4. L’équipe soulève l’appareil directement dans la découpe du caisson.
- 5. Glissez l’appareil en place complètement.
- 6. Fixez l’appareil dans l’ouverture du caisson avec les vis fournies.
- 1. Avant d’installer l’appareil, assurez-vous de vérifier que les dimensions du caisson sont correctes pour votre appareil et que les connexions électriques requises sont présentes. Assurez-vous que le conduit électrique fourni sur l’appare...
- Pour enlever l’emballage
- Exigences en matière de dimensions et d'armoire
- Installation électrique
- Installation de l’appareil
- Opération d’essai
- Soutien Bosch®
- ContenidoInstrucciones de instalación
- Definiciones de Seguridad
- INSTRUCCIONES DE SEGURIDAD IMPORTANTES
- LEA Y CONSERVE ESTAS INSTRUCCIONES
- Antes de empezar
- Lista de verificación de instalación
- 1. Antes de instalar el aparato, asegúrese de verificar que las medidas del gabinete sean correctas para su aparato y que estén presentes las conexiones eléctricas requeridas. Asegúrese de que el conducto eléctrico proporcionado en el aparato pu...
- 2. Mueva el aparato a su lugar, en frente de la abertura del gabinete.
- 3. Retire los materiales de embalaje, pero deje el embalaje de la parte inferior en el aparato para evitar daños al piso.
- 4. Con ayuda, levante el aparato y colóquelo directamente en el hueco del gabinete.
- 5. Deslice completamente el aparato en su lugar.
- 6. Sujete el aparato en la abertura del gabinete con los tornillos suministrados.
- 1. Antes de instalar el aparato, asegúrese de verificar que las medidas del gabinete sean correctas para su aparato y que estén presentes las conexiones eléctricas requeridas. Asegúrese de que el conducto eléctrico proporcionado en el aparato pu...
- Quitar el embalaje
- Dimensiones y requisitos del gabinete
- Instalación eléctrica
- Montaje del electrodoméstico
- Prueba del funcionamiento
- Soporte de Bosch®

8
Electrical Installation
The model stated on the front cover is rated at 120V AC,
60 Hz and uses a NEMA 5-15 plug to connect to a
dedicated 120 V microwave circuit.
Electrical Requirements:
▯ a three prong grounded outlet
▯ 120 V, 60 Hz, AC only
▯ 15 Amp electrical supply with a fuse or a circuit
breaker
This product must be connected to a supply circuit of the
proper voltage and frequency. Wire size must conform to
the requirements of the National Electric Code or the
prevailing local code for this rating. The power supply
cord and plug should be brought to a separate 20-amp
branch circuit single grounded outlet. The outlet box
should be located in the area behind the appliance (see
section Cabinet Dimensions). The outlet box and supply
circuit should be installed by a qualified electrician and
conform to the National Electrical Code or the prevailing
local code.
The voltage used must be the same as specified on this
microwave oven. Using a higher voltage is dangerous
and may result in a fire or oven damage. Using a lower
voltage will cause slow cooking. The manufacturer is not
responsible for any damages resulting from the use of
the oven with any voltage other than specified.
Install Appliance
Note: The appliance is heavy. It is advisable to install it
with a second person.
NOTICE: Before installing the appliance, be sure to
verify the cabinet dimensions and electrical connections.
Mount to Cabinet
1.
Fully insert the appliance and center it. Do not kink the
electrical cable.
2.
Screw the appliance into place.
Testing Operation
1.
Turn on power at the breaker.
2.
Test the microwave:
Place a cup of water into the oven cavity. Follow the
instructions in the Use and Care Manual on how to
heat a beverage.
3.
Verify that the oven light comes on and the water is
heated.
4.
If any of the tests do not result as explained above,
contact Service for assistance. Otherwise, the
installation is complete at this time.
Model Connection Circuit
Requirements
HMB57152UC NEMA 5-15 120 V,
60 Hz
15 Amps
HMB50152UC NEMA 5-15 120 V,
60 Hz
15 Amps
HMB50162UC NEMA 5-15 120 V,
60 Hz
15 Amps