
Installation Guide
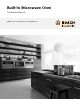
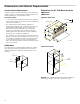
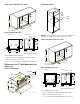
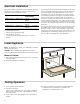

Table Of Contents
- Built-In Microwave Oven
- Table of ContentsInstallation instructions
- Safety Definitions
- IMPORTANT SAFETY INSTRUCTIONS
- READ AND SAVE THESE INSTRUCTIONS
- Before you begin
- Checklist for Installation
- 1. Before installing the appliance, be sure to verify the cabinet dimensions are correct for your appliance and that the required electrical connections are present. Make sure the electrical conduit provided on the appliance is able to reach to the p...
- 2. Move the appliance into place in front of the cabinet opening.
- 3. Remove packaging materials, leaving the bottom packaging on the appliance to avoid damage to the floor.
- 4. Team-lift the appliance directly into the cabinet cutout.
- 5. Slide the appliance all the way into place.
- 6. Fasten the appliance to the cabinet opening with the screws supplied.
- 1. Before installing the appliance, be sure to verify the cabinet dimensions are correct for your appliance and that the required electrical connections are present. Make sure the electrical conduit provided on the appliance is able to reach to the p...
- Removing Packaging
- Dimensions and Cabinet Requirements
- Electrical Installation
- Install Appliance
- Testing Operation
- Bosch® Support
- Table de MatièresInstructions d’installation
- Définitions de Sécurité
- CONSIGNES DE SÉCURITÉ IMPORTANTES
- LIRE ET CONSERVER CES CONSIGNES
- Avant de commencer
- Liste de contrôle pour l’installation
- 1. Avant d’installer l’appareil, assurez-vous de vérifier que les dimensions du caisson sont correctes pour votre appareil et que les connexions électriques requises sont présentes. Assurez-vous que le conduit électrique fourni sur l’appare...
- 2. Déplacez l’appareil devant l’avant de l’ouverture du caisson.
- 3. Retirez les matériaux d’emballage, en laissant l’emballage du fond de l’appareil pour éviter d’endommager le plancher.
- 4. L’équipe soulève l’appareil directement dans la découpe du caisson.
- 5. Glissez l’appareil en place complètement.
- 6. Fixez l’appareil dans l’ouverture du caisson avec les vis fournies.
- 1. Avant d’installer l’appareil, assurez-vous de vérifier que les dimensions du caisson sont correctes pour votre appareil et que les connexions électriques requises sont présentes. Assurez-vous que le conduit électrique fourni sur l’appare...
- Pour enlever l’emballage
- Exigences en matière de dimensions et d'armoire
- Installation électrique
- Installation de l’appareil
- Opération d’essai
- Soutien Bosch®
- ContenidoInstrucciones de instalación
- Definiciones de Seguridad
- INSTRUCCIONES DE SEGURIDAD IMPORTANTES
- LEA Y CONSERVE ESTAS INSTRUCCIONES
- Antes de empezar
- Lista de verificación de instalación
- 1. Antes de instalar el aparato, asegúrese de verificar que las medidas del gabinete sean correctas para su aparato y que estén presentes las conexiones eléctricas requeridas. Asegúrese de que el conducto eléctrico proporcionado en el aparato pu...
- 2. Mueva el aparato a su lugar, en frente de la abertura del gabinete.
- 3. Retire los materiales de embalaje, pero deje el embalaje de la parte inferior en el aparato para evitar daños al piso.
- 4. Con ayuda, levante el aparato y colóquelo directamente en el hueco del gabinete.
- 5. Deslice completamente el aparato en su lugar.
- 6. Sujete el aparato en la abertura del gabinete con los tornillos suministrados.
- 1. Antes de instalar el aparato, asegúrese de verificar que las medidas del gabinete sean correctas para su aparato y que estén presentes las conexiones eléctricas requeridas. Asegúrese de que el conducto eléctrico proporcionado en el aparato pu...
- Quitar el embalaje
- Dimensiones y requisitos del gabinete
- Instalación eléctrica
- Montaje del electrodoméstico
- Prueba del funcionamiento
- Soporte de Bosch®

9
Bosch
®
Support
Before Calling Service
See the Use and Care Manual for troubleshooting
information. Refer to the “Statement of Limited Product
Warranty” in the Use and Care Manual.
To reach a service representative, see the contact
information at the front of the manual or in the following
section. Please be prepared with the information printed
on your product data plate prior to calling.
Data Plate
The data plate shows the model and serial number. Refer
to the data plate on the appliance when requesting
service.
The data plate can be found on the inside of the
appliance door.
To avoid having to search for each piece of information
when calling, you can enter the four items needed in the
spaces provided below.
Keep your invoice or escrow papers for warranty
validation if service is needed.
Service
We realize that you have made a considerable
investment in your kitchen. We are dedicated to
supporting you and your appliance so that you have
many years of creative cooking.
Please don’t hesitate to contact our Customer Support
Department if you have any questions or in the unlikely
event that your Bosch® appliance needs service. Our
service team is ready to assist you.
USA
800-944-2904
www.bosch-home.com/us/support
Canada
800-944-2904
www.bosch-home.ca/en/support
Parts and Accessories
Parts, filters, descalers, stainless steel cleaners and more
can be purchased in the Bosch
®
eShop or by phone.
USA
www.bosch-home.com/us/store
Canada
Marcone 800-482-6022
or
Reliable Parts 800-941-9217
Model No.
FD-No.
Date of Purchase
Customer Service O