Congratulations and thank you from Bosch! Thank you for selecting a Bosch dishwasher. You have joined the many consumers who demand quiet and superior performance from their dishwashers. This manual was written with your safety and convenience in mind, and the information contained herein is very important. We highly recommend that you read this manual before using your dishwasher for the first time.
IMPORTANT SAFETY INSTRUCTIONS: Please READ and SAVE this information WARNING Misuse of the dishwasher can result in serious injury or death. Do not use the dishwasher in any way not covered in this manual or for any purpose other than those explained in the following pages. Severe product damage and/or injury could result from the use of unqualified service technicians or non-original replacement parts.
WARNING: To reduce the risk of fire, electrical shock, or serious injury, observe the following: 1 2 3 4 5 6 7 8 9 10 11 12 13 This dishwasher is provided with Installation Instructions and this Use and Care Manual. Read and understand all instructions before using the dishwasher. This appliance must be grounded to a metal, permanent wiring system, or an equipment grounding conductor must be run with the circuit conductors and connected to the equipment grounding terminal or lead on the dishwasher.
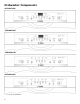
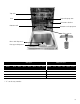
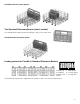
Dishwasher Components SHE3AR7xUC* SHE3ARFxUC* SHE3AR5xUC* SHE3ARLxUC* * “x” can be any number 4
Top rack Top rack spray arm Vent Silverware basket Bottom rack Bottom rack spray arm Filter system Rinse aid dispenser Detergent dispenser Wash Cycles Additional Features Model Heavy Wash Auto Wash Normal Wash Delicate Express Wash Wash SHE3AR7xUC* X X X X X SHE3ARFxUC* X X X X X SHE3AR5xUC* X X X SHE3ARLxUC* X X X X Half Load Rinse & Adjustable Hold Top Rack X X Child Lock Delay Start Flip Tines Sanitize Silverware Option Basket X X X X X Standard X X X X
Dishwasher Features Auto-Close: The auto-close feature will hold the door wherever you place it and then automatically latch when open 20 degrees or less. Delay Start: Delay the start time of your dishwasher using the delay start option. EcoSense™ Wash Management System: Checks water condition and decides if a second fresh water fill is necessary. Extra Dry Heat: Raises the temperature of the rinse and increases the drying time resulting in improved drying.
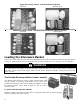
Loading the Dishwasher Do not pre-wash items with loosely attached soiling. Remove all food particles, bones, toothpicks and excessive grease. Items having burned-on, baked-on or starchy soils may require some pretreatment. Refer to the Dishware Materials section for more information about dishware suitability. Load only dishwasher safe items into the dishwasher. Load dishes in the dishwasher racks so the insides of bowls, pots and pans are facing the spray arms.
Suggested Loading Pattern - Standard Silverware Basket Top Rack Bottom Rack Additional Loading Pattern - Standard Silverware Basket (10 place settings) Top Rack Bottom Rack Loading the Silverware Basket Place knives and sharp utensils with their HANDLES UP and forks and spoons with their handles down. If large or oddly-shaped items are loaded in the silverware basket, be sure they do not nest together. WARNING The sharp points and edges of knives and other sharp utensils can cause serious injury.
Flexible Basket Placement Options The Standard Silverware Basket (select models) The standard silverware basket fits along the side of the lower rack. Standard Basket Placement Option Loading pattern for Flexible & Standard Silverware Baskets 1 1234- 2 3 4 5 6 7 salad fork 5 - tablespoon teaspoon 6 - serving spoon dinner fork 7 - serving fork knife The basket lid may also be snapped to the handle in order to leave the basket open.
Figure 1 Rack Accessories Flip Tines (model dependent) The racks consist of tines that can be folded down depending on what you may need to load in the rack. To fold down, grasp the folding tine and release from notch. Push folding tine downward to desired position as shown in Figure 1. Adjustable Upper Rack (model dependent) Figure 2 Remove the empty upper rack by pulling it out of the dishwasher until it can be lifted upward as show in Figure 2.
Adding Detergent • 1 tablespoon (15ml) will clean most loads (see Figure 4). • Do not use more than 3 tablespoons (45ml). • Do not over fill the detergent dispenser. • When using detergent tabs, lay them flat to avoid contact with the cover. Figure 4 3 Tbsp. Max. 2 Tbsp. (25ml) 1 Tbsp. (15ml) To Close • Place finger as shown in Figure 5. • Slide door closed and press down firmly until it clicks. To Open • To open the cover, push the button as shown in Figure 6. • Cover will slide open.
Dishwasher Cycles and Options Wash Cycles (model dependent) Heavy Wash: Best for cleaning items with baked-on food or grease. These dishes would normally require soaking. Auto Wash: With our most complex soil sensing capability, this cycle is perfect for use with mixed loads of dishware with varying amounts of food soil. This is the most flexible cycle and is a good choice for everyday use. Normal Wash: Thoroughly cleans a full load of normally soiled dishes.
Operating the Dishwasher Start the dishwasher: 1 2 3 4 Press the On/Off button. One of the wash cycle LEDs will be flashing. You can now select a wash cycle. Press the Cycle Select arrow buttons to select the desired wash cycle. Press Start to begin the cycle. Delay start: 1 2 3 4 Press the On/Off button. Select a cycle. Press the Delay Start button. Release when the desired delay time is shown in the display window or the appropriate LED is lit (depending on model). Press Start to begin the cycle.
For models without display: To 1 2 3 4 5 enter options mode: With the door closed, press the On/Off button to turn the unit on. One of the wash cycle LEDs will be flashing. Press and hold down the > button, then press and release the Start button. Now release the > button. The “Clean” and one other LED will be flashing. You are now in options mode. Press the > button to select the option you would like to adjust.
To reinstall the top spray arm, place it back in position and return the locking nut to its install position. Turn the locking nut clockwise to secure. Return the top rack to the top rack roller guides. Figure 9 Remove the bottom spray arm by first removing the empty bottom rack from the dishwasher. Grasp and lift the spray arm as shown in Figure 9. Look for obstruction in the spray nozzles. If the spray nozzles need cleaning, flush them under running water.
Self Help Dishwashers may occasionally exhibit problems that are unrelated to a malfunction of the dishwasher itself. The following information may help you with a dishwasher problem without involving a repair professional. Problem Cause Action Auto-Close 1. Auto-close feature will not work properly door not clos- if dishwasher is not installed correctly. ing properly 1. Ensure the alignment of the dishwasher frame is accurate and level. 1. Door may not be properly latched 2.
Problem Odor Cause 1. Food debris is present at the bottom of the dishwasher 2. Food particles are present near the door seal 3. Dishes left in unit too long before running a cycle 4. Residual water is present at the bottom of the dishwasher 5. Drain hose is obstructed Action 1. Remove the filters and clean according to the “care and maintenance” section of the manual 2. Refer to “care and maintenance” section of the manual 3.
Customer Service Your Bosch dishwasher requires no special care other than that described in the Care and Maintenance section of the manual. If you are having a problem with your dishwasher, before calling for service please refer to the Self Help section of the manual. If service is necessary, contact your dealer or installer or an authorized service center. Do not attempt to repair the appliance yourself. Any work performed by unauthorized personnel may void the warranty.
Warranty Information What this Warranty Covers & Who it Applies to: The limited warranty provided by BSH Home Appliances (“Bosch”) in this Statement of Limited Product Warranty applies only to Bosch dishwashers (“Product”) sold to you, the first using purchaser, provided that the Product was purchased: (1) for your normal, household (non-commercial) use, and has in fact at all times only been used for normal household purposes; (2) new at retail (not a display, “as is”, or previously returned model), and n
BSH reserves the right to change specifications or design without notice. Some models are certified for use in Canada. BSH is not responsible for products which are transported from the United States for use in Canada. Check with your local Canadian distributor or dealer. BSH Home Appliances, Corporation, 5551 McFadden Avenue, Huntington Beach, CA 92649. BSH se réserve le droit de modifier les données techniques ou le design sans préavis. Certains modèles sont certifiés pour une utilisation au Canada.