The Bose® Lifestyle® SA-2 and SA-3 Stereo Amplifier Owner’s Guide
Safety Information WARNING: To reduce the risk of fire or electrical shock, do not expose the product to rain or moisture. WARNING: The apparatus shall not be exposed to dripping or splashing, and objects filled with liquids, such as vases, shall not be placed on the apparatus. As with any electronic products, use care not to spill liquids into any part of the system. Liquids can cause a failure and/or a fire hazard.
Important Safety Instructions 1. 2. 3. 4. 5. 6. 7. 8. 9. 10. 11. 12. 13. 14. 15. 16. 17. 18. 19. Read these instructions – for all components before using this product. Keep these instructions – for future reference. Heed all warnings – on the product and in the owner’s guide. Follow all instructions.
Contents Introducing the Lifestyle® SA-2 and SA-3 Stereo Amplifier . . . . . . . . . . . . . . . . . . . . . . . . . . . . . . Before you begin . . . . . . . . . . . . . . . . . . . . . . . . . . . . . . . . . . . . . . . . . . . . . . . . . . . . . . . . . . . Unpacking the carton . . . . . . . . . . . . . . . . . . . . . . . . . . . . . . . . . . . . . . . . . . . . . . . . . . . . . . . . Connection panel features . . . . . . . . . . . . . . . . . . . . . . . . . . . . . . . . . . . . . . . . . . . . . .
Introducing the Lifestyle® SA-2 and SA-3 Stereo Amplifier Before you begin Thank you for purchasing a Lifestyle® SA-2 or SA-3 stereo amplifier. The Lifestyle® stereo amplifier provides you with a simple solution when you want to add Bose® non-powered environmental speakers or Bose non-powered accessory speakers to your Lifestyle® system. Bose proprietary Integrated Signal Processing technology, featured in the amplifier, provides full, rich stereo sound, even when the speakers are playing at low volumes.
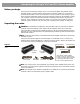
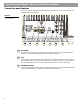
Introducing the Lifestyle® SA-2 and SA-3 Stereo Amplifier Connection panel features The connection panel includes the input/output connections plus room code switches and amplifier LED status indicators. Figure 2 Lifestyle® amplifier connection panel 1 6 2 3 4 5 6 7 1 AC POWER AC power cord jack. There is no on/off switch on this product. Power is applied when the power cord is installed and plugged into an AC (mains) receptacle. 2 VCA Local volume control connection jacks.
Introducing the Lifestyle® SA-2 and SA-3 Stereo Amplifier 4 ROOM CODE switches Microswitches for setting room code and amplifier advanced features. For switches A, B, and C, see “Setting Up Advanced Features” on page 26. For switches 6 through 9, see “Setting up the amplifier room code” on page 25. SA-3 A B C 6 7 8 9 SA-2 C 6 7 8 9 5 LED status indicator The green LED indicates the operational state of the amplifier. See “Powering-up your system” on page 22.
Setting Up Your Lifestyle® Stereo Amplifier Identifying your system The Lifestyle® stereo amplifier and additional remote come ready to be installed and used in a second room (Room B). This section provides placement and mounting instructions for the Lifestyle® stereo amplifier. Following this information you will find a section that describes how to set up the amplifier with your particular home entertainment system.
Setting Up Your Lifestyle® Stereo Amplifier Selecting a location for your Lifestyle® stereo amplifier Your Lifestyle® stereo amplifier does not need to be situated close to either your Lifestyle® system or the accessory speakers. Consider the following guidelines when selecting a location for your amplifier. CAUTION: DO NOT mount the amplifier on surfaces that are not sturdy enough, or that have hazards concealed behind them, such as electrical wiring or plumbing.
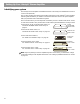
Setting Up Your Lifestyle® Stereo Amplifier Mounting your Lifestyle® stereo amplifier Your Lifestyle® stereo amplifier can be placed on a shelf or mounted on a wall (Figure 3). • When placing the amplifier on a horizontal surface like a floor or shelf, the amplifier’s rubber feet provide stability and prevent scratches. • ONLY when mounting the amplifier on a wall, remove the rubber feet and use the existing guide holes in the amplifier’s enclosure for mounting hardware.
Setting Up Your Lifestyle® Stereo Amplifier Model AV-18/38/48 media center setup CAUTION: Before making connections, turn the Lifestyle® system off and disconnect the media center from the AC (mains) power outlet. DO NOT plug the amplifier into an outlet until you have completed all other connections. 1. Insert one end of the Bose® link A cable into the Bose® link output jack on the rear panel of the media center (Figure 5). 2.
Setting Up Your Lifestyle® Stereo Amplifier Setting up RC18S2 and RC38S2 remotes Your additional remote is shipped from the factory already set up for a second room (room B). To make sure that this remote will work with your home entertainment system, do the following to check the house code setting. 1. Remove the remote control battery cover and locate the microswitches (Figure 6). 2. Make sure that the house code settings (switches 1, 2, 3, and 4) match the house code settings in your main room remote.
Setting Up Your Lifestyle® Stereo Amplifier Model AV-28 media center setup CAUTION: Before making connections, turn the Lifestyle® system off and disconnect the media center from the AC (mains) power outlet. DO NOT plug the amplifier into an outlet until you have completed all other connections. 1. Insert the 8-to-9-pin adapter into the SPEAKER ZONES 2 output jack on the rear panel of the media center (Figure 7). 2. Insert one end of the Bose® link A cable into the 8-to-9-pin adapter. 3.
Setting Up Your Lifestyle® Stereo Amplifier Setting up the RC28S remote Your second remote is shipped from the factory already set up for Zone 2. To make sure that this remote will work with your home entertainment system, do the following to check the house code setting. 1. Remove the remote control battery cover and locate the microswitches (Figure 8). 2. Make sure that the house code settings (switches 1, 2, 3, and 4) match the house code settings in your main room remote. 3.
Setting Up Your Lifestyle® Stereo Amplifier Multi-room interface setup CAUTION: Before making any connections, turn the Lifestyle® system off and disconnect the music center from the AC (mains) power outlet. DO NOT plug the amplifier into an outlet until you have completed all other connections. 1. Insert the 8-to-9-pin adapter into one of the unused ROOM output jacks (B, C, or D) on the rear of the multi-room interface (Figure 10). 2. Insert one end of the Bose® link A cable into the 8-to-9-pin adapter. 3.
Setting Up Your Lifestyle® Stereo Amplifier Setting up the Personal® music center Systems that have a multi-room interface are controlled by the Personal® music center which requires no internal switch settings before it allows you to control more than one room of speakers. However, if you purchase a second Personal® music center, you must follow the procedure for setting up the Personal® music center for the first time.
Setting Up Your Lifestyle® Stereo Amplifier Model 20 music center setup CAUTION: Before making connections, turn the Lifestyle® system off and disconnect the music center from the AC (mains) power outlet. DO NOT plug the amplifier into an outlet until you have completed all other connections. ® 1. Insert the 8-to-9-in DIN adapter into the SPEAKER ZONES 2 output jack on the rear panel of the music center (Figure 12). 2. Insert one end of the Bose® link A cable into the 8-to-9-pin adapter. 3.
Setting Up Your Lifestyle® Stereo Amplifier Setting up the RC-20 remote for Zone 2 If your system uses a Model 20 music center, you need to set up a second RC-20 remote control to operate the ZONE 2 outputs. 1. Remove the remote control battery cover and locate the miniature switches (Figure 13). 2. Make sure that the house code settings (switches 1, 2, 3, and 4) match those in your first remote. 3. Slide switch 5 down (off), and switches 6 and 8 up (on).
Setting Up Your Lifestyle® Stereo Amplifier Model 5 music center setup This setup requires a 3-ft audio input adapter cable. Contact your Bose dealer or Bose® Customer Service. See the list of locations and phone numbers included in the shipping carton. CAUTION: Before making connections, turn the Lifestyle® system off and disconnect the music center from the AC (mains) power outlet. DO NOT plug the amplifier into an outlet until you have completed all other connections.
Setting Up Your Lifestyle® Stereo Amplifier Setting up the RC-5 remote If your system uses a Model 5 music center, you need to set up a second RC-5 remote control to operate your Lifestyle® stereo amplifier. 1. Remove the remote control battery cover and locate the miniature switches (Figure 15). 2. Make sure that the house code settings (switches 1, 2, 3, and 4) match those in your first remote. 3. Slide switch 5 down (off) and 6 up (on).
Setting Up Your Lifestyle® Stereo Amplifier Connecting speakers to your Lifestyle® stereo amplifier CAUTION: DO NOT connect any make or model of powered speakers to the speaker outputs of the Lifestyle® stereo amplifier. Doing so may cause damage to the equipment. CAUTION: Make sure that the amplifier is disconnected from AC power before making speaker connections. CAUTION: The Lifestyle® stereo amplifier requires a 6-ohm minimum load. Speaker cord consists of two insulated wires.
Setting Up Your Lifestyle® Stereo Amplifier Powering-up your system CAUTION: DO NOT plug the AC power cord into an AC (mains) outlet until all other connections are complete. 1. Using the power cord included with your Lifestyle® stereo amplifier, firmly insert the small connector on one end of the power cord into the AC power jack on the rear panel of the amplifier (Figure 17). 2. Connect the power cord of the Lifestyle® stereo amplifier and your Lifestyle® music system to an AC (mains) outlet.
Setting Up Additional Rooms For Sound Setup guidelines for additional rooms If you have a Lifestyle® 18 series II, 28 series II, 38 or 48 home entertainment system, you can experience stereo sound in up to 14 other rooms using Lifestyle® stereo amplifiers, compatible speaker systems and remote controls for the other rooms. • Remote controls for other rooms must be set to the same house code as the main room remote, but each remote must be set to a different room code.
Setting Up Additional Rooms For Sound Setting up remote controls for other rooms To set up the RC18S or RC38S remote: 1. Remove the remote control battery cover and locate the microswitches (Figure 19). 2. Make sure that the house code settings (switches 1, 2, 3, and 4) match the house code settings in your main room remote. 3. This remote is shipped from the factory set for room B.
Setting Up Additional Rooms For Sound Setting up the amplifier room code The room code of the amplifier must match the room code of the remote used in the room where the speakers are installed.
Setting Up Advanced Features Amplifier mode switches The advanced features of the Lifestyle® stereo amplifier are set up using microswitches A, B, and C (Figure 21). The SA-3 has all three switches, but the SA-2 has only switch C.
Maintaining Your Lifestyle® Stereo Amplifier Cleaning the amplifier CAUTION: Disconnect the power cord from the AC outlet before cleaning. The amplifier, which is designed only for indoor use, may become dusty over time. To clean the amplifier, use only a soft, dry cloth to remove dust from the outside of the enclosure. You may use a brush attachment on a vacuum cleaner to clean the hard-to-reach areas. DO NOT use any solvents, chemicals, or cleaning solutions containing alcohol, ammonia, or abrasives.
Maintaining Your Lifestyle® Stereo Amplifier Problem What to do Bass or treble is weak • Check the speaker wire connections. Make sure the wires are connected + to + and – to –. • See “Connecting speakers to your Lifestyle® stereo amplifier” on page 21. Interference • Make sure the speaker wires are firmly inserted in the terminals on the back of the speaker and on the amplifier rear panel. Check to be sure no wires are touching across terminals.
Maintaining Your Lifestyle® Stereo Amplifier Technical information Features • Bose® proprietary digital signal processing technology • Built-in digital volume control • Thermal overload protection • Protective rubber feet Power rating • USA/Canada: 120V 50/60 Hz, 220W (SA-2), 400W (SA-3) • International: 220-240V 50/60 Hz, 220W (SA-2), 400W (SA-3) Input sensitivity • 0.
Bose Corporation USA Italia Bose Corporation, The Mountain Framingham, MA 01701-9168 1-800-367-4008 Phone hours - ET (eastern time): Weekdays 8:30 a.m. to 8 p.m. Saturdays 9 a.m. to 3 p.m. Bose S.p.A., Via della Magliana 876 00148 Roma TEL 06-65670802 FAX 06-65680167 Canada Bose Ltd., 1-35 East Beaver Creek Road Richmond Hill, Ontario L4B 1B3 1-800-465-2673 Phone hours - ET (eastern time): Weekdays 9 a.m. to 5 p.m. European Office Bose Products B.V.
©2004 Bose Corporation, The Mountain, Framingham, MA 01701-9168 USA 275071 AM Rev.
OUR COMMITMENT TO YOU We take great pride in designing each of our products with the goal of providing the highest accuracy musical performance possible in the price range of that product. We strive to reproduce the musical sounds as closely as possible to those of the original performance. And we strive to avoid flashy sounds such as those associated with accentuated bass and/or treble frequencies. While those sounds may be initially attractive to the novice, they are not real and are not enduring.
lIorg.e Bose AlS, Soll4eimsgate 11 N-2001, lillestr0m TEL 63-817380 Osterreich Bose Ges.m.b.H., Vienna Business !earl< Wienerbergstrasse 7 (10.0G) A-1100 Vienna TEL 01-60404340 Schweiz Bose AG, Runenbergerstrasse 13 4460-Gelterkinden TEL 061-9815544 Sverige Bose AlS, Jol4annefredsgatan 4>·· · · ·.· · ·.>.>··\.»··.· >· S-43153 Molndal TEL 31-878850 United Kingdom Bose Limited 1 Ambley Green Gillingl4am Business Park Gillingl4am, Kent ME8 ONJ FAX 0870-741-4545 TEL 0870-741-4500 World Wide Web www.bose.
For U.S.
IMPORTANTI IMPORTANTI IMPORTANTI PLEASE COMPLETE AND RETURN IMMEDIATELYI 6 Please indicate the serial number(s) of this product. Register online at http://www.bose.
16 Which best describes your family income? 1.0 Under $15,000 7.0$100,000-$124,999 2. 0 $15,000-$24,999 8. 0 $125,000-$149,999 3. 0 $25,000-$34,999 9. 0 $150,000-$174,999 4. 0 $35,000-$49,999 10. 0 $175,000-$199,999 5. 0 $50,000-$74,999 11. 0 $200,000-$249,999 6. 0 $75,000-$99,999 12. 0 $250,000 or over 17 Education: (Please check which category applies to you) 1. 0 Some high school 2. 0 Completed high school 3. 0 College degree 4.
I Bose® Product Please Keep This Warranty Information Card With Your Owner's Guide. What is covered: All parts defective in material and workmanship. This limited warranty does not cover a defect that has resulted from improper or unreasonable use or maintenance, accident, excess moisture, improper packing, lightning, power surges, or unauthorized tampering, alteration or modification.
Continued from other side c) Labeling and shipping, freight prepaid, to Bose® Corporation, Product and Technical Support, The Mountain, Framingham, MA 01701-9168 or the one provided by Bose Corporation. You may also write to this address to obtain information about this limited warranty. d) Placing any necessary return authorization number prominently on the outside of the carton. (Cartons not bearing a return authorization number where required will be refused.