4 10 R - 02 0896
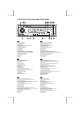
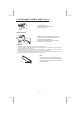
1. BUTTONS LOCATION AND FUNCTIONS 1 10 14 4 9 2 12 13 7 6 8 15 11 3 5 16 17 1. Panel Release Button 2. Power / Mute Button 3. CD Eject Button 4. Audio Button 5. Display Button / ID3 Information Button 6. Local / Distant Button 7. Preset Memory Buttons 8. iX-Bass Button 9. Source Button 10. Volume Knob 11. Automatically Store / Preset Scan Button 12. Band/Loudness Button / MP3 Enter Button 13. Tuning Up/Down & Track Up / Down Buttons 14. Remote Control Receiver 15. Preset Equalizer Button 16.
This radio is equipped with the most advanced "TOUCH SENSE PANEL", so that it is easy and convenient to use while driving. Tips Here are some tips to show you how easy it is to use this touch sense panel: Using a very light touch on the radio panel will activate that feature. You will not need to "PRESS" hard on the panel to make this radio change features. The power button along with some of the buttons that have dual functions, will need to be "TOUCHED" from 2 to 3 seconds to make the change.
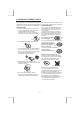
2. HANDLING COMPACT DISCS MOISTURE CONDENSATION On a rainy day or in a very damp area, moisture may condense on the lenses inside the unit. Should this occur, the unit will not operate properly. In such a case, remove the disc and wait for about an hour until the moisture has evaporated. NOTES ON DISCS If you use the discs explained below, the sticky residue can cause the CD to stop spinning and may cause malfunction or ruin your discs.
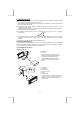
3. INSTALLATION Before finally installing the unit, connect the wiring temporarily and make sure it is all connected up properly and the unit and system work properly. Use only the parts included with the unit to ensure proper installation. The use of unauthorized parts can cause malfunctions. Consult with your nearest dealer if installation requires the drilling of holes or other modifications of the vehicle.
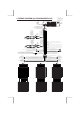
Removing the unit a a. Frame b. Insert fingers into the groove in the front of frame and pull out to remove the frame. (When re-attaching the frame, point the side with a groove down wards and attach it.) c. Insert the levers supplied with the unit into the grooves at both sides of the unit as shown in figure until they click. Pulling the levers makes it possible to remove the unit from the dashboard. b c Trim Plate Installation: Push the trim plate against the chassis until it is fitted.
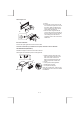
4. DETACHABLE CONTROL PANEL (D.C.P.) Removing The Detachable Control Panel (D.C.P.). PANEL RELEASE BUTTON 1. Turn the power off 2. Press the D.C.P. release button 3. Remove the D.C.P. Attaching the DCP 2 A B 1. Attach the panel at the right side first, with point B on the main unit touching point A on the D.C.P. (As shown on the digram). 2. Then press the left side of D.C.P. onto the main unit until a “click” sound is heard. CAUTION DO NOT insert the D.C.P from the left side. Doing so may damage it.
ANTENNA CABLE INPUT 5.
6. BASIC OPERATIONS 1) PANEL RELEASE BUTTON (REL) Press this button to remove the control panel. 13) POWER ON/OFF BUTTON ( ) Press the POWER button on the front of the unit to turn on the unit. Long press the POWER button to turn Off the unit. 13) MUTE BUTTON (MUTE) Short Press the MUTE button to mute the audio output, and “Mute” will appear on the display. Press the mute button again to restore the audio output to the previous level.
7. MENU OPERATIONS To use this function keep press short AUDIO/MENU Button for few seconds, each time you press this button the mode will move and the functions will shown on the display, turn the encoder volume knob up/ down to set the desires functions ,the function states as following: BASS ( Bass level ) Turn the encoder volume knob to adjust the desired Bass level range from -10 to +10, the default is “0”.
8. RADIO OPERATIONS 9) RADIO SIGNAL STRENGTH METER (RSLM) This is use to indicate the signal strength of current radio station broadcast. When you choose RADIO mode, it will show on the display. Best reception Worst reception 7) STATION PRESET BUTTONS (M1-M6) 1.Press these buttons briefly to recall the stored stations in the selected band. 2.Presetting stations manually, Press the BAND button to select the band for the station to be preset. Use Tuning Up/Down to tune in the stations to be preset.
9.CD OPERATIONS 4) CD SLOT Insert the disc into CD slot. The CD will begin to play. M1) PAUSE BUTTON (PAU) Press this button to pause CD play, press again to release pause. M2) SCAN BUTTON (INT) Press this button, the first 10 seconds of each track will be played sequentially until this button is pressed again, then normal play will resume at the current track. M3) REPEAT BUTTON (RPT) Press this button, the current track will be played repeatedly until this button is pressed again.
PLEASE READ THIS INSTRUCTION CAREFULLY BEFORE OPERATING THE UNIT 10. USB DRIVE OPERATIONS COMPATIBILITY Due to the fast changing technology world, this unit may or may not be compatible to all the USB drive / device available with all the future technology, especially those USB drive / device which require to install a driver. Always choose a compatible USB drive / device which is compatible with this unit. P.1 NOTE: This unit is not compatible with portable Hard-Disk. START THE USB DEVICE MODE 1.
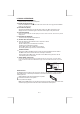
11. SD/MMC OPERATIONS 1.Press panel release button to release the front panel.(P.1) 2.The SD/MMC card slot is located on the unit as indicated in (P.2). 3. Insert the SD/MMC card into the card slot in the correct direction until a “CLICK” sound is heard.(P.3) 4.Close the front panel.(P.4) P.2 P.1 P.3 Face Up P.4 Click Detach the Front Panel Insert the SD/MMC Card with Label up side Push in till heard a “click” Close the front Panel 5.
12.MP3/WMA OPERATIONS(ENCODER VERSION) Notes : This unit support : MPEG1/2/2.5/ Layer 2/3 WMA Version 7/8/9 Sampling frequency - MPEG1 : 32/44.1/48 KHz - MPEG2 :16/22.05/24 KHz - MPEG2.5 : 8/11.025/12KHz - WMA : 22/32/44/48KHz Sampling But rate - MP3/WMA : 32~320Kbps & VBR CDROM Mode 1 / 2 ISO9660 Level 1 / 2 & Joliet(unicode) Max File/DIR. Count : 255 Max DIR. Depth : 255 Sorting Method : Tree sorting Max File/DIR. Name : 64Byte ID3 V1.0/1.1/2.0/2.
ENTER BUTTON and continue to search the directory or file name in the directory by TUNE UP / DOWN Button (TUNE DOWN First).
13.REMOTE CONTROL 8 1 9 2 3 10 4 5 11 6 12 7 13 14 OPERATIONS: Key Radio Mode CD Player Mode MP3/USB/SD Mode 1. Power ( ) Power On/Off Power On/Off Power On/Off 2. Volume Up/Down Adjust Vol,Bas, Tre,Fad,Bal Adjust Vol,Bas, Tre,Fad,Bal Adjust Vol,Bas, Tre,Fad,Bal 3. ID3/DISP Display Clock Display Clock ID3 tag information Display Clock, Numeric key 0* No Functio n No Functio n 4.Stereo/Mono Stereo/FM Mono 5.
14.SPECIFICATIONS CD PLAYER System Usable disc Sampling frequency No of quantization bits Frequency Number of channels S/N Ratio RADIO SECTION FM Frequency Range Intermediate Frequency Usable Sensitivity Stereo Separation S/N Ratio AM/MW Frequency Range CD Player Sistema: Tipo de disco: Frequência de Amostragem: Conversor D/A: Resposta de frequencia Número de canais: Relação sinal/ruído: Compact disc audio system Compact disc 44.1KHz 1bit 5-20,000Hz 2 channels 70dB Rádio FM Faixa de Frequencia: 87.
15.TROUBLE SHOOTING Before going through the check list, check wiring connection. If any of the problems persist after check list has been made, consult your nearest service dealer. Symptom No power Disc cannot be loaded or ejected Cause Solution The car ignition is not on. If the power supply is properly connected to the car accessory terminal, switch the ignition key to “ACC” The fuse is blown. Replace the fuse. Presence of CD disc inside the player.