
Replacement Part List


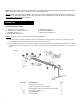

Page 3
GENERAL REPAIR
WARNING! This product has been shipped partially assembled. Use extreme caution unpacking this machine.
Some components are very heavy and will require additional people or mechanical lifting tools.
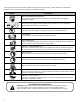
Unpacking tools needed:
1. Wrench 13mm
2. Scissors or knife
3. Pry bar or claw hammer
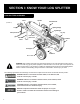
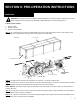
Step 1: Use a 13mm wrench to remove the bottom bolts securing the crate side frames onto the crate bottom, lift the
crate top and the cardboard box up and put them aside together. See FIGURE 4.
Step 2: Carefully remove all loose parts included in the container, e.g. wheels, hardware box.
Step 3: Use scissors or a knife to cut and remove the straps securing the parts to the beam or tank assembly, including
tongue assembly and log tray assemblies, then put aside these parts for installation.
NOTE: DO NOT remove the strap securing the hydraulic hoses to the beam at this time, until you do the procedure to
connect the hoses.
Step 4: Use scissors or a knife to cut and remove the straps securing the engine / pump assembly to the crate bottom,
and then place aside carefully for installation.
Step 5: Use a pry bar or claw hammer to remove the plywood splinters securing the beam and tank assemblies on the
crate bottom. Take out the two heavy assemblies.
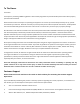
SECTION II: PRE-OPERATION INSTRUCTIONS
UNPACKING
Crate Top
Cardboard box
Hex head bolt
x 28 PCS
D.O.T. Tire
(FIGURE 4)
Crate Bottom
6