
Installation Guide
CLEAN UP
As you work, immediately clean any adhesive from prefinished
flooring with Bostik Ultimate™ Adhesive Remover or mineral
spirits (be careful not to harm finish), then dry buff with a non-
abrasive towel. Immediately clean all tools and equipment with
Bostik Ultimate™ Adhesive Remover or mineral spirits before
material cures.
TROWEL CLEAN-UP TIP: Before use, over areas of the trowel
that are not used to spread the adhesive with blue tape. After
use, simply tear off tape before material cures, and clean the
remainder of the trowel with adhesive remover.
STORAGE/SHELF LIFE
Store at temperatures between 50°F and 100°F (10°C and 38°C).
Shelf life is one year from date of manufacturing in closed,
original packaging.
Re-Seal Partially Used Container: With pail upright place a sheet
of plastic (e.g., trash bag) over the top of the pail. Secure lid tightly
over the plastic on top of pail. Carefully turn pail upside down.
Plastic will help prevent the material from bonding the lid closed.
Re-Open Partially Used Container: Carefully turn pail right side
up. Remove lid. Carefully cut and discard cured material and
plastic from top of pail. Any uncured material may be used.
LIMITATIONS
• Periodically check coverage of adhesive during installation;
100% substrate coverage and adhesive transfer is required to
protect against damages from subfloor moisture.
• Due to limitations with solid and bamboo wood flooring (e.g.,
lack of dimensional stability), “below-grade” installations are
limited to engineered hardwood flooring.
• For substrates with any history of moisture problems, or for
concrete slabs exceeding 6 lb MVER or 80% RH, use a high
performance moisture vapor reduction product such as Bostik
Wood-Grip™ Advanced, or use MVP4™ prior to the application
of MultiGrip™.
• On- or below-grade substrates must have appropriate vapor
barrier (6 mil poly or better) properly installed below slab.
• Do not install solid wood flooring over VCT/vinyl.
• Bamboo installations should follow solid hardwood flooring
installation recommendations.
• Slab temperature should be between 50°F and 95°F (10°C and
35°C) during installation.
• Do not use on wet, dusty, contaminated, glassy smooth or
friable substrates; do not use over substrates/slabs treated
with sealers or curing compounds.
• Completely remove all adhesive residue and other surface
contaminants by diamond grinding, shot blasting, or scarifying.
• Do not use over perimeter bonded flooring material.
• Use over gypsum-based/underlayments is limited to dry, “above-
grade” installations where the gypsum has dried hard (not dusty/
powdery), with a minimum compressive strength > 2,000 psi for
engineered hardwood installations, or minimum compressive
strength > 2,500 psi for solid hardwood installations.
• Please refer to flooring manufacturer’s recommendations
and NWFA’s specifications for proper acclimation, verification
of moisture content of flooring with a moisture meter, and
expansion relief around perimeter throughout installation.
• Do not use with vinyl-backed cork flooring or foamed-
SURFACE PREPARATION
All surfaces must be absorptive, clean, and free from loose
materials, oil, grease, sealers, curing compounds, waxes,
silicates, laitance, and all other surface contaminants that may
inhibit proper bond. Completely remove cutback adhesive
residue or other surface contaminants by diamond grinding
to open the pores of the concrete. All surfaces to be treated
must have a concrete surface profile (CSP) of 1-3 (similar to
a broomed finish), as defined by ICRI (International Concrete
Repair Institute, Guideline No. 03732). Maximum acceptable
floor variation is 3/16" in 10 feet. Areas requiring patching or
leveling must be done using a Portland cement-based material
(e.g., Bostik UltraFinish™, Webcrete
®
95 or SL-150™ Self-Leveling
Underlayment). For cracks in concrete that are larger than 1/8",
use a quality urethane sealant, such as Bostik 915FS™.
PLEASE NOTE: Concrete substrate should NOT be smooth and
reflective; it must have a concrete surface profile of CSP 1-3
(similar to a broomed finish), as define by ICRI (International
Concrete Repair Institute, Guideline No. 03732). It is advisable
to test for adequate substrate absorption and texture in
several areas throughout the jobsite by sprinkling droplets of
water onto the slab. The drops of water should show signs of
penetrating the substrate within one minute. This is evidenced
by a water stain on the concrete without a “domed” droplet.
If no signs of water penetration are shown within one minute
and “domed” droplets remain (similar to drops on a car hood)
the substrate must be scarified, shot blasted, or mechanically
textured until it is absorptive.
INSTALLATION
The installation begins with a starter row secured to the subfloor;
the starter row provides a stationary point to push against so
flooring doesn’t move during installation. Once the starter row
is secured, apply adhesive/membrane to substrate using the
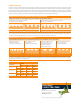
appropriate trowel. See the chart on last page for proper trowel
selection. Flooring may be installed using a “Wet-Lay” method
of installation. For “Wet-Lay” installations, spread the adhesive
and begin to install the flooring immediately. Periodically lift
boards immediately after installation to ensure proper slab
coverage and transfer to the back of the flooring. As you work,
immediately clean any adhesive from prefinished flooring
with Bostik Ultimate™ Adhesive Remover or mineral spirits (be
careful not to harm finish), then dry buff with a non-abrasive
towel. After a few rows have been installed, and as you move
across the room, tape the boards together using removable 3M
#2080 Blue tape to prevent boards from sliding and to secure
close-fitting joints. Rolling is recommended for all installations.
Flooring that is not flat should be tacked, weighted, or rolled to
ensure proper contact between the flooring and substrate.
PLYWOOD OVER CONCRETE: Score 4' x 4' or 2' x 8' sheets of 3/4"
exterior-grade plywood on the backside every 8" to 10" by using
a circular saw and cutting one-half the thickness of the plywood;
“scoring or kerfing” takes the tension out of the plywood and
helps to prevent possible warping or curling. Apply adhesive/
membrane to substrate and then set plywood into the wet
adhesive/membrane. Allow the adhesive to fully cure before
nailing or using MultiGrip™ adhesive to install flooring. If nailing
to the plywood, nails must not protrude through to the adhesive.