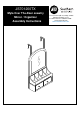
JS701200TX Myla Over The-Door Jewelry Mirror / Organizer Assembly Instructions For assistance with assembly, contact: Southern Enterprises Inc. Customer Service 1-800-633-5096 Service@seidal.com www.seifurniturestore.
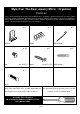
Myla Over The-Door Jewelry Mirror / Organizer Parts List Page 1 Please check packaging for all parts and hardware before discarding. Unpack and lay parts on clean, padded surface like carpet or a blanket. Check that you have all parts indicated. Call customer service if any hardware is missing. Before beginning assembly, carefully study the diagrams below and sort your hardware according to the pictures. Using the incorrect hardware will cause damage. 1. Quantity of 1 Cabinet A.
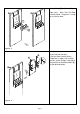
Myla Over The-Door Jewelry Mirror / Organizer Assembly Instructions Attach Metal Hooks (3) to Cabinet (1) using Bolt (A). Tighten Bolts (A) with Phillips screwdriver (not included). Figure 1 Hang the assembled unit over the door. Use Level (D) on unit top to ensure product is level.
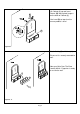
Attach Cubby (2) to Cabinet (1). Now your Myla Over-The-Door Jewelry Mirror / Organizer is ready to use on the door. Figure 3 If you feel that the Myla Over-the-Door Jewelry Mirror / Organizer’s height is not suitable for you, return to Step 1 and adjust the position of the Metal Hooks (3) to the desired height. .
To install this unit on the wall, follow the instructions below: Take the assembled unit down from the door and remove Cubby (2) from Cabinet (1). Unscrew Bolts (A) with Phillips screwdriver (not included). Figure 5 Mark 2 holes on the wall 15" apart. The holes must be 15" apart. Drill two 3/16" holes. Insert Wall Anchors (C) into the two holes, tapping lightly with hammer (not included) as needed. Insert Screws (B) into Wall Anchors (C).
Lift Cabinet (1) up and insert Screws (B) into keyhole hangers on the back of Cabinet (1). Use Level (D) on top of unit to ensure product is level. Figure7 Attach Cubby (2) to Cabinet (1). Ensure unit is securely mounted to wall. Now your Myla Over-The-Door Jewelry Mirror / Organizer is ready to use on the wall.
Parts Replacement Form Customer Information Name Address City/State/Zip Code Phone Number Please indicate where you purchased this item: Store/Website/Catalog Please indicate color/size/style number: Style No Parts Letter Parts Description Quantity Needed Please immediately examine this product carefully. Any request for missing parts or damage replacement must be received within 90 days of your receipt of the product. Replacement, if available, will be honored within this time frame.