
Owner`s manual
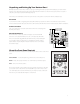

10
Setting an Alarm
If you plan to use the wake to music function, note that the last source and volume level
settings will be used for this alarm.
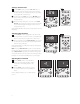
1
Press the ALARM 1 or ALARM 2 buttons one or more times to turn on the alarm and
set the alarm type. One press selects wake to music . A second press selects wake
to tone . A third press selects both. Press the button a fourth time to cancel the
alarm.
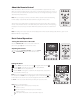
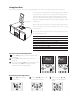
This example shows how the display might look after the Duo-i is turned o. The current time
is displayed and the icons show Alarm 1 is on set for wake to music and tone and Alarm 2 is on
set to tone only.
Alarm Clock Features
The Horizon Duo-i has two independent alarm settings. Each can have its own type of alarm —wake to tone, wake to music or
both. Both types of alarms start at a low volume level that gently increases.
Setting the Alarm Time
The alarm time can be set when the Duo-i is turned on or o.
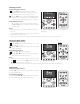
1
Press and hold the ALARM 1 or ALARM 2 button for one second. The alarm time and
the or icon will ash.
2
Turn the MODE control to adjust the alarm time.
3
Press the MODE control to set the alarm time.
In this example Alarm 2 is set to 7:15 AM.
Note: The alarm time can also be set by using the MODE control to highlight the
or icon. Then press the MODE control and follow steps 2 and 3 above.
How the Alarms Work
When an alarm is triggered the icon for the alarm starts ashing.
If you selected wake to tone, the alarm tone starts sounding, quietly at rst then with increasing volume.
If you selected wake to music with a radio, the station you last tuned to is played at a gradually increasing volume
If you selected wake to music from your iPod, the selected song is played at a gradually increasing volume.
If you selected wake to music and tone, the radio station or iPod song you selected begins playing at a gradually
increasing volume. If you do not turn o the music source alarm after ve minutes the music stops playing and the alarms
tone begins to sound at a gradually increasing volume.
To turn o the alarm press the POWER/VOLUME control.