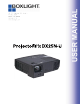
ProjectoWrite DX25N-U
Table of contents Important Safety instructions ......3 Maintenance ..............................26 Introduction....................................5 Care of the projector .....................................26 Projector features ................................. ……….5 Cleaning the lens………………………………26 Shipping contents............................................. .6 Cleaning the projector case……………..……26 Projector exterior view………………………. …..7 Storing the projector…………...
Important safety instructions Safety Instructions 1. Read these instructions. 2. Keep these instructions. 3. Heed all warnings. 4. Follow all instructions. 5. Do not use this unit near water. 6. Clean with a soft, dry cloth. 7. Do not block any ventilation openings. Install the unit in accordance with the manufacturer’s instructions. 8. Do not install near any heat sources such as radiators, heat registers, stoves, or other devices (including amplifiers) that produce heat. 9.
minutes prior to removing the lamp assembly for replacement. 22. Do not operate lamps beyond the rated lamp life. Excessive operation of lamps beyond the rated life could cause them to break on rare occasions. 23. Never replace the lamp assembly or any electronic components unless the projector is unplugged. 24. Do not place this product on an unstable cart, stand, or table. The product may fall, sustaining serious damage. 25. Do not attempt to disassemble this projector.
Introduction Projector features The projector integrates high-performance optical engine projection and a user-friendly design to deliver high reliability and ease of use. The projector offers the following features. • Short throw projection. • Screen Color correction allowing projection on surfaces of several predefined colors • Quick auto search speeding up the signal detecting process • Digital keystone correction to correct distorted images • Ability to display 16.
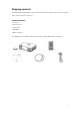
Shipping contents Carefully unpack and verify that you have all of the items shown below. If any of these items are missing, please contact your place of purchase. Standard Contents . Projector*1 . Remote control *1 . Power cord*1 . VGA cable*1 . Owner’s manual*1 The supplied accessories will be suitable for your region, and may differ from those illustrated.
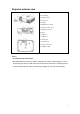
Projector exterior view 1. Lens shift 2. Focus Ring 3. Projection Lens 4. Lens Cover 5. Keypad 6. Adjustable foot stand 7. Rear IR receiver sensor 8. Audio phone jacket 9. RJ 45 10. VGA out 11. VGA in *2 12. Composite 13. Security lock 14. Power cord socket 15. Skid-proof pad Warning • THIS APPARATUS MUST BE EARTHED. • When installing the unit, incorporate a readily accessible disconnect device in the fixed wiring, or connect the power plug to an easily accessible socket-outlet near the unit.
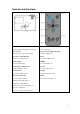
Controls and functions 16. Lens shift 1. POWER To adjust the projection position up and down. To turn on/off power. 17. Focus ring 2. Arrow keys ( Left/Right/ Up /Down) Adjusts the focus of the projected image. To adjust the OSD menu. 18. Power on/ Stand-By button 3. Enter To power on/ off the projection To confirm the OSD selection 19. Menu button 4. MENU To enter the OSD menu To enter the OSD menu 20. UP/ Down/ Left/Right button 5.
Remote control effective range Infra-Red (IR) remote control sensor is located on the front and rear of the projector. The remote control must be held at an angle within 20 degrees perpendicular to the projector's IR remote control sensor to function correctly. The distance between the remote control and the sensor should not exceed 5 meters (~ 16 feet).
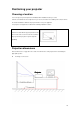
Positioning your projector Choosing a location Your room layout or personal preference will dictate which installation location you select. Take into consideration the size and position of your screen, the location of a suitable power outlet, as well as the location and distance between the projector and the rest of your equipment. Your projector is designed to be installed in the following installation locations: 1.
Image Diagonal Projection (inch) Distance(mm) 30 Image Width(mm) Image Height(mm) 378 610 457 45 567 914 686 60 756 1219 914 80 1008 1626 1219 100 1260 2032 1524 120 1512 2438 1829 150 1890 3048 2286 200 2520 4064 3048 250 3150 5080 3810 300 3780 6096 4572 There is 3% tolerance among these numbers due to optical component variations.
Connection When connecting a signal source to the projector, be sure to: 1 Turn all equipment off before making any connections. 2 Use the correct signal cables for each source. 3 Ensure the cables are firmly inserted. In the connections shown below, some cables may not be included with the projector (see "Shipping contents" on page 6). They are commercially available from electronics stores.
Connecting a Composite Video source device Examine your Video source device to determine if it has a set of unused Composite Video output sockets available: 1. If so, you can continue with this procedure. 2. If not, you will need to reassess which method you can use to connect to the device.
Connecting an Audio source device Examine your Audio source device to determine if it has a set of unused audio output sockets available: 1.If so, you can continue with this procedure. 2.If not, you will need to reassess which method you can use to connect to the device.
Operation Starting up the projector 1. Plug the power cord into the projector and into a wall socket. Turn on the wall socket switch (where fitted). Check that the POWER indicator shows steady orange light after power has been applied. 2. Remove the lens cap. If it is closed, it could become deformed due to the heat produced by the projection lamp. 3. Press On/Stand-By of the projector or remote control to start the projector.
Use the Menu The projector is equipped with On-Screen Display (OSD) menus for making various adjustments and settings. Below is the overview of the OSD menu. To use the OSD menus, please set them to your familiar language first. Menu/ Source 1. Press MENU of the remote control or unit to turn on the OSD. 2. Press 3. Press Enter Key to confirm the selection 4. Press the Menu key to leave the Menu or press to select the beneath function for your needs.
Menu/ Picture Shown only when Signal Source is attached 1. Press MENU of remote control or unit to turn on the OSD. 2. Press to picture category. 3. Press to select the beneath function for your needs. 4. Press the 5. Press Enter key to confirm the selection 6. Press MENU to leave the menu or press ▲ to back to menu category after Enter key confirming the key to adjust the modes or function values selection.
When Picture mode is selected on User mode, this function can be active. Color Adjusts the intensity of the Color in the image. There is no the function support for VGA input source When Picture mode is selected on User mode, this function can be active. Adjusts the balance of red-to-green necessary for realistic representation of Video Tint signals. (+ is green and – is reddish) There is no the function support for VGA input source. When Picture mode is selected on User mode, this function can be active.
Menu/ Display Shown only when Signal Source is attached 1. Press MENU of remote control or unit to turn on the OSD. 2. Press to Display category. 3. Press to select the beneath function for your needs. 4. Press the 5. Press Enter key to confirm the selection 6. Press MENU to leave the menu or press ▲ to back to menu category after Enter key confirming the key to adjust the function values selection.
This function allows the user to adjust the clock phase to reduce image distortion. Phase (Only VGA Active) Base-On ADC’s Phase:0 ~ 31 This function allows the user to adjust the horizontal width of the image. (Only VGA H Size Active) Digital Zoom scales part of the input image to a larger size to increase visibility at a Digital Zoom distance.
Menu/ System Setup-Basic 1. Press MENU of remote control or unit to turn on the OSD. 2. Press to System Setup-Basic category. 3. Press to select the beneath function for your needs. 4. Press the 5. Press Enter key to confirm the selection 6. Press MENU to leave the menu or press ▲ to back to menu category after Enter key confirming the key to adjust the modes selection.
Menu/ System Setup-Advance Drop down menu 1. Press MENU of remote control or unit to turn on the OSD. 2. Press to System Setup-Advance category 1. Press to select the beneath function for your needs. 2. Press the 3. Press Enter key to confirm the selection 4. Press MENU to leave the menu or press ▲ to back to menu category after Enter key confirming the key to adjust the modes or values selection. Feature Description Allow user to set the Fan running at full speed when Altitude On.
Menu/ Information 1. Press MENU of remote control or unit to turn on the OSD. 2. Press 3. Press MENU to leave the menu. to Information category.
IR Remote Control Command Description Unit off- press Power button once to turn unit on Unit On - press Power button once to initiate turn off notice, press again to return product to standby state Power Button Pressing Source button will sequentially switch through inputs (First initial press brings up the current selected source)(each selection requires a button press) Source Button Mute's sound when pressed, returns to previous volume setting when pressed again Mute Button Initiates On Screen Menu.
Use Ethernet function The function allows users to remote control the projector through computer system in “Intranet environment”. Operation Instruction 1. Computer system links to intra net port and the projector links to anther intra net port through Ethernet cables. 2. Or use IP Router to link Computer/ Intra Net port/ Projector by Ethernet cables. 3. Adjust OSD of the unit to Information category to find IP address 4.
Maintenance Care of the projector Your projector needs little maintenance. The only thing you need to do on a regular basis is to keep the lens clean. Never remove any parts of the projector except the lamp. Contact your dealer if other parts need replacing. Cleaning the lens Clean the lens whenever you notice dirt or dust on the surface. Use a canister of compressed air to remove dust.
Lamp information Getting to know the lamp hour When the projector is in operation, the duration (in hours) of lamp usage is automatically calculated by the built-in timer. To obtain the lamp hour information: Press MENU and then press to the Information category You will see the Equivalent lamp hour information displaying on the menu To leave the menu, press MENU. Timing for replacing the lamp When a message appears “Please change the lamp”, please install a new lamp or consult your dealer.
1. To remove the screws showed as 1 to open the lamp door showed as A 2. To remove the screws showed as 2 then use the handle showed as B to draw up the lamp holder 3. To remove the screw showed as A and press the E point forward to loose the lamp 4. To pull out the 2 pins of lamp ( B&C ) and push the lamp to D direction then lamp can be removed. 5.To change the new lamp and use the inverse procedure to reassemble the unit.
WARNING Hg - Lamp contains mercury. Manage in accordance with local disposal laws. See www.lamprecycle.org To reduce the risk of electrical shock, always turn the projector off and disconnect the power cord before changing the lamp. To reduce the risk of severe burns, allow the projector to cool for at least 45 minutes before replacing the lamp. To reduce the risk of injuries to fingers and damage to internal components, use caution when removing lamp glass that has shattered into sharp pieces.
LED Indicators Mode LED Signals on Projector Stand by Orange LED (always on) Powering up Orange LED (Flashing) Normal Operation Green LED (always on) Fan Error Red LED (Once every one second) Thermal Error Red LED (twice every one second) Power Error Red LED (always on) Download mode Green LED on first, then Orange LED flashing Cooling Mode RED and Green LED (interlace) 30
Trouble shooting Cause Remedy There is no power from the power Plug the power cord into the AC inlet on the projector, and plug the power cord. cord into the power outlet. Attempting to turn the projector on Wait until the cooling down process has completed. again during the cooling process. Cause Remedy The video source is not turned on or Turn the video source on and check that the signal cable is connected connected correctly. correctly. The projector is not correctly Check the connection.
Specifications All specifications are subject to change without notice. General Product name DLP Projector Optical Resolution 1024*768 XGA Display system TI 0.55" DMDTM Type X Lens F/Number F = 2.6 Lamp OSRAM 180-230W E20.6 Power Supply Input Voltage 100V to 240V with 10% tolerance Power consumption Normal operation: less than 300W; Stand By: less 1W Mechanical Dimensions L -280.00 W-207.00 H-84.50 Weight 2.
Dimension 33
Timing chart Mode Resolution V(Hz) VGA 640x480 50 VGA 640x480 60 VGA 640x480 70 VGA 640x480 72 VGA 640x480 75 VGA 640x480 85 VGA 720x400 60 VGA 720x400 70 VGA 720x400 85 SVGA 800x600 50 SVGA 800x600 56 SVGA 800x600 60 SVGA 800x600 70 SVGA 800x600 72 SVGA 800x600 75 SVGA 800x600 85 XGA 1024x768 50 XGA 1024x768 60 XGA 1024x768 70 XGA 1024x768 72 XGA 1024x768 75 XGA 1024x768 85 SXGA 1152x864 60 SXGA 1152x882 60 SXGA 1280x1024 60 Quad
Mode 480p(525p) Resolution V(Hz) 59.