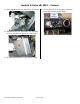
INSTALLATION INSTRUCTIONS Bongiovi Acoustics DPS – Toyota & Scion Vehicles (Kit part number 2000-3811) Applications Covered: 2012 – Current Scion FR-S 2011 – Current Scion iQ 2010 – Current Toyota Highlander 2010 – Current Toyota Matrix 2011 – Current Scion tC 2010 – Current Toyota Prius 2011 – Current Scion xB 2010 – Current Toyota RAV4 2011 – Current Scion xD 2010 – Current Toyota Sequoia 2010 – Current Toyota 4-Runner 2010 – Current Toyota Sienna 2010 – Current Toyota Avalon 2010 –
INSTALLATION INSTRUCTIONS TABLE OF CONTENTS Section 1: Scion FR-S Pages 3 Section 2: Scion tC 4–6 Section 3: Scion xB 7–9 Section 4: Scion xD 10 – 12 Section 5: Toyota 4-Runner 13 – 14 Section 6: Toyota Avalon 15 – 17 Section 7: Toyota Camry 18 – 21 Section 8: Toyota Corolla Section 9: Toyota FJ Cruiser 22 – 25 Section 10: Toyota Highlander Section 11: Toyota Matrix 28 – 29 Section 12: Toyota Prius 32 – 34 Section 13: Toyota RAV4 35 – 37 26 – 27 30 – 31 Section 14: Toyot
Section 1: Scion FR-S, 2012 – Current IMPORTANT: DPS is NOT compatible with the optional factory BeSpoke® audio system. 10. Reinstall radio. 1. Ensure all radio functions are working properly, return all Treble, Bass, Fade, and Balance to neutral settings, and remove any CDs to avoid possible jam before disassembly. 2. For vehicles equipped with automatic transmissions, place shifter in the N (neutral) position and set parking brake. 11. Reconnect vehicle battery. Re-torque battery bolt to 36 inch lbs.
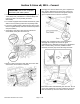
Section 2: Scion tC, 2011 – Current IMPORTANT: DPS is NOT compatible with factory JBL audio systems or tC Series Release 7.0 6. Open and slightly flex the upper part of the glove compartment door to release the 2 stoppers. Open the glove compartment door until it is horizontal. 1. Ensure all radio functions are working properly, return all Treble, Bass, Fade, and Balance to neutral settings, and remove any CDs to avoid possible jam before disassembly. 2.
Section 2: Scion tC, 2011 – Current 9. Route the DPS harness along the factory harness and up to the radio area. Using supplied Wire Ties, secure DPS harness to factory harness away from any moving parts. 13. Reinstall radio. 14. Reconnect vehicle battery. Re-torque battery bolt to 36 inch lbs. 15. Place DPS module with the Bongiovi DPS Acoustics side face down. Then confirm the DPS module’s dip switches are all set to the “down” position – “DDDDD”. 10.
Section 2: Scion tC, 2011 – Current 17. Plug the small 4-pin connector back into the DPS module and wait 10 seconds. (Note: There should again be no sound from the speakers). Unplug the 4pin connector from the DPS module and wait another 10 seconds. 18. Again, plug the 4-pin connector back into the DPS module. (Note: After a short delay, there should now be sound from the speakers). Ensure radio head unit is working properly including all speaker channels. 19.
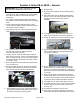
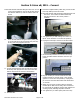
Section 3: Scion xB, 2011 – Current IMPORTANT: DPS is NOT compatible with factory JBL audio systems. 1. Ensure all radio functions are working properly, return all Treble, Bass, Fade, and Balance to neutral settings and remove any CDs to avoid possible jam before disassembly. 6. Disengage the claw and disconnect glove compartment door stopper. Slightly flex the upper part of the glove compartment door to release the 2 stoppers and open glove compartment door until it is horizontal. 2.
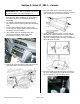
Section 3: Scion xB, 2011 – Current 9. Place DPS module under RH dash glove box area. Do not secure with supplied 24” wire ties at this time. Route the DPS wire harness up and over heater control as shown. 10. Route the DPS harness along the factory wiring and up to the radio area. Secure harness away from any moving parts using supplied wire ties. 13. Reconnect negative battery cable using a 10mm socket. Re-torque battery bolt to 36 inch lbs. 14.
Section 3: Scion xB, 2011 – Current 21. Slide supplied 24” Wire Ties under factory wire harness. 24. Use a 50/50 mix of alcohol and water to clean dash surface before installing the DPS badge. 22. Place DPS module over supplied Wire Ties and tighten to secure as shown. Use side cutters to trim excess. 23. Re-install removed parts in reverse order of removal. 2000-3811 Instructions 8-1-13.
Section 4: Scion xD, 2011 – Current IMPORTANT: DPS is NOT compatible with factory JBL audio systems. 1. Ensure all radio functions are working properly, return all Treble, Bass, Fade, and Balance to neutral settings and remove any CDs to avoid possible jam before disassembly. 6. Disengage the claw and disconnect the glove compartment door stopper. Slightly flex the upper part of the glove compartment door to release the 2 stoppers and open the glove compartment door until it becomes horizontal. 2.
Section 4: Scion xD, 2011 – Current 8. Place DPS module under RH dash glove box area. Do not secure with supplied 24” Wire Ties at this time. Route the DPS wire harness up and over heater control as shown. 9. Route the DPS harness along the heater box and up to the radio area. Use wire ties to secure harness avoiding any moving parts. 13. Place DPS module with the Bongiovi DPS Acoustics side face down. Then confirm the DPS module’s dip switches are all set to the “down” position – “DDDDD”: 14.
Section 4: Scion xD, 2011 – Current 20. Slide supplied 24” wire ties under factory passenger side brace. 21. Place DPS module over wire ties and tighten to secure DPS module. Use side cutters to trim excess. 22. Re-install removed parts in reverse order of removal. 23. Use a 50/50 mix of alcohol and water to clean dash surface before installing the DPS badge. 2000-3811 Instructions 8-1-13.
Section 5: Toyota 4-Runner, 2010 - Current 1. Ensure all radio functions are working properly, return all Treble, Bass, Fade, and Balance to neutral settings, and remove any CDs to avoid possible jam before disassembly. 7. Remove shift lever knob by twisting the shift lever knob counterclockwise as indicated by the arrow. 2. For vehicles equipped with automatic transmissions, place shifter in the N (neutral) position and set parking brake. 3. Using a 10mm socket, loosen the negative battery cable bolt.
Section 5: Toyota 4-Runner, 2010 - Current 13. Place DPS module with the Bongiovi DPS Acoustics side face down. Confirm the DPS unit’s dip switches are all set to the “down” position – “DDDDD”: 17. Plug the small 4-pin connector back into the DPS module and wait 10 seconds. (Note: There should again be no sound from the speakers). Unplug the 4-pin connector from the DPS module and wait another 10 seconds. 18. Again, plug the 4-pin connector back into the DPS module.
Section 6: Toyota Avalon, 2010 - Current 1. Ensure all radio functions are working properly, return all Treble, Bass, Fade, and Balance to neutral settings, and remove any CDs to avoid possible jam before disassembly. 7. Disengage the 6 claws retaining the console upper box and remove. 2. For vehicles equipped with automatic transmissions, place shifter in the N (neutral) position and set parking brake. 3. Using a 10mm socket, loosen the negative battery cable bolt.
Section 6: Toyota Avalon, 2010 – Current 10. Using a Plastic Trim Removal Tool, remove the dash panel to the left of the steering wheel. 15. Connect the DPS harness to the radio and connect the factory radio plug to the other end of the DPS harness. Reconnect all previously removed connectors and antenna. 11. Remove the trim panel from around the steering wheel and disconnect the connectors from panel. 16. Reinstall radio. 17. Reconnect negative battery cable using a 10mm socket.
Section 6: Toyota Avalon, 2010 – Current 22. Plug the small 4-pin connector back into the DPS module and wait 10 seconds. (Note: There should again be no sound from the speakers). Unplug the 4pin connector from the DPS module and wait another 10 seconds. 23. Again, plug the 4-pin connector back into the DPS module. (Note: After a short delay, there should now be sound from the speakers). Ensure radio head unit is working properly including all speaker channels. 24.
Section 7: Toyota Camry, 2010 – Current 1. Ensure all radio functions are working properly, return all Treble, Bass, Fade, and Balance to neutral settings and remove any CDs to avoid possible jam before disassembly. 2. For vehicles equipped with automatic transmissions, place shifter in the N (neutral) position and set parking brake. 3. Loosen negative battery cable bolt. Remove negative battery cable from terminal and position away from battery. 4.
Section 7: Toyota Camry, 2010 – Current 9. Use a Philips head screwdriver to remove 2 lower glove box screws. 12. Use a Plastic Trim Removal Tool to remove vent panel. Remove lower glove box slowly and detach connector from back. 10. Remove lower glove box slowly and carefully to avoid damage to attached wires. 13. Use a 10mm socket to remove 2 bolts located below radio/climate control assembly. 11. Disconnect accessory plug from back of lower glove box. 14.
Section 7: Toyota Camry, 2010 – Current 18. Connect the DPS harness to the radio and connect the factory radio plug to the other end of the DPS harness. Reconnect all previously removed connectors and antenna. 15. Pull out radio/climate control assembly slowly and carefully. Detach wire harness from back of assembly. 19. Reinstall radio. 16. Place DPS module in front console cavity as shown. Do not secure with supplied 24” wire ties at this time. 17.
Section 7: Toyota Camry, 2010 – Current 29. Place DPS module over Wire Ties and tighten to secure module. Use side cutters to trim excess. 24. Set the DPS dip switches for Camry according to vehicle year using the following chart: Model Years 30. Re-install removed parts in reverse order of removal. 31. Use a 50/50 mix of alcohol and water to clean dash surface before installing DPS badge. DPS Dip Switch Setting “UDDUD” 2013 – Current Camry “UDDDD” 2010 – 2012 Camry 25.
Section 8: Toyota Corolla, 2010 – Current 1. Ensure all radio functions are working properly, return all Treble, Bass, Fade, and Balance to neutral settings and, remove any CDs to avoid possible jam before disassembly. 6. Turn the shifter knob counterclockwise and remove the shift lever knob. 2. For vehicles equipped with automatic transmissions, place shifter in the N (neutral) position and set parking brake. 3. Loosen the negative battery cable bolt.
Section 8: Toyota Corolla, 2010 – Current 10. Open console door and remove console box carpet. 11. Apply protective tape to the area shown in the illustration. Repeat process for right side. 14. Remove 4 radio retaining bolts. Pull the radio with bracket toward the rear of the vehicle and disengage the 4 clips. 12. Insert Plastic Trim Removal Tool and slide it toward the clip. Pull the tool with both hands to disengage the clip as shown.
Section 8: Toyota Corolla, 2010 – Current 16. Remove right front seat bolts. Slide seat rearward and disengage 4 claws on front trim covers then remove 2 bolts. 22. Connect the DPS harness to the radio and connect the factory radio plug to the other end of the DPS harness. Reconnect all previously removed connectors and antenna. 17. Slide seat forward and disengage 4 claws on rear trim covers and then remove 2 bolts. 18.
Section 8: Toyota Corolla, 2010 – Current 26. Unplug the small 4-pin connector from DPS module. 28. Plug the small 4-pin connector back into the DPS module and wait 10 seconds. (Note: There should again be no sound from the speakers). Unplug the 4-pin connector from the DPS module and wait another 10 seconds. 29. Again, plug the 4-pin connector back into the DPS module. (Note: After a short delay, there should now be sound from the speakers).
Section 9: Toyota FJ Cruiser, 2010 – Current 1. Ensure all radio functions are working properly, return all Treble, Bass, Fade, and Balance to neutral settings, and remove any CDs to avoid possible jam before disassembly. 7. Disengage the 2 “A” claws and 2 “B” claws retaining the parking brake opening cover. Slide the cover toward the front of the vehicle, disengage the 2 “C” claws and remove the parking brake opening cover. 2.
Section 9: Toyota FJ Cruiser, 2010 – Current 12. Reconnect negative battery cable using a 10mm Socket. Re-torque battery bolt to 36 inch lbs. 18. Again, plug the 4-pin connector back into the DPS module. (Note: After a short delay, there should now be sound from the speakers). Ensure radio head unit is working properly including all speaker channels. 13. Place DPS module with the Bongiovi DPS Acoustics side face down. Confirm the DPS module’s dip switches are all set to the “down” position – “DDDDD”: 19.
Section 10: Toyota Highlander, 2010 – Current 1. Ensure all radio functions are working properly, return all Treble, Bass, Fade, and Balance to neutral settings, and remove any CDs to avoid possible jam before disassembly. 6. Remove 4 radio retaining bolts. Pull the radio assembly with bracket toward the rear of the vehicle by disengaging the 4 clips. 2. For vehicles equipped with automatic transmissions, place shifter in the N (neutral) position and set parking brake. 3.
Section 10: Toyota Highlander, 2010 – Current 9. Connect the DPS harness to radio and connect factory radio plug to the other end of the DPS harness. Reconnect all previously removed connectors and antenna. 16. Plug the small 4-pin connector back into the DPS module and wait 10 seconds. (Note: There should again be no sound from the speakers). Unplug the 4-pin connector from the DPS module and wait another 10 seconds. 17. Again, plug the 4-pin connector back into the DPS module.
Section 11: Toyota Matrix, 2010 – Current 1. Ensure all radio functions are working properly, return all Treble, Bass, Fade, and Balance to neutral settings, and remove any CDs to avoid possible jam before disassembly. 6. Disengage the 3 claws and guide to remove the front No. 1 console box insert. 2. For vehicles equipped with automatic transmissions, place shifter in the N (neutral) position and set parking brake. 3. Loosen negative battery cable bolt using a 10mm socket.
Section 11: Toyota Matrix, 2010 – Current 10. Remove 4 bolts retaining radio bracket. Disconnect each connector and remove radio with bracket. 16. Turn ignition key to “ON” making sure radio is on. (Note: There should be no sound from speakers). 17. Unplug the small 4-pin connector from DPS module. 18. Set DPS dip switches for Matrix. The first and third switches should be flipped to the “up” position – “UDUDD”: 11. Locate an area under the dash to which to mount the DPS module.
Section 12: Toyota Prius, 2010 – Current 1. Ensure all radio functions are working properly, return all Treble, Bass, Fade, and Balance to neutral settings, and remove any CDs to avoid possible jam before disassembly. 2. For vehicles equipped with automatic transmissions, place shifter in the N (neutral) position and set parking brake. 3. Loosen negative battery cable bolt using a 10mm socket. Remove negative battery cable from terminal and position away from battery. 4.
Section 12: Toyota Prius, 2010 – Current 7. Remove the 4 screws and lift the instrument panel cup holder assembly from the lower center instrument cluster finish panel sub-assembly. 11. Behind radio cavity, locate 2 eyelets on the heater box and slide the two supplied 24” Wire Ties through them. 8. Disengage the 14 claws securing the instrument cluster finish panel garnish. Disconnect the connector and remove the panel. 12.
Section 12: Toyota Prius, 2010 – Current 14. Reinstall radio. 15. Reconnect negative battery cable using a 10mm Socket. Re-torque battery bolt to 36 inch lbs. 20. Plug the small 4-pin connector back into the DPS module and wait 10 seconds. (Note: There should again be no sound from the speakers). Unplug the 4pin connector from the DPS module and wait another 10 seconds. 16. Place DPS module with the Bongiovi DPS Acoustics side face down.
Section 13: Toyota RAV4, 2010 – Current 1. Ensure all radio functions are working properly, return all Treble, Bass, Fade, and Balance to neutral settings and, remove any CDs to avoid possible jam before disassembly. 6. Remove the 4 radio retaining bolts on sides of radio. Detach the 4 claws from radio faceplate. Disconnect all connectors and remove radio with bracket. 2. For vehicles equipped with automatic transmissions, place shifter in the N (neutral) position and set parking brake. 3.
Section 13: Toyota RAV4, 2010 – Current 14. Place supplied 24” Wire Tires under front console box as shown. Do not tighten at this time. 10. Using a Plastic Trim Removal Tool, detach the 2 clips and 4 claws retaining the floor shift position indicator housing and remove. Disconnect the connector. 11. Detach the 2 clips and 2 claws retaining the console switch base. Disconnect the connectors and remove. 15. Place DPS module on top of console box as shown.
Section 13: Toyota RAV4, 2010 – Current B. For the RAV 4 4-speaker system, the second and third switches should be flipped to the “up” position — “DUUDD”: 17. Reinstall radio. 18. Reconnect negative battery cable using a 10mm Socket. Re-torque battery bolt to 36 inch lbs. 23. Plug the small 4-pin connector back into the DPS module and wait 10 seconds. (Note: There should again be no sound from the speakers). Unplug the 4-pin connector from the DPS module and wait another 10 seconds. 19.
Section 14: Toyota Sienna, 2010 – Current NOTE TO INSTALLERS: Full Sienna instructions and photos were unavailable at the time of this printing. However, the basic DPS install is shared with other Toyota vehicles covered elsewhere in these instructions. Please visit www.brandmotion.com for the latest installation instructions. 1. Ensure all radio functions are working properly, return all Treble, Bass, Fade, and Balance to neutral settings, and remove any CDs to avoid possible jam before disassembly. 10.
Section 15: Toyota Tacoma, 2010 – Current Note: Disassembly varies slightly according to seating arrangement. These instructions are based on a bucket seat equipped vehicle. Refer to instructions for full details. 1. Ensure all radio functions are working properly, return all Treble, Bass, Fade, and Balance to neutral settings and, remove any CDs to avoid possible jam before disassembly. 2. For vehicles equipped with automatic transmissions, place shifter in the N (neutral) position and set parking brake.
Section 15: Toyota Tacoma, 2010 – Current D. Manual transmission with bench seat. Remove shift knob by twisting counterclockwise. B. Manual transmission with bucket seats. Remove the 2 screws. Disengage the 2 clips and claw, and remove the front console box. Next, remove box bottom mat, instrument panel cup holder, and No. 2 console box bottom mat. Remove the clip and 2 bolts. Disengage the 2 clips and claw, and remove front console box. C. Automatic Transmission with bench seat.
Section 15: Toyota Tacoma, 2010 – Current 10. Remove 4 radio retaining bolts. Disengage the 5 clips and remove radio with bracket. IMPORTANT: Take care not to damage the clips. Disconnect all connectors. 14. Place DPS module between right seat tracks. Make a mark on front and rear side of DPS module. Using a utility knife, make a 1” long slit in the carpet on either side of the DPS module. Do not secure with supplied 24” wire ties at this time. 15.
Section 15: Toyota Tacoma, 2010 – Current 30. Reinstall radio. 37. Again, plug the 4-pin connector back into the DPS module. (Note: After a short delay, there should now be sound from the speakers). Ensure radio head unit is working properly including all speaker channels. 31. Reconnect negative battery cable using a 10mm Socket. Re-torque battery bolt to 36 inch lbs. 32. Place DPS module with the Bongiovi DPS Acoustics side face down.
Section 16: Toyota Tundra & Sequoia, 2010 – Current 6. Use a Plastic Trim Removal Tool to unsnap the four clips retaining the HVAC control panel and pull the panel out. Lift slowly and carefully to avoid damage to attached wires. Note 1: Disassembly instructions vary according to transmission type and seating arrangement. Note 2: DPS module settings vary according to body style, year, and audio system options. Refer to instructions for full details. 1.
Section 16: Toyota Tundra & Sequoia, 2010 – Current 10. Twist shifter lever knob counterclockwise as indicated by the arrow and remove. 13. Place DPS module in console cavity. Make a mark on front and rear side of DPS module. Using a utility knife, make a 1” long slit in the plastic either side of the DPS module. Do not secure with supplied 24” wire ties at this time. 11. Disengage the 12 clips retaining the console panel and remove sub-assembly and remove. 14.
Section 16: Toyota Tundra & Sequoia, 2010 – Current 15. Connect the DPS harness to the radio and connect the factory radio plug to the other end of the DPS harness. Reconnect all previously removed connectors and antenna. 22. Set the DPS dip switches according to vehicle, audio system, and/or model year: A. 2014-present Tundra 6-speaker. The third and fifth switches should be flipped to the “up” position – “DDUDU”: 16. Reinstall radio. B. 2014-present Tundra 8-speaker.
Section 16: Toyota Tundra & Sequoia, 2010 – Current E. 2010-present Sequoia. The second, third, and fifth switches should be flipped to the “up” position – “DUUDU”: 27. Re-install removed parts in reverse order of removal. 28. Re-torque seat bolts to 31 foot lbs. IMPORTANT: If you removed any of the seat connectors, the occupant safety settings must be recalibrated. 29. Use a 50/50 mix of alcohol and water to clean dash surface before installing DPS badge. 23.
Section 17: Toyota Venza, 2010 – Current 1. Ensure all radio functions are working properly, return all Treble, Bass, Fade, and Balance to neutral settings, and remove any CDs to avoid possible jam before disassembly. 7. Remove screw and disengage four claws from temp face plate and lift up and out to pull plate away. Disconnect connectors. 2. For vehicles equipped with automatic transmissions, place shifter in the N (neutral) position and set parking brake. 3.
Section 17: Toyota Venza, 2010 – Current 17. Plug the small 4-pin connector back into the DPS module and wait 10 seconds. (Note: There should again be no sound from the speakers). Unplug the 4-pin connector from the DPS module and wait another 10 seconds. 13. Place DPS module with the Bongiovi DPS Acoustics side face down. Confirm the DPS module’s dip switches are all set to the “down” position – “DDDDD”: 18. Again, plug the 4-pin connector back into the DPS module.
Section 18: Toyota Yaris, 2010 – Current 1. Ensure all radio functions are working properly, return all Treble, Bass, Fade, and Balance to neutral settings, and remove any CDs to avoid possible jam before disassembly. 2. For vehicles equipped with automatic transmissions, place shifter in the N (neutral) position and set parking brake. 3. Loosen negative battery cable bolt using a 10mm socket. Remove negative battery cable from terminal and position away from battery. 4.
Section 18: Toyota Yaris, 2010 – Current 8. Open glove compartment door. Slightly deform the upper part of the door to release the two stoppers (arrows) and open the glove compartment door to horizontal. Pull the glove compartment door assembly out horizontally to disengage the hinge portion and remove the glove compartment door assembly. Pull the glove compartment door straight out, otherwise, installation failure caused by excessive play around the hinge portion may result. 10.
Section 18: Toyota Yaris, 2010 – Current 19. Turn ignition key to “ON” position making sure radio is on. (Note: There should be no sound from the speakers). 13. Place DPS module behind glove box area. Do not secure with supplied 24” Wire Ties yet. Route harness along factory harness and over to radio area. 20. Unplug the small 4-pin connector from the DPS module. 21. Set DPS dip switches for Yaris according to the vehicle’s sound system options: A. Yaris 4 speaker.
Section 18: Toyota Yaris, 2010 – Current 25. Slide supplied 24” Wire Ties behind factory bracket behind glove box compartment as shown. 28. Use a 50/50 mix of alcohol and water to clean dash surface before installing DPS badge. Yaris Hatchback 26. Secure DPS module using supplied 24” Wire Ties. Use side cutters to trim excess. Yaris Sedan 27. Re-install removed parts in reverse order of removal. 2000-3811 Instructions 8-1-13.
Section 19: Scion iQ, 2011 – Current IMPORTANT: DPS is NOT compatible with the optional factory BeSpoke® audio system. 1. Ensure all radio functions are working properly, return all Treble, Bass, Fade, and Balance to neutral settings, and remove any CDs to avoid possible jam before disassembly. 9. Connect the DPS harness into the radio and connect the factory radio plug into the other end of the DPS harness. Reconnect all connectors and antenna. 2.
Section 2: Scion iQ, 2011 – Current 16. Set DPS dip switches for Scion iQ. Flip the fifth switch to the “up” position – “DDDDU”: 17. Plug the small 4-pin connector back into the DPS module and wait 10 seconds. (Note: There should again be no sound from the speakers). Unplug the 4-pin connector from the DPS module and wait another 10 seconds. 18. Again, plug the 4-pin connector back into the DPS module. (Note: After a short delay, there should now be sound from the speakers).