
Owner's manual


Section 1: Scion FR-S, 2012 – Current
2000-3811 Instructions 8-1-13.Doc Page 3 of 54
1. Ensure all radio functions are working properly, return
all Treble, Bass, Fade, and Balance to neutral settings,
and remove any CDs to avoid possible jam before
disassembly.
2. For vehicles equipped with automatic transmissions,
place shifter in the N (neutral) position and set parking
brake.
3. Loosen negative battery cable bolt using a 10mm
wrench. Remove negative battery cable from terminal
and position away from battery.
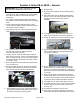
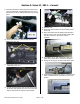
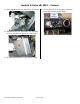
4. Using a plastic trim tool, remove the passenger side
dash trim panel, then remove the radio trim bezel.
5. Use a 10mm Socket to remove the 4 bolts securing
the radio and remove the radio with bracket.
Disconnect the radio connectors.
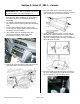
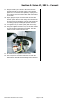
6. Locate a place to secure the DPS module under the
dash, at the front of the console, in the passenger kick
panel, or under the seat. Do not secure with supplied
wire ties at this time. Route DPS wire harness up and
over heater control.
7. Route the DPS harness along the factory harness and
up to the radio area.
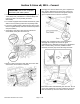
8. Connect the DPS harness into the radio and connect
the factory radio plug into the other end of the DPS
harness. Reconnect all connectors and antenna.
9. Using supplied 8.5” Wire Ties, secure DPS harness to
factory harness and/or brackets taking care to keep
the harness away from any moving parts.
10. Reinstall radio.
11. Reconnect vehicle battery. Re-torque battery bolt to
36 inch lbs.
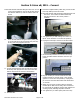
12. Place DPS module with the Bongiovi DPS Acoustics
side face down. Then confirm the DPS module’s dip
switches are all set to the “down” position –
“DDDDD”.
13. Turn ignition key to “ON” making sure radio is on.
(Note: There should be no sound from speakers).
14. Unplug the small 4-pin connector from DPS module.
15. Set the DPS dip switches for Scion FR-S: The third,
fourth, and fifth switches should be flipped to the
“up” position –“DDUUU”:
16. Plug the small 4-pin connector back into the DPS
module and wait 10 seconds. (Note: There should
again be no sound from the speakers). Unplug the 4-
pin connector from the DPS module and wait another
10 seconds.
17. Again, plug the 4-pin connector back into the DPS
module. (Note: After a short delay, there should now
be sound from the speakers). Ensure radio head unit
is working properly including all speaker channels.
18. Turn ignition key to “LOCK” (OFF) and remove key.
19. Use supplied 24” Wire Ties to secure the DPS module
to factory bracing. Use side cutters to trim excess
from wire ties.
20. Re-install removed parts in reverse order.
21. Use a 50/50 mix of alcohol and water to clean the
dash surface and affix the DPS badge where desired.
IMPORTANT: DPS is NOT compatible with the
optional factory BeSpoke® audio system.