
Owner's Manual

INSTALLATION INSTRUCTIONS
NOTE: We strive to provide accurate and up-to-date installation instructions. For the latest full color
instructions, as well as an installation video, please visit www.brandmotion.com
INSTALLATION: Camera
1. Remove the 4 Allen screws that are located on the sides of the camera. Then remove the camera
mounting bracket and visor.
2. Find an appropriate place to mount the backup camera. Line up the foot bracket to ensure that there is
enough space to attach the camera to the body.
3. Attach the mounting foot using either self-tapping screws or a bolt and nut.
4. Use a 1” hole saw to drill a hole for the camera harness.
5. Then feed the harness through the drilled hole, fit the grommet to the inside of the hole.
6. Reattach camera and visor to the mounting bracket. Make sure the camera is oriented
7. UP by seeing the light sensor on the right side of the camera when looking at it.
8. Route the camera harness to the front of the vehicle where the display is located.
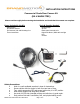
9. Connect the 4-pin to RCA cable to the end of the harness at the display end.
10. Connect the RED to 12-volt accessory
11. Connect the BLACK to ground.
12. The YELLOW RCA is video output.
13. The WHITE RCA is audio output.
14. The BLACK connector if for the power plug.
15. To turn off the guidelines connect the white wire loop on the camera harness by using the included
connector.
AHDS-7701 Instructions 08-5-2017.docx Page 2 of 2 KB